In my “The Real Cost of Bad Sanding” blog, I talked about some of the common problems that happen when people make mistakes with their sanding process. One of the most challenging things about sanding a wood floor is blending the field with the edges. When the scratch patterns don’t blend well, you can see what we call a “halo” around the floor. If it’s bad enough you can see it on a natural floor, but like with any sanding issue, it’s highlighted by stain, and the darker the stain, the more visible it is.
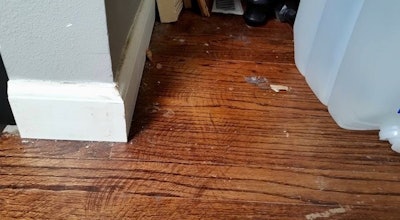
 This floor shows a classic "halo" in which the perimeter of the room ended up too smooth compared with the field, resulting in a lighter stain color.
Because of this, traditionally most pros would next use, for example, a 120-grit screen on the buffer to blend the two. Then we’d scrape the edges where the buffer doesn’t reach, which makes the floor glass-smooth, and we would have to hand-sand where we scraped to rough the floor up again so it would be close to matching the buffer’s texture on the wood. Today, instead of scraping and hand-sanding, many pros use a random orbital sander, which leaves a texture slightly rougher than the one from the edger. If you aren’t careful, it can leave little sanding marks I call “hooks” on the floor (see a picture of them at the top of my blog post I mentioned above).
Many of today’s pros have also switched to using multi-head machines or multi-head buffer attachments after their big machine and edger work. Most of these tools get close to the wall lines and do a good job of getting the floor flat with an even scratch pattern across most of the floor. Be aware that even when using these machines, you must stick to a correct abrasive sequence and be sure to vacuum between each cut. Sometimes with these machines we are now seeing what I call a “reverse halo,” where the field of the floor is actually smoother than the edge and therefore lighter after staining.
No one tool we have is able to sand 100 percent of the floor (although the bigger random orbital sanders that many pros call the “shake-and-bake” gets close). The reality is that every sanding machine we use on a wood floor has a unique scratch pattern. Being able to blend all of those patterns so the wood floor looks flat and takes stain evenly is the mark of a skilled wood flooring pro.
More from Toby Merrill:
Sponsored Blog: Years of Experience Don’t Equate to Years of Knowledge
Sponsored Blog: This Is What Happens When You Rush a Job
Sponsored Blog: The Real Cost of Bad Sanding
Sponsored Blog: How to Use the Color Wheel to Get the Color You Want