Wax Check
I have had some recoats that have failed due to wax or residues left on the floor. Is there a way to find out if there is something on the floor? And how can I remove it?
Rob Johnson, national training manager for Toledo, Ohio-based finish and machine manufacturer Basic Coatings LLC, answers:
To test for paste wax, it is best to test an area that has low traffic but also is part of the main living area (behind a door is a good place to start). First, clean the floor with a neutral hardwood floor cleaner that leaves no residue. Once the floor is completely dry, put one drop of mineral spirits on the floor and let it sit for three minutes. Wipe it with a clean white rag. If the rag shows a yellow or brown stain or feels waxy, there is a paste wax present, and you will probably need to do a full sand and-finish job.
You might also want to check for acrylic floor polish and other waxes.Follow the same cleaning process described above, and then do your spot check in the same area behind the door. Use a mix of 1 teaspoon ammonia, 1 teaspoon water and one drop of dishwashing detergent in a small cup. Place one drop of the mixture on the floor and let it sit for five to 10 minutes. If a white spot appears, then there probably is a floor polish or wax on the floor.
If you think there may have been some sort of oil soap products used on the floor, there are some "aggressive" cleaning products safe for wood floors available from your distributor that can remove this type of residue.
Recoats are an excellent source of income, but they can also be tricky. You need to be sure of the recoating process that you choose. Contact your finish manufacturer to help steer you in the right direction so that lucrative recoat job does not turn into a free sand-and-finish job.
Breaking Points
Some of the tongues are cracking on the floor I'm trying to install. Is that a problem?
Rusty Swindoll, assistant director of technical training for the NWFA, answers:
A broken tongue here and there won't normally be a problem, but if you have too many tongues cracking throughout your floor, you'll end up with a loose, and probably noisy, floor. A common reason for cracked tongues is having the pressure turned up too high on the compressor when you're using a pneumatic nailer. It happens most often with staples, but cleats will do it, too. This isn't only bad for your floor; it also can damage your nailer. There's a certain amount of pressure the nailer manufacturer recommends, and that's what you've got to use. The length of your air hose can affect the pressure, too. Too little pressure can cause the fastener to not set deep enough, which can show up on factory-finished flooring as bumps on the back of the groove side.
Some of the imported woods, like Brazilian walnut, are really hard. When you try to drive the fastener, it splits the tongue. Some installers have told me that they've had luck nailing these species using a ratchet nailer. Or, you can attach wedges to the bottom of your nailer to very slightly adjust the angle of the fastener. You can get wedges from the nailer manufacturer, or some guys make their own. If nothing else works, then you have to drill and hand-nail the entire floor. Of course, you want to know this ahead of time, before you bid the job, so you can figure all that extra labor into your estimate.
Another reason we're seeing tongues cracking is that some flooring imported from overseas, especially Asia, is close to the milling we expect but slightly different. It might be almost 3/4 inches thick, for example, but not quite, and when you try to use our standard nailers and 2-inch fasteners, the tongues break. Some nailer manufacturers have now come up with nailers that use thinner cleats or staples to compensate for that exact problem.
Any time you're having a problem with nailing, your best bet is to call your nailer manufacturer. They can give you advice on how to handle different species and products so your installation is a success.
Minimizing Cracks
If I use riftsawn and quartersawn products, will I still experience the seasonal cracks between the boards?
Diana Gurley, assistant marketing and sales coordinator at McDermott, Ohio-based wood flooring manufacturer Taylor Lumber Inc., answers:
Seasonal movement is a normal characteristic of wood flooring. Because wood is hygroscopic, meaning it readily absorbs moisture, humidity control is one of the best ways to control the performance of a hardwood floor. With plainsawn products, expansion and contraction is horizontal—across the face of the boards. With rift- and quartersawn products, expansion and contraction is vertical. This offers more dimensional stability and could possibly eliminate the notorious gaps between the boards.
Using a rift- and quartersawn product does not eliminate the need for acclimation of your hardwood before installation. The species (and its dimensional stability) and the job-site conditions, including temperature and relative humidity, all still have to be considered when thinking about expansion and contraction of wood flooring, even for rift- and quartersawn flooring.
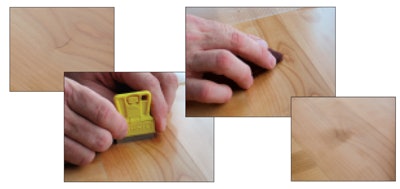
Trick of the Trade: Removing Hair in the Finish
by G. Brent Sorbet

When you notice a hair in the finish between coats, this is an easy way to get rid of it without ruining the finish. Use a razor parallel to the direction of the hair to gently scrape the hair away. Then, to remove the ridge of finish that was around the hair, use a scrap of a maroon pad to lightly abrade the area. As with any finish repair, you should try to keep the area as small as possible (as in the last photo). Once the next coat goes down, the repaired area will be invisible.