Keith Long here with Thunderheart Flooring to go through a staircase and inlay John Kimminau and I installed in Windsor, Colo., while he was out to work and learn.

It's a testament to John's level of motivation in this industry that he was willing to come out and work with me for four days. While out here, he learned new skill sets that are now his forever. Along the same lines, I have worked with people in this and other trades on a volunteer basis, and continue to do so. My reasoning is to gain a better understanding of the finer points of the construction process, so that I can develop into the most well-informed, well-rounded contractor I can be.
John noticed the difference in elevation between Kansas City and Colorado right away as he edged down this homemade inlay we would set the next day:

For those of you that are interested in the finer points of stair work, there is a five-part series I posted earlier this year. To avoid redundancy, let's explore the aspects of this staircase that are different, namely the stringers, the trim to cap off the stringers to the wall, and the inlay.
I believe one of the things that allows good flooring technicians to become great flooring technicians is attention to detail. While initially bidding this floor, I asked the customers if they preferred more tame-looking wood or more varied. Without hesitation, they both said "varied" right away. I mentioned that one way to get lots of variation and wow factor for not too much extra cost would be to do the stringer and riser material on the stairs in walnut instead of oak. After looking at some pictures of previous staircases I had done that way, they opted to go that route. When I went to Sears Trostel Lumber to purchase the materials, I kept pulling out sheets of ¼ inch walnut veneer plywood until I came across this one:

It probably took me 10 more minutes than just grabbing the first sheet off the top, and by my way of thinking, that's 10 minutes well spent. When I selected from the S4S (Surfaced Four Sides) ¾-inch-thick by 7 ¼-inch-wide, 8-foot walnut planks, I took each of the 43 pieces they had in stock and leaned them up against the racking in the warehouse, knowing I was going to purchase only eight of them. Three of them jumped out at me right away, and the other five that were best suited for this project were easy to select from the available stock.
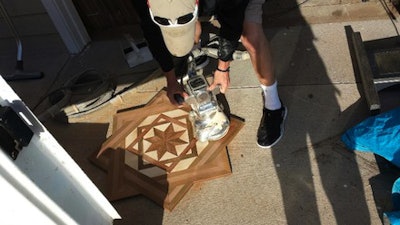
The same concept was true for the fabrication of the inlay. Here's my wife Robin after she glued and clamped the outside portion of the border:

Although it looks like a big undertaking, she spent about an hour mapping out which pieces would complement each other color-wise, then about that long again to rip, glue, and clamp them together. This perimeter was lacewood with a piece of Brazilian walnut on each side. Both of these species can have quite a bit of variation in both grain orientation and color, so she took the time to properly plan the work. Doing so made working the plan easy, and the end product pleasing to the eye.
After preparing the staircase, John and I cut a section of underlayment paper a little wider and longer than the stringer. We used the factory edge of the paper along the top line, then used a utility knife to cut the paper along the rise and run of the plywood where the treads and risers would go. Knowing that the riser material was ¾ inch thick, and the tread material 1 1/16 inches thick, we did what we could to get a snug fit with these stringers. We were most concerned with getting a match with the factory edge of the walnut plywood to the top of the material that was there, so that the cap would match up nicely. If there were slight gaps on the rise and run, they got covered by the thickness of the risers and treads. We took our paper template and traced it onto the plywood, then passed it through the table saw just a little wide to have a straight edge for the next one. Then, we cut out the profile with a jigsaw. The first one took a little refinement, the other three were straightforward once we had the hang of it. John glued them up liberally …

… and fastened them with 23-gauge headless pin nails.
When we got the bottom six steps installed, and got to the 4-by-8-foot landing halfway up the flight, we centered the 3-foot-wide, eight-point Celtic knot inlay. The homeowners chose the exact placement and orientation of the piece. They're the ones that will enjoy it in their home, so they got the final say concerning placement. Once decided, we marked north on the inlay, and traced its perimeter on the floor for reference. While installing the 4-inch red oak, John and I glued and nailed up close to the traced reference line without being on or over it. We didn't run wood all the way through, as it would be cut out and removed, anyway. Enough so that the boards clear the line is sufficient:

As we went along, we rough-sketched the reference line from the subfloor to the red oak, so that we could get our inlay in the same place as before. Once installed, we set the Celtic knot on top of the oak, with north facing north, and put a final trace on the oak for a definite line to cut out.
John used the Festool TS 55 track saw and guide rail, and cut on the lines. I've found it to be most accurate to let the guide rail be out in the field of the floor, so that when the line gets cut off, the thickness of the saw kerf cuts to the inside, which gets taken out. John used an oscillating tool to finish the cuts on the eight points, and removed the excess 4-inch material. We set down a couple pieces of spline in the subfloor before dry fitting the inlay. Our reasoning was that if the piece dropped in perfectly right away, there would be no adhesive underneath it, and could be a bearcat to coax back up out of there. Once pleased with the fit, John removed the spline, put a good clean on the area, and glued and set it:

The inlay was made from ¾ solid flooring, and was a little proud on height. We set some bundles of flooring that were acclimating in the home on top, and weighted it overnight.
One of my favorite parts of hardwood flooring is how much satisfaction it brings to the people who get to be a party to it. John, you did a great job - I'd work with you any time!

The homeowners are ecstatic, and gladly referring my company to their neighbors and relatives. I completed the cap on the stringer at a later date when Robin and I installed 4-inch red oak on the main level of the home. I cut strips from one of the S4S walnut boards, then used a roundover bit on the router to ease that profile into the walnut stringer. Apologies, I didn't take pictures specifically of that process, but it can be seen on this picture taken just before the final coat:

I'm having a great time out in the field producing quality floors that are designed to last. Not everything I do is custom, but I'd say at this point, about half of the installation jobs I contract have custom elements to them. For the next couple of posts, I'd like to back off on the trickiness scale a bit, and get some information out there that contractors can put to use fairly easily, mostly with tools they already have. I believe this technique adds tangible wow factor to an otherwise straight-laid floor, without having to get too carried away with extra time or materials. Here's a teaser from the same job that this staircase went in:

Stay sharp!