Nothing finishes a room off better than complementing your hardwood flooring with a beautiful hardwood staircase. Wood treads and risers are typically installed by a stair specialist, not the company installing the flooring, although some high-end wood flooring contractors also handle stairs. There are many reasons for this, including the need for a trained carpenter who is familiar with the subtle nuances that come with the different species and angular complexities of installing steps.
When you find yourself installing wood treads and risers, remember these dos and don'ts to help ensure a proper install.
Dos
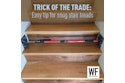
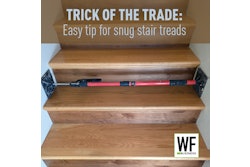
Do ensure that you measure properly. For older homes that may have settled, or newer homes where workmanship is less than perfect, there are specialized tools available that can create an exact template of the tread or riser including length, end angles and depth.

 When installing glue blocks to the stringers for extra tread support, most installers will use scrap lumber and cut it to their liking. A high-quality construction adhesive should be used.
Do apply "glue blocks," where possible, on all of your stringers prior to tread installation. Glue blocks are approximately 4-inch blocks, square or triangular, that can be made at the job site from scrap lumber. Where possible, these blocks should be installed at every wood-to-wood contact point on the underside of the stair. This helps maintain stability of the riser and the integrity of the stringer, which also helps ensure a solid floor without squeaks.
When installing glue blocks, follow this procedure for a professional installation.
• Secure blocking to the stringers at the front, along the edge located directly behind the risers.
• Install the risers with a level top edge slightly above the top edge of both the blocking and the stringers.
• Never nail into a block from either a tread or a riser.
• Adhere the blocking to the risers and the stringers using a construction adhesive.
• Use a dimensional sized 2-by-2 piece of lumber for blocking material.
• The top tread on the stairs that cannot be accessed from underneath cannot be glue-blocked. Use generous amounts of adhesive to account for the lack of glue blocks.
• Support blocking can be added to the side of the stringers to increase surface contact for gluing.
Do work at least one riser ahead before installing treads. Installing two risers is one way to ensure proper strength and performance. The important thing is to remember to install riser, tread, riser, tread or install the risers first.
Do use both adhesives and fasteners when possible. This will prevent movement. The Janka hardness in some exotics may require the use of only adhesives or pre-drilled fasteners. When using just adhesives, kerf the stair bottoms first.
Do seal the sides of the tread and riser in closed stair wells. Paint can cause moisture to infiltrate the wood. Sealing edges is particularly critical on closed stairwells when paint is applied to the wall or skirt board.
Do know and follow the care and maintenance procedures. Treads and risers are created to be consistent with the care and maintenance of the matching flooring manufacturers' products.
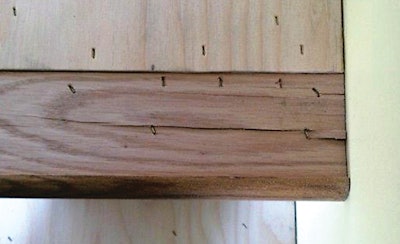
Do nail only where there are stringers, and finish the nail holes with filler. Sink all nail holes. The fibers of the wood will fan out to help fill the nail hole, and the filler should do the rest.
Don'ts
Don't leave steps partially finished. This may be common sense, but I've seen jobs that were left half-done where clients could trip or splinter the wood material. This is hazardous to their health and the future of your business.
Don't fasten treads and or risers with only nails or staples. The adhesive is much more important than the fasteners. There will be times when fastening may be limited, so a good adhesive is critical.
Don't use the stringer as a level for the treads. The tops of the stringers will never be level. Rely on the front edge of the riser for your level surface.
Don't deviate from local building and construction codes. The inspector will tear out your staircase if it doesn't meet ADA and ASTM codes.
Don't assume that any two treads or risers will be the same size. This is particularly important on closed-wall installations, because the adjacent walls will vary in width.
Don't do a job without the proper tools. Money spent on the proper tools will save you tenfold on the job site. Reduce the windshield time and call-backs, and provide a quality installation.
Don't face-nail through the tread and into the riser. Nails should always go into the stringer to reduce the risk of splitting the riser and tread. Stay away from the front edge of the tread, as this is visually unattractive and you run the risk of compromising the installation of the riser.
RELATED: How I Do These Jobs: Creating Floating Stairs