Sometimes the sequel is as interesting as the original! To those of you with wood dust on your clothes who take joy in repairing, renovating or creating something that may well outlive you, I hope you find Part 2 of this article looking at sanding machine motors and maintenance helpful. P.S.: Just say no to rugs! (To read Part 1 of this article, including the basics of how motors work, big machine maintenance, troubleshooting chatter and wave, and more, go to Part 1 of this article.)
Edger Adjustments
Edgers, like big machines, come in various configurations. For instance, in our industry we have edgers with:
- brush motors
- brushless motors
- rubber sanding discs
- metal sanding discs
- bolt-on-only and combination bolt-on and hook and loop discs
- direct gear-driven machines
- belt-driven machines
- varying wheel configurations including size, type of material (nylon, steel, rubber, etc.) and adjustment.
They all have one thing in common: They will make your back ache!
Where edgers cut:
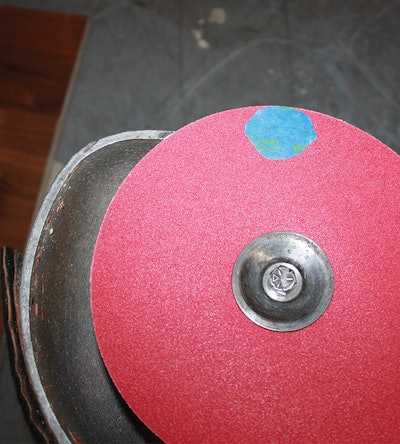 The cutting area on an edger is only about the size of the blue tape you see here—about the size of a quarter.
Rubber edger discs
First, let's go over edgers with rubber discs to drive the sandpaper. If you just purchased a brand-new-in-the-box edger, ask if it has been dressed (see the sidebar "Dressing a rubber pad" on page 54) and set up to clock where you like the sanding pattern to be. Most manufacturers deliver their machines set up and ready to go—their only variable being where, and how aggressively, they set the sanding pattern. Keep in mind that the "spot" where the paper meets the floor is approximately the size of a quarter. Visualizing a clock face on the floor in front of you, that spot can range from 11 o'clock to 2 o'clock as you stand behind the machine. Some folks like the pattern to be at 11 o'clock and some like it at 1 o'clock depending on how they were taught, as well as what is most efficient and comfortable for them. To adjust the "clock'' setting, raise or lower one back wheel a bit (right wheel to move to 11, left wheel to move to 1). Do the adjustment in small increments and check frequently until you hit the sweet spot you are looking for.
Note that for a belt-driven edger, depending the distance of the disc from the center of the machine body (long nose, short nose, attachments), the wheel adjustments may differ. Always refer to the manufacturer of the edger you are using for their exact directions.
DON'T DO THIS:
Using a backup pad or stacking multiple pieces of paper on the disc will change the angle of the machine; this will diminish the vacuum efficiency and may cause unnecessary vibration. A properly adjusted and maintained edger should run smoothly with one piece of paper at a time.
On the sample walnut panel below you can see the cut with the correctly set up edger on the top left, and how the precision of that cut is ruined by adding multiple layers of paper on the machine (as we did below). When you use the machine the way it was engineered, it not only sands better but vacuums better, too.

When properly adjusted, your edger:
1) Should not have excessive vibration.
2) Should be able to be controlled with one hand when needed.
3) Should not need any backup pads.
Edger Maintenance
Here's a regular maintenance program. Note that edger styles vary, and some of these tips apply only to those with rubber pads and a grease box):
- Make sure all your edger wheel bearings are turning freely with no drag and the wheels are clean with no buildup of filler, resin, old finish or sap.
- Check the brushes for wear and keep the commutator clean. You can purchase a commutator stick (photo 1) and do it yourself (photo 2) or take it to a reputable shop for planned maintenance (that's what I'd recommend). Some European manufacturers have a fail-safe built into their brushes. When the brush wears to a certain point, the machine will stop. It will only run when the start switch is held down continuously. This is simply the machine telling you to replace the brushes! (photo 3) Excellent idea!
- Remove the rubber disc (counter clockwise) by blocking the fan from turning (photo 4a) and then using a hammer to unscrew it (photo 4b), then remove the disc guard (photo 5). Remove the bottom of the gear box (photo 6) and check to make sure it is well-lubricated, with no signs of excessive wear. If you don't change the grease enough, it becomes waxy crud that sticks to the casing (photo 7). Clean out the box and refill with the factory recommended lubricant (photo 8). After reinstalling the gearbox cover, clean the aluminum that the disc guard turns on and apply some paraffin wax. Clean the brass bearing on the disc guard, reinstall and make sure it turns smoothly. Do not use oils, grease, silicon lube or such, as these may contaminate the next floor you work on. You can get paraffin wax at most grocery stores.
- Keep the dust bag clean and free of holes. The bag is both a filter and a dust containment device. Do not overfill the bag, as this will greatly reduce its ability to filter the air and keep the vacuum fan at full efficiency. If you use a stand-alone vacuum, make sure it has the capacity to keep up with the edger vacuum system. Always empty bags and vacuums frequently and never leave dust in them overnight or during transport between sites. Keep vigilant regarding spontaneous combustion and fire!

Edger Dos and Don'ts
Some other quick dos and don'ts:
- Do not leave your edger resting on the rubber pad.
- Do lay the edger on its side when changing paper so bits of grain do not get into the bolt shaft. Those bits of abrasive grain will build up to a point where you will not be able to tighten the paper down correctly.
- Do not use your edger as a step or seat (one of my friend Daniel Boone's pet peeves)!
For edgers with metal discs:
- Do ensure the male and female sides are not too worn and that they grip the sandpaper uniformly. Change the hook-and-loop on the disc as needed. Edgers with metal discs obviously do not need to be dressed, but they can be clocked.
For belt-drive edgers:
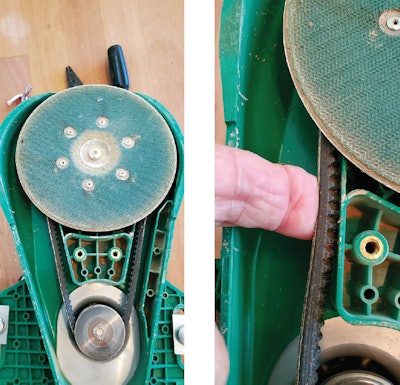
- Do check the belt frequently to ensure it is tight, clean and free of damage, as issues with it will cause vibration. Use only the replacement belts recommended by the manufacturer—non-OEM belts may cause unnecessary vibration and damage.
Dressing a rubber padDressing a rubber pad or drum is done by lightly sanding the rubber until it is smooth and vibration-free. To do so, glue a piece of 80-grit sandpaper large enough to handle the disc or drum to a very flat surface. Put fine sanding dust or blue chalk on the rubber evenly. Start the machine, quickly and lightly engage it with the paper, and then look at the rubber. A disc should have even black rubber cut from three to four rings from the front edge with no skip marks in the dust or chalk. A drum should be smooth and vibration-free, with no skip marks in the dust or chalk. Ensure the wheels are set before dressing a disc or drum! And remember that not all edgers and big machines have pads or drums that can or should be dressed! If you are inexperienced, use a service pro. |
|
Wiring problemsHave you ever gotten a shocking surprise when your machine touched a radiator or other metal object? It is nature's way of letting you know your machine does not have an earth ground. In the U.S., the ground wire is always the green or bare wire in the harness. Check to ensure that all of the wires in the plugs are clean and tight: no burns and no loose wires. Use a meter to check the continuity of the wires in the cords and from the plug on your machine. One major stress point in the system is where the wires connect to the machine. There is a device called a strain relief at the point where the cable enters the machine. Check for continuity from each leg of your plug to the connection in the machine. If your equipment is properly wired and grounded, you will not get a shock when it touches a ground source. (For in-depth information on electricity for wood flooring pros, see the article "Electricity for Wood Floor Pros 101.") |
Buffers: Two Types of Motors
Open and closed motors
Buffers are usually built with capacitor motors, and they are one of two basic types: a closed motor, where a fan on the top blows air over fins along the sides to cool the motor, and an open motor, where air is circulated through the windings to cool the motor. The open motor type requires more maintenance, as ambient dust will build up on the windings and on the contact points that start the motor. Blow the motor out frequently to ensure a cooler running, longer lasting motor.
When open motors simply stop
One common on-the-job issue with open motors is they may simply stop running and not restart for no apparent reason. This can happen even with a new machine if it is being used in a very dusty environment. In the pictures below, I'm showing my son Todd's buffer. He keeps his machines pretty darn clean, but you can see how much dust had accumulated inside his buffer.
Unplug the machine (photo 1), remove the top cover from the chassis (photo 2) and unbolt the motor (four long bolts)(photos 3a, 3b), and remove the top cap of the motor. You will see a set of contact points (photo 4). Blow the windings out (photo 5) and, using an emery board or piece of 220 sandpaper, carefully clean the contact points (photo 6). Reassemble the motor and it should start right up. (When you tighten the bolts, criss-cross back and forth so you aren't tightening them in order as you go around the machine. This way it will gently compress the aluminum back on the bearing without getting cockeyed.)
As with our discussion of big machine motors (see that article here), if the buffer motor gets unusually hot, stops, then runs again after cooling off, check the capacitors before freaking out.

Parting words: Let's keep it clean!
Many wood floor professionals tout dust containment as part of their service. But how can you convince a customer you are going to keep the dust under control when your equipment is covered in it? Take the time to clean off dust, filler, stain or other debris before bringing your machines into someone's home. It is much better for the machines, as they will run cooler, and it shows that you care about dust containment and are meticulous in your work. While we are on the subject, the same goes for your work vehicle. Keep it clean and organized. The habit of washing and organizing your work vehicle will save you time and lead to more referrals in the long run.
RELATED: Motors 101 & What Wood Flooring Pros Should Know, Part 1


