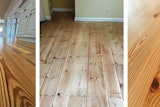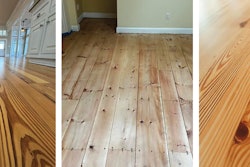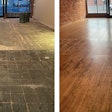
Bigger windows and brighter lighting have created more dramatic homes in recent years. Unfortunately, they've also helped put the work of the wood flooring contractor under the microscope of the homeowner's critical eye. Wood flooring is subject to ever-increasing scrutiny, with complaints about swirls and other sanding problems more frequent than in the past. The good news is that understanding the buffer and its different coated abrasives and pad compositions can help minimize these complaints.
However, if you are like most of us with human nature, we forge ahead without understanding why things work the way they do. Think of last Christmas—did you put one toy together for little Johnny, only to find that you had a few parts leftover? Or, did you have to take it apart to change something? Was that because you did not read the instructions? On the wood flooring job site, contractors often use instructions as a dust pan instead of reading them. Buffers don't necessarily come with instructions, and when you ask contractors why they do what they do, they answer something like, "Because my grandfather, father, uncle—or whoever—said to do it that way." The contractor never understood why, but instead followed the mantra "Just Do It." While that was a good ad campaign, it won't help you be successful on the wood flooring job site.
A near-flawless sanding job with a finely tuned big machine and edger can be ruined with one swirl of the buffer. Or, a detailed buffing of a not so-good sanding job can result in an acceptable job. All floor sanding machines must work in concert with each other to make a sanding job look great. In the sanding process, we keep sanding with less aggressive abrasives to refine the scratch smaller and smaller so that small scratches are not visible with the human eye from a standing position. (Remember, the industry standard is that wood flooring should always be inspected from a standing position.) To do this sanding process correctly, you must understand that how you drive the buffer and which abrasives you use—and there are lots of options today—can make a world of difference to the final result.
Back in the June/July 2003 issue, the article "Taming the Buffer" helped explain some of the common tips and techniques of using the buffer to blend scratch patterns when hard-plating, screening and padding the floor during the sanding process, both prior to and after finish application. In the first article, we discussed following a buffer cut pattern and "clocking" the buffer to lessen the scratch. This bears repeating: Remember, most buffers cut most aggressively at about the 2 o'clock to 3:30 position (assuming the operator is holding onto the buffer at 6 o'clock). Why is this important? You want to keep the scratch going with the grain as much as possible. In the abrasive world, the rotary cut is the most aggressive cut. So, when buffing with the grain, using a slower, methodical, egg-shaped motion in a similar path as the big machine's cut path results in a smoother and flatter floor.
A Few Reminders
So how can your buffer pad do a better job? First, safety! Make sure that your buffer has the proper grounded electrical plug. If the ground terminal has been broken off or is missing, stop and replace the connection with a proper grounded plug.
The cleaner you keep your equipment, the cleaner the floor will be when the finish is applied.
Next, keep everything clean. Always sweep the floor and follow that with a thorough vacuuming. This helps stop "hitchhiking" bits of abrasives, dirt or other contaminants that get caught under the buffer from creating unwanted scratches. Your buffer should be cleaned before it enters the job site. This means cleaning the wheels after rolling over the sand and/or grit from the truck to the floor. You know how the buffer creates a mini cloud of dust when you first set it down? You don't want that on your floor. Clean the buffer before and after use so you do not carry the dust from one job to another. Remember, the cleaner you keep your equipment, the cleaner the floor will be when the finish is applied. (When you're applying finish, be sure you're also dust- and debris-free.)
RELATED: The Basics of Sanding Wood Flooring
Now, pick the correct abrasive for the job. If you aren't sure, the NWFA's"Technical Manual A200: Wood Species Used in Wood Flooring—Revised Edition" offers some good starting points on which abrasive grades you should start with for different species. Some wood species are highly resinous and tend to clog sandpaper. When working with such species, it may be necessary to use a coarser grit of sandpaper than normal, or to change the sandpaper more often than with other species. Also, the wood dust created by sanding some species may cause an allergic reaction in some people. This is more likely to occur with imported species than with domestic, however, even North American oak has been known to cause a skin rash or respiratory difficulties in some people. (Species known to frequently cause allergic reactions are noted in the technical manual.) Asa precaution, wear long sleeves,proper respiratory protection and eye protection when sanding.
A Few Clarifications
With the buffer, contractors are often confused about which are the right abrasives to use. No wonder—there are many types of products and combinations of products available. To clarify when to use what, first we'll discuss buffing unsealed wood with coated abrasives such as hard-plate paper, double-sided discs and sanding screens. Then, we'll finish the discussion with intercoat abrading using non woven abrasives (such as the maroon pad).
Whether you use hard-plate paper, double-sided discs or screens depends on the specific floor being sanded. First,let's clarify what we're talking about:
Hard-plating: This is a process often used to flatten a floor. It was the first process on the scene to blend the edger and big machine. It employs a buffer fitted with a hard plate and sanding discs—but without a driving, or backing, pad. Hard-plating is also sometimes used to sand areas where grain changes direction, or where wood species of different density are adjacent to one another. Hard-plating can help prevent"dishing out" the softer species in these instances.
Double-sided discs: These are nothing more than two single-sided sanding discs glued together and driven by a non-woven pad under the buffer. That isn't true hard-plating, however, it is a more economical option that makes changing abrasive discs easier.
Screening: Screening is somewhat similar to hard-plating, but its purpose is to remove abrasion patterns left by previous sanding cuts. The screening process gained popularity in the 1960s and also created another problem for the floor mechanic called "dishing out the grain" caused from over-screening and removing the softer spring wood of the floor. Over-screening also closes the grain of the wood, which can cause finish adhesion problems.
To make the floor flat, hard-plating is the recommended process.
RELATED: Taming the Buffer: Understanding How a Wood Floor Buffer Works, Part I
Demystifying the Maroon Pad
The maroon pad was introduced to the floor sanding market in the early '90s because of the need to abrade water-based finishes. As these finishes became prevalent, contractors found that some of the abrasive products they had always used between coats didn't work well for waterborne finish.
For example, when screens are used on waterborne finishes, there can be loading or gumming on the screen, which can cause severe scratching. (This can also occur when screening oil-based finishes that are not completely dry.)
The number of abrasive strips under the maroon pad can change the aggressiveness of the cut.
In response to this problem came the combination of coated abrasive strips used together with the maroon pad. Using these abrasives together smooths and cuts raised wood fibers to give a smoother finish. (See the "The Maroon Pad and Strip System" sidebar at the bottom of this article.) It is important to note that the number of abrasive strips under the maroon pad can change the aggressiveness of the cut. If you completely cover the maroon pad with abrasive strips, you would essentially have a soft-backed hard-plate abrasive disc. On the other hand, if you don't place any abrasive strips on the maroon non-woven pad, it would tend to smooth over raised grain or other dirt nibs in the finish (the purpose of the abrasive strip is to cut the raised grain or nib flat).
With this systematic approach, you—the floor mechanic—are in control of how aggressive you make your final abrasion before applying the last coat of finish. As always, it is proper protocol to follow the finish manufacturer's recommendations for between coat abrasion.
How Does it Work?
The maroon pad works because the non-woven pad has synthetic fibers and abrasive particles combined and bonded to form a conformable, three dimensional, open-web material (see"The Maroon Pad" sidebar below). The exceptional performance characteristics of this open-web technology has changed the final finishing procedure for many flooring contractors, resulting in a better-looking finished floor. There are several reasons for this:
• The controlled abrasive action helps prevent undercutting or gouging so there is less chance of leaving wild scratches.
• Fresh abrasive is continually exposed to the work surface to deliver consistent, uniform results and to provide long product life.
• The open web also allows air to circulate for cool operation, so there is less chance of loading.
• Conformable action of the web allows the disc to follow contours and edges of the flooring while maintaining uniform contact with the floor surface.
For longer life, maroon pads should be vacuumed after 200 to 300 square feet. This helps remove the excess build-up of swarf (finish residue) that can prevent full cutting of the pad on the floor.
The Full Spectrum
Now that you have a better understanding of how non-woven pads are made and what to do with them, what about all those other pads that many wood flooring contractors use under the buffer? Pads also come in black,blue, red, white and thin white. In the world of abrasives, the harder you back up the abrasive, the more aggressive the cut will be. So, with the traditional hard plate and felt backing and abrasive bolt on the disc, you have the most aggressive scratch and cut. For the pads, a good rule of thumb is, "The darker the pad, the heavier the scratch."
A thick, harder pad is going to ride hard on the floor, causing a deeper scratch.
By far, the most popular pads are the thick red and white pads. Think of the pad and abrasive as a shock absorber and tire on a car. The softer the pad—the shock absorber, the smoother the ride will be on the abrasive—the tire. A thick, harder pad is going to ride hard on the floor, causing a deeper scratch. The red pad with a screen is going to scratch harder and more aggressively than the white pad. Some floor contractors screen using a red pad with a 100-grit screen on white oak and switch to a white pad and a100-grit screen on red oak. They produce a similar scratch on two different species just by changing the pad.
Thinner pads have reemerged. (Yes, we did have thin pads years ago.) Changes in the non-woven technology have brought us the screen driver pad. This thin, white, non-abrasive pad holds the screen or double-sided disc more tightly and stops the screen from wobbling out or going off center. (Weebles wobble, but screens should not.) However, this thinner drive pad also changes the way the screen or double sided sandpaper cuts. The thin white pad has more density and results in a more aggressive scratch than the thicker white pad, because more buffer energy is lost with a softer back-up. You can soften the scratch of a thin white pad by backing it up with a thick red pad or another thinner maroon pad, also. You may have to use a screen between some pad combinations to prevent the drive pads from slipping.
New Technologies
A buffer to a floor man is much like a hammer to a carpenter. You have your good old buffer that you can work magic with, however, you may also want to look at some newer machines that can bring you great results in finishing wood floors and allow you to leave the buffer back at the shop.
The 12-by-18-inch orbital sanding machines (OBS) offered by several manufacturers are great machines and should not be overlooked as a possible addition to the floor sanding arsenal in your van. These machines have a different abrasive action that doesn't cause the standard large swirl marks of rotary buffers. In addition, the OBS sanders have built-in vacuum systems,saving on labor. They are also easier to operate. The maroon pad and abrasive strips can also be used with these OBS machines. Note the abrasive strip layout (see the "OBS Action" side barabove) that gives the optimum cut so that you will not leave a sanding pattern on the coating, no matter which direction you sand.
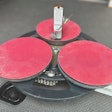
If you are a contractor doing more patterned floors, medallions or specialty floors, a three-disc sander also is something to investigate. The combination of the three sanding heads' counter-revolution flattens a floor better and faster than many buffers. Another little-known advantage of a three-disc sander is that it allows you to sand, screen or even use non-woven pads and sandpaper.
Words to Live By
As you can see, there are numerous abrasives, non-woven pads and machine combinations available today to make your job easier and more productive, adding to your bottom line. Experiment when you can—on your own sample panels in your shop—to find the combinations that work best for you, your machines, your species and your finish. Always strive to lessen the scratch. When sanding,remember: "If you don't put the deep scratch in, you don't have to take it out." Happy sanding!
Read the original "Taming the Buffer" article.
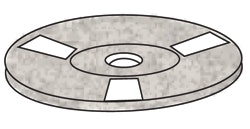
The Maroon Pad and Strip System
Contractors often had problems abrading waterborne finishes between coats until the advent of the maroon pad and coated abrasive strip system. The maroon pad prevents loading of the finish, while the abrasive strips cut raised wood fibers, providing a smoother floor without leaving deep scratches in the finish. Changing the number of abrasive strips changes the aggressiveness of the cut. Suggested placement of the strips on the pad for a typical floor is shown above.
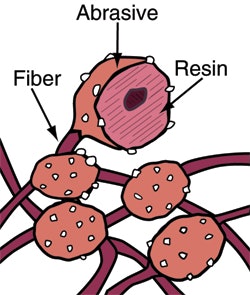
The Maroon Pad
With the design of the maroon pad, fresh abrasive is continually exposed to the wood floor, which helps deliver consistency and prolong the abrasive’s life. The open-web design also allows air circulation, which helps minimize loading.
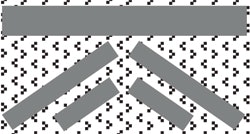
OBS Action
The scratch pattern left by the newer 12-by-18-inch orbital sanding machines is different from that of a typical rotary buffer, with no large swirl marks. They are also easier to operate, so they can be a good option for abrading between coats. Because the motion and shape of the sander is different, the layout of the coated abrasive strips on the maroon pad is also different (see the recommend layout in the illustration).


