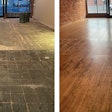
In part 2 of “Sanding 101,” we have two more sanding experts sharing their wisdom with our readers: Russ Watts of Lägler explains what you need to know about using a multi-head sander, and then Norton’s Mark Opperman goes over the most common mistakes he sees when wood floor pros use abrasives. Just turn the page to find their insights and helpful tips, too. Did you miss Part 1 in the February/March 2022 issue? You can find it here.
What to know about multi-head sanding
By Russ Watts
 Russ Watts handles sales and service for Denver-based Lägler North America.
In recent years it isn’t uncommon to get a question like this from a wood floor pro: “I’m having trouble getting out the scratches from my multi-head sander when I’m doing a stain job. What am I doing wrong?”
Visible, cross-grain scratches left behind on the floor can certainly be a bit of a risk that is taken when using a multi-head sander. The reason is fairly simple: A multi-head employs a spinning motion of varying sorts (depending on the machine), and, with that, comes those cross-grain scratches. If left at certain intensities, they will likely show up in your finished product. This occurs primarily because the wood’s end grain becomes exposed in a cross-grain cut and experiences a higher saturation with finish and/or stain. Visible cross-grain scratches are not desirable when sanding wood floors, but they are definitely avoidable. Let’s back up and talk multi-head sanders, and then explain how we can use them successfully.
Why do we use multi-head sanding machines?
Let’s begin by realizing that wood varies significantly from species-to-species and job-to-job in terms of how it responds to sanding. Every wood surface that is sanded is a mixture of grain structures with differing hardness properties that have a profound effect on how that surface is best sanded. In wood flooring, differing grain structures, knots, open grain (springwood), multi-species layouts and multi-directional layouts (parquet, etc.) are frequently encountered, making sanding surfaces of varying material hardness—or resistances to sanding—a common reality.
In cases when the entire sanding process is done with a big machine, these surfaces often fail to hold their optimal form, as the rolling motion of these machines, particularly in the finish-sanding grits (80-grit and higher) have a tendency to polish the harder grain while cutting away the softer grain. This is commonly called “dishout,” and in extreme cases, this can become a wavy or rippled floor surface—a phenomenon that continues to frustrate some in the industry today.
As trends in building over the last 25 years or so have added more lighting into dwellings with site-finished wood floors, the need became greater to sand in a way that would minimize dishout. Since employing the use of a dramatically different sanding dynamic for finish-sanding versus cutting/shaping sanding has long been a staple in contemporary woodworking, it didn’t take long for the same idea to enter the wood flooring industry, and hence the rise of the multi-head. By offering a varied, planetary sanding motion, the refinement of sanding scratches (called “finish-sanding”) in the wood surface is accomplished with a noticeably minimized distressing effect. In other words, we achieved visibly flatter floors by substituting the belt or drum sander with the multi-head in the finish-sanding stages—a transformation of sorts for the industry.
However, as the saying goes, “No good deed goes unpunished.” Here we are spinning sandpaper discs and applying them to wood, creating the inevitable cross-grain scratch. What kind of an imbecile would do such a thing? Aren’t we in effect trading floor flatness problems for cross-grain scratch problems?
Well, it turns out that many who create the industry’s flattest floors employ multi-head sander on a regular basis without leaving behind the dreaded cross-grain scratches. The reason is they understand that virtually all wood surfaces—even those being stained—are tolerant of cross-grain scratches. The only difference is how high a grit of abrasive the refinement must go up to in order for them to not appear in the finished product.
Vital tips for using a multi-head sander successfully
Use good abrasives. You know what is good and not-so-good. Use the best you can buy and do not try to get too much mileage out of them, running yourself into the realm of counter-productivity. One contractor I know put it best when he equated the quality of abrasives run on any machine to the quality of tires run on any car. You can excel or struggle all on that choice alone. (For more on abrasive quality, read Todd Schutte’s “Wood Floor Abrasives Basics” in the February/March 2022 issue.)
When first using your multi-head on any job, do not begin with too low of a grit. Lower grits not only dig deeper scratches, the abrasive minerals tend to be wider and can be quite damaging to wood grain, especially when swept across grain. These kinds of scratches can be disproportionately difficult to refine out in sanding and tend to show up in the finished product. There is a reason why there is a saying in sanding: “Do not put in scratches that you cannot take out.” In finish-sanding with a multi-head, make this gospel: “The grit you begin with is (at least) just as important as the grit you end with.” Starting the multi-head with the same grit you last used on your belt sander is a very good rule to abide by unless it is in your plans to end your belt sanding at 40 grit or lower. Know the species of wood you are working with and consider what finishes and color are going to be used on the floor when making this choice—it could be a critical choice on how any particular job comes out.
Vacuum between grits. Leftover stray grits shed from your abrasives while sanding will be your enemy when they get in the mix with your next, higher grit. Don’t be tempted to slack on vacuuming!
Do not skip ANY grits when using a multi-head. Remember, you are refining your scratches, and grit-skipping will not refine scratches. Just as we say for sanding in general: A little patience pays off.
Edge first! If you are doing things correctly, you will find this “edge first” practice in finish sanding with a multi-head to be the opposite of how edging is done in the earlier cut-sanding stage. Think of it this way: As you advance your grits in finish-sanding, you are using two machines: your edger and your multi-head. If it is, for instance, 100-grit that the floor is ready for from wall to field, do the 100-grit edging first followed by the multi-head with 100 grit. This narrows that edger-to-multi-head transition zone, bringing better uniformity, and actually is a part of reducing the amount of edging done on any job where a multi-head is used.
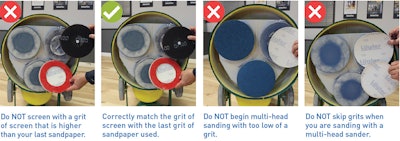
Proper buffing, part 1: Use a multi-head buffer when buffing multi-head sandpaper scratches. Any time there is a problem with cross-grain scratches showing up in a finished floor, an examination into the buffing process must not be overlooked. The purpose of mesh/screen mediums on the wood floor surface is to burnish out the sandpaper scratches. Multi-head sanding is best followed up with multi-head screening or meshing. Its scratch pattern is generally far more useful on wood surfaces than the lone buffer wheel that is heeled to one side in three ways: By way of its multi-directional action, it is more effective at burnishing out cross-grain scratches. Because it is not heeled over to one side, there is better, more uniform coverage, and the chances of missing or under-working spots to be seen later are greatly reduced. The heeled-to-one-side, lone buffer wheel leaves a more unidirectional scratch pattern, and for best results it’s “clocked” such that these wheel marks end up concealed in the wood’s grain. Unfortunately, not all regions of the floor will afford the necessary space to properly “clock” that buffer. There is virtually no “clocking” when screening with the multi-head—its scratch-pattern is highly varied and blends into the grain much more readily. If you haven’t tried screening/meshing with your multi-head yet, you just might be in for a very nice surprise.
Proper buffing, part 2: Don’t go up a grit with your screen/mesh. When you have completed your last sandpaper grit with your multi-head, and you are now set to use your multi-head in the screening process, it is a common mistake to select the screen/mesh grit to be even one grit higher than what you finished off with in sandpaper. This is one of the fundamental differences from using a multi-head as opposed to traditional sanding and buffing. One of the worst things one can do is to make some kind of grit-skip here and create a glazed surface with the mesh without removing the scratches of the sandpaper. When a stain is applied in these situations, there often will be the horrible effect of highlighting these scratches with stain. Always screen/mesh with the same grit you finished off with in sandpaper. If an alternative to this idea is being considered, a screen or mesh one grit below what was last used in sandpaper is far more likely to be a better choice than one grit above. Such things are great to think about while you are vacuuming!
Consider water-popping. The practice of applying some moisture to your wood surface before applying a stain can become a science all unto itself. Most agree that when done reasonably and consistently, the wood is returned to a bit more of its natural state to take in the stain, and the scratches from the sanding and/or screening process tend to get broken up and released.
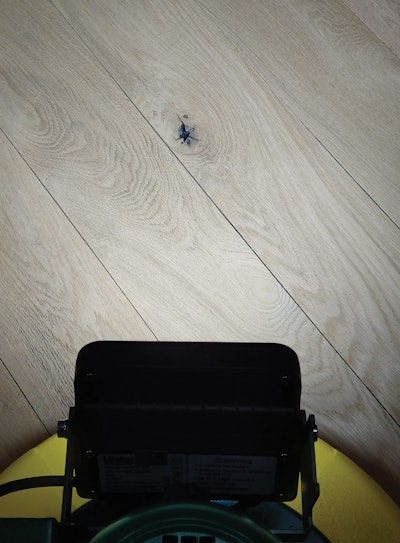
TIP: YOU HAVE TO SEE THE SCRATCH
Most cross-grain scratches that can get left behind are easy to contend with so long as they can be seen during sanding/screening processes. Make certain you have the best lighting on your job site that you possibly can to give you that advantage. You will have more confidence overall in not only using your multi-head, but also to run your belt sander at steeper angles when faced with a floor that is going to be tough to get and keep flat. Check with your machine’s manufacturer for any lighting upgrades available.
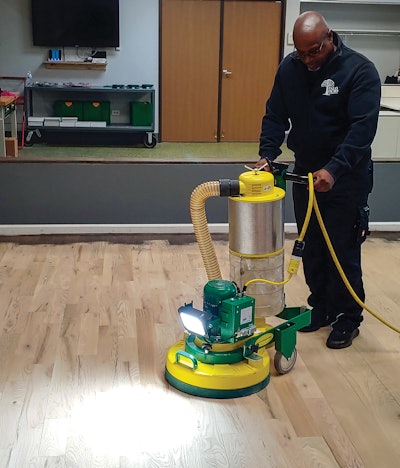
DON’T BE AFRAID TO REACH OUT
Remember, there is no shortage of those who are enjoying huge success with their
multi-head sanders over all kinds of woods and stains. These people know all the nuances of the wood they sand and the whole “what works on this will not work on that” lexicon that has long since become second nature. These multi-head machines hold vast potential for you to produce the industry’s finest floors on a consistent basis, and the key to success here is aimed at doing all of the things right instead of just some of the things right. We encourage you to explore the many trainings available in the industry and enroll in one or two of them when you can. Call your manufacturers from time to time, get on their email list and stay afloat on what is new and helpful.
Paper vs. screen scratch
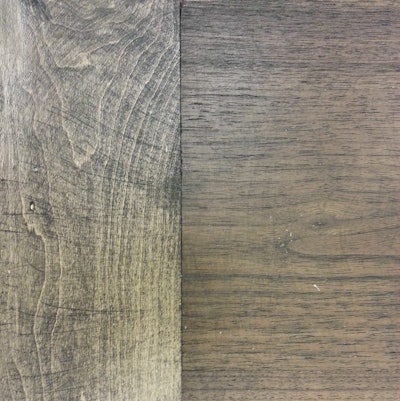
These shots at 60x magnification show what wood looks like after abrasion with a 100-grit paper vs. a 100-grit screen. You can see a notable difference in the “scratchiness” of a wood surface from sandpaper to a screen, even though they are the same grits, and therefore the importance of good screening.
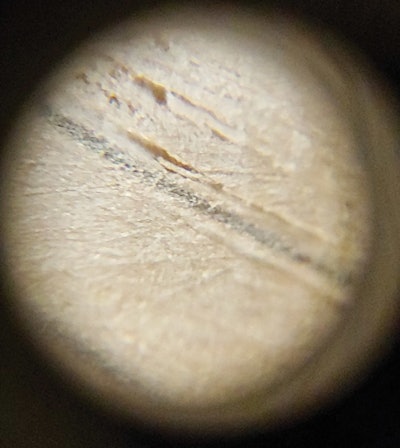 100-grit paper
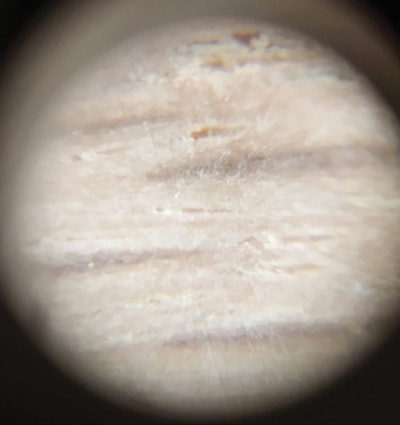 100-grit screen
Avoid these top sanding mistakes
By Mark Opperman
 Mark Opperman is Northeast territory manager at Norton Abrasives.
As a contractor for many years and now a rep for an abrasives company, I have spent a lot of time on job sites
seeing good sanding and bad sanding, and now I help contractors learn how to be better and more efficient when sanding. Here are some top mistakes I see when I’m on job sites.
1) Skipping too many grits
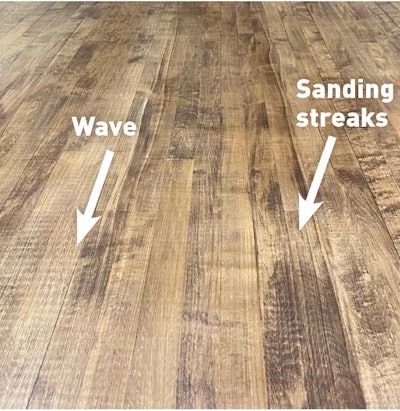 In addition to wave, you can also see sanding streaks in this gym floor. I’d guess they went from something like 36 right to 60 or 80, then tried to screen the marks out with a 100- or 120-grit screen, which just skimmed across the top of the peaks, then stained, which highlights all the sanding marks.
Sometimes it feels like beating a dead horse, because we talk about it so much, but I still see so many people skipping too many grits: They’ll start with 36 on the big machine and go right to 80, just cutting off the tops of the peaks of the scratches and not getting all of that 36 scratch out. (Some people even do this on stained floors!) I know they are trying to save time and be more efficient, but they’re really just giving their customer a lesser product.
On a natural floor, at first this might look acceptable, especially if they use multiple coats of a thicker finish like an oil-modified polyurethane. Initially the finish might look smooth and flat on top of those peaks, but as that finish settles into the scratches, you’ll see the rough texture of the floor with those deeper valleys, and the floor will have more of a torn look. If you’re working with a floor like white oak or red oak that has a lot of soft grain, the floor will tend to have a dishout look, where the rough grit dug out that soft grain and wasn’t flattened out. Then your big machine wheels can ride down into that dishout and introduce a little bit of wave into the floor, too. You’ll also see the sanding tracks parallel to the wood grain.
Those floors generally don’t last as long as if you had gone through the correct grit sequence, because the finish has settled in the valleys (the deep scratches you didn’t get out because you skipped more than one grit in your sequence) and will wear off on the peaks over time.
2) Over-using abrasives
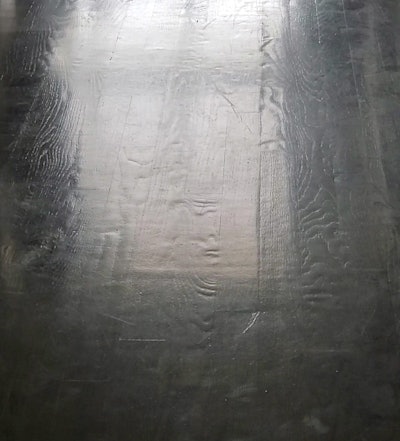 There’s a lot going on in this one photo, but the main thing I want to point out is the dishout. I’m going to guess that they used a cheap abrasive on their big machine and skipped too many grits, and then as the wheels started dipping into the dishout, it created some of that erratic wave. Then I’m going to guess they buffed with a cheap screen and used the same screen for the whole floor. They obviously didn’t do a flattening cut with a planetary sander or a hardplate.
They might simply not be paying attention, or they might be too cheap to change them, but many people over-use their abrasives past the point when they need to be changed out. Once you’ve used up your abrasive and it’s not cutting anymore, you’re literally polishing the hard grain and dishing out the soft grain.
How do you know when your abrasive is done? Take a look at the floor where you started sanding after a paper change and where you sanded after the paper was wearing out: Where you started with fresh paper, the floor will look nice and dull, and with worn paper, you’ll see the wood starting to look like it’s polished a little bit. With a belt or drum sander, you’ll feel like you have to walk more slowly to do what the abrasive was doing before when you had fresh paper. If you push the worn-out abrasive too far, the paper will literally start to burn the floor.
3) Walking too slowly with planetary sanders
Heat kills an abrasive faster than anything else, causing the minerals to break down faster than they normally would, so you should always think about heat when using an abrasive.
With a big machine, you only have a half-inch section of abrasive 8 inches wide—only 4 square inches—actually contacting the floor at any moment, and the rest of the time that abrasive can cool off. With a planetary sander—any multi-disc sander (such as a Trio, Power Drive, 3DS, Spider, etc.)—that abrasive is in contact with the floor 100 percent of the time. The only way to cool it off is to move it on top of wood that hasn’t been sanded yet.
With planetary sanders, you walk much more slowly than with other sanders, but I find that, in an attempt to get out their previous scratch in one pass, people tend to walk so slowly they are heating up the floor and the abrasive too much. Then they can’t figure out why they are polishing the floor and not getting their previous scratch out, and they complain that they aren’t getting the square footage they expect out of their discs. When they do this, I always suggest that they go at their normal pace, then turn off their machine to bend down and feel the floor. If it’s so hot that you can’t hold your hand on it for more than a second, you’re heating your abrasives too much. Instead of trying to take out the scratch in one pass, you can try walking at a quicker pace and doing two passes with the same grit. It won’t take any more time than doing one slower pass, but it won’t damage your abrasives.
That said, some people walk too fast with their planetary sander and wonder why they aren’t getting the scratch out. If you use a planetary sander, you can’t walk as fast as you do with a belt or drum machine; you need to give the abrasive time to work. Find the pace that works for the wood you’re sanding and the machine you’re using, and know that, as I just discussed, you might need to make two quicker passes with the same grit.
4) Not blending scratches
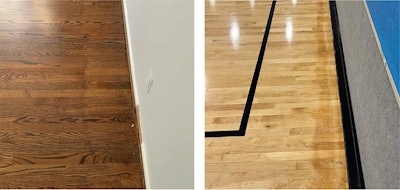 Halo two ways: left, on a residential job, and right, on a gym job. No matter where it happens, it’s the result of not blending the scratch patterns from the field and the edges.
There are so many ways to blend your edges in with your field, depending on what equipment you are using, but this is something that many people still find challenging, and we’ve all seen floors where the edges look different from the field. When that happens on a stained floor, that’s called “picture-framing” or “halo”—the color of the stain will look different around the perimeter compared with the field.
The first step to making sure you can blend the field with the perimeter is having good edger technique. You need a consistent system, feeling the floor with your hand as you’re running the edger to make sure you’re actually getting it flat. Many people will try to go too fast with the edger, and they might be doing their J-hook technique but not necessarily getting the edges flat where they meet the field—if you run your hand over it, you can feel a step up between the edges and the field. If you’re using a buffer as your next step, it probably won’t take that height difference out. Planetary sanders are pretty good at getting a floor flat, and because of that sometimes people use them as a crutch to help disguise bad edger technique. But if you were doing a good job with your edger in the first place, you’d save time and abrasives.
If you are using a buffer instead of a planetary sander for your final sanding before you coat, I always recommend using the same grit screen as your last sanding. For example, I would sand a floor with 100-grit on my belt sander and edger, do whatever hand-sanding or palm-sanding I needed, then screen with 100-grit to make sure all those paper marks were gone before going to a higher grit (if needed). I’d screen around the perimeter once, or twice at a quicker pace before going backto do all my rows.
5) Not paying for good abrasives
As a contractor for many years, I’ve tried almost every product and idea to save time and money, including trying cheaper brands of abrasives. I always came to the same conclusion: I was better off spending the money on the better products. Good abrasives are uniform in shape and size, and they fracture uniformly, so they leave a very consistent scratch; you can be confident about getting your last scratch out as you go through your grit sequence. They won’t leave what some people call a “phantom scratch”—those inconsistent scratches that you can’t figure out exactly where they came from. It’s more work and stress to get those scratches out of the floor, so I always found that paying for a better abrasive was worth it for efficiency and peace of mind.
TIP: GO TO CLASSES AND DEMOS
When people aren’t doing floors the “right” way, they aren’t necessarily trying to cheat the customer, but maybe they just don’t know what a first-class floor looks like. Maybe they’ve never been to a class or worked for someone who did it any differently. But just because you’ve been doing something for many years doesn’t mean you’ve been doing it the best way all those years. That’s where rubbing shoulders with other contractors by attending a training class or even just demo days at local distributors gives you a different perspective. You have the opportunity to run different machines with different abrasives and learn a lot from other contractors who are attending the same event. You might not want to take time out of your busy schedule to go to training, but most likely you’ll learn something at the class that, in the long run, will save you time, money and stress. We all still have something to learn, and learning better ways to do things can make sanding more enjoyable, too.
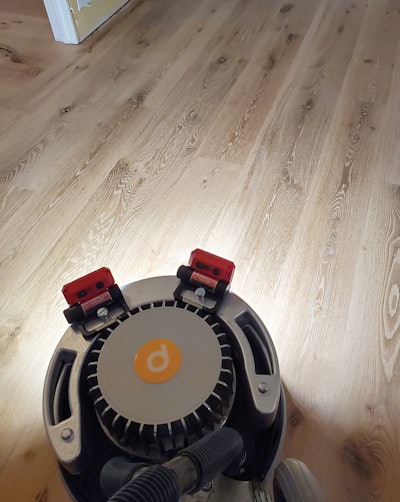
TIP: ADD BRIGHT LIGHTS & FEEL THE FLOOR
The last thing we want our customers doing is shining a bright light on the floor, but as a contractor, you want as much light as possible on your floor as you’re sanding. A lot of people don’t want to get down on their hands and knees to look at the floor, but it’s one of the best things you can do to learn about your sanding technique and your abrasives. If you have any questions about what your abrasives are doing to the floor, use a flashlight, a Festool bar light or any light that’s bright to shine across the wood. It will easily highlight your sanding mistakes, and as you’re sanding, you can compare your current sanding step with what you haven’t sanded yet. I also suggest using different abrasives to sand equal sections of floor on a test panel, then using a light to compare the areas.
Some sanders have lights, but they aren’t always as bright as you’d like. I added lights to my machines because I like to have an LED close to the floor, shining at a low angle—then you can see your scratches plain as day. I used Milwaukee magnetic rechargeable lights on my Spider (at left), with one angled down in front shining on what I just sanded, and one shining onto what I haven’t sanded. I also use them on the weights on my Power Drive. Some people just sand and think about what they’re going to eat for dinner, but you need to pay attention to your floor, looking at the floor as you go.
Some guys complain that when they get to higher grits, they can’t see scratches, but you can with a light. And if you can’t see bad scratches from a standing position as you’re sanding, you need to learn how to see them (if you really can’t, get your eyes checked).
TIP: ALWAYS START WITH THE HIGHEST GRIT POSSIBLE
Don’t waste time and money putting in a deep scratch you’ll have to remove if you could have started with a higher grit. Knowing which grit you need to start with comes with experience with different woods, existing coatings and the machines you use, as well as trial and error. Some people seem to start with 36 on every job, even with new wood, because they are stuck in a set process for every floor, but that wastes time and money, and it ignores the fact that every floor is different.
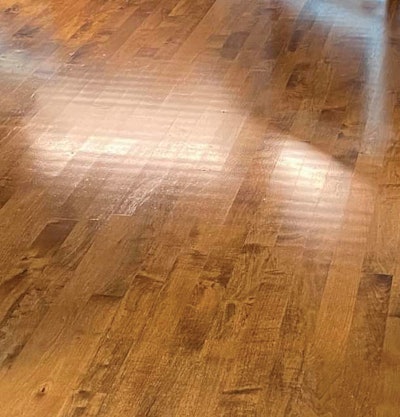
TIP: TRY THIS FOR SPOTTING CHATTER
This photo shows classic chatter, which happens consistently across the floor. The cause could be so many things (see “Motors 101 & What Wood Flooring Pros Should Know, Part 1” in the December 2019/January 2020 issue for more on the causes), but if it happens, it’s your job to fix it. Many people say they can’t spot chatter (or wave) until they put stain or finish on the floor, but you can. Turn off any lights in the house (lights shining down directly on top of the floor disguise sanding marks) and use your flashlight or bar light to shine at a low angle across the floor. (You’ll see drywallers doing the same thing to spot problems on their walls.) If you do that, sanding tracks, chatter, wave and dishout will pop right out at you. If you spot a sanding problem, you should be able to fix it using your planetary sander or a hardplate on a buffer. But always remember: If you don’t see it, you can’t fix it.
RELATED: Wood Floor Sanding 101, Part 1
TAKE A QUICK QUIZ BASED ON THIS ARTICLE:


