Multidirectional Finishing
I’m about to finish a job with large-scale parquet and multiple borders and inlays. How do I approach finishing the floor?
Johannes Boonstra, sales and technical support supervisor at Pontiac, Mich.-based Synteko Floor Finishes, answers:
Floors with wood pieces oriented in multiple directions often make it challenging for a “streak-free” application of the final coat. More and more floor finish manufacturers suggest utilizing a roller application for floors with multidirectional installations. Roller application allows applications across the grain pattern of wood floors without leaving the typical and pronounced streaking of the matting agent in the finish coat often associated with a linear application like a T-bar, brush or lambswool applicator. Check with the finish manufacturer of your choice for advice on potential roller application on multidirectional floors.
On such floors, it is of utmost importance that the final finishing coat has all the time possible to flow and level. So, apply the finish in a rather fast but controlled fashion; do not overwork it. During the application, avoid any direct airflow across the floor and cover windows to prevent direct, hot sunlight from warming up the floor too much.
It is important that the floor, air and finish are at the most ideal application temperature to promote the best potential flow and leveling. Check with the manufacturer of the finish you plan to use but, generally speaking, a range of 65-80 degrees Fahrenheit is ideal. Cooler temperatures will result in reduced flow and leveling, since all finishes tend to thicken up when they are cold. Warmer temperatures will result in rapid evaporation of the solvents in the finish and are likely to cause poor flow and leveling.
Racking Right
I mainly install prefinished floors. Most boxes only have two or three lengths in them at the most. I try to follow NWFA guidelines for staggering the joints, but with no luck—I still have H joints and stair steps. What else can I do?
Avi Hadad, owner at Avi’s Hardwood Flooring in El Sobrante, Calif., answers:
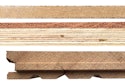
You can cut different lengths from those boards and match the end joint as desired. First, use a good 60-tooth blade on your sliding miter saw to score the top layer with the carbide teeth only. Then, finish the cut. This will give you a splinter-free cut. Next, use a router with a correct-size bit to groove the end joint and, finally, match the profile. Use a file to bevel the edge; a scraper, sandpaper or a block plane to roll the edge; and stains or Sharpie-type markers to color it. Now you have custom lengths and no excuse to ignore guidelines (plus, your floor looks so much better than the competition’s floor).
What’s the Norm?
My customer is complaining about some butt joints in the solid prefinished floor I installed—they aren’t exactly square, but they look fine to me. What is the industry standard I can show my customer?
Frank Kroupa, technical services advisor at the National Wood Flooring Association, answers:
In the case of prefinished wood flooring, there are few established guidelines you can refer to when dealing with the customer. This is an issue not just with end joints, but many other factors. What do we say to the customer who says they can fit 100 dimes in gaps throughout their floor? Cupping, overwood and underwood, and dimpling on the face of prefinished flooring due to the fasteners are also issues, as are very minor dents or slight crushing along the board sides from being hit by a mallet. You may find them perfectly acceptable, but the customer may not.
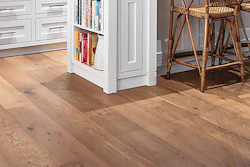
Regarding butt joints, the generally accepted industry practice is that they must be fillable and barely visible from a standing position. Remember that butt joints can have different causes: the flooring not being straight, the floor not being tight or the flooring having unsquare ends.
While it won’t help you in this case, the best approach is to create your own “standards” for your customer when you’re selling the floor. Don’t set yourself up for problems by having every sample floor look perfect. Show the customer realistic examples of what that product will look like when it’s installed in a home, and point out what you will consider to be acceptable and unacceptable as you install the floor. The more you educate the customer ahead of time, the less likely you’ll end up in a dispute later, when you’re trying to get paid. Customer expectations are paramount when standards or guidelines are vague or non-existent.