Often we run into jobs that have additions and home improvements that may have not been thought out nor factored in for future additions. Some "professionals" have no clue what should be done, or, more important, what should not be done.
In this case, a high-quality home remodeling contractor, Russ from Artisan Builders in Nashville, Tenn., reached out to us with a question and concern about a subfloor issue. The home had been added onto a few times, and the previous contractor was, in nice words, a hack.
Just a few some things they encountered:
1) They needed to brace up the old subfloor addition with new “I beams” because the old remodeling contractor, rather than use I beams or 2x12 joists, used untreated 4x4’s with a support only at the ends of a long run. As we would expect, over time they sagged.
2) They did not support the load-bearing wall, and, yes, that also sagged over 1 3/4 inch.
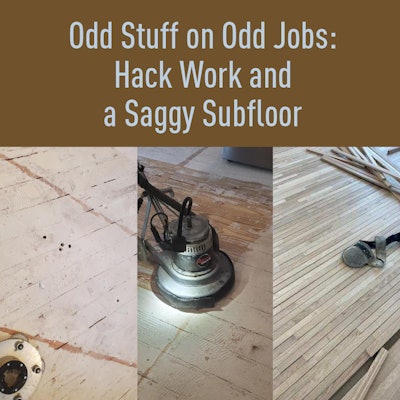
3) They installed what we refer to as lap boards—square-edged 3/4-inch planks … that is okay, but they put a thick mix of thinset and self-leveling compound to fill the voids and flatten the subfloor. Then they installed tile over that subfloor system. This is what it looked like once the tile was removed:

I have had some firm conversations with inspectors over the years, both as a flooring contractor and now as the tech support with Middle Tennessee Lumber. It seems like the older inspectors have a handle on what is good and what is not, but the newer or up-and-coming inspectors never had to put in the time to do the work. On this job, both Russ and I were left wondering: Was this ever even looked at? I just cannot see how an inspector could allow a 4x4 as a load support for a flooring system.
The fix was simple but took a bit of work. Artisan jacked up the whole floor and put in a new joist to hold it up. They also had to brace up the load-bearing wall. All that work was done from the crawl space:

Next was getting rid of the thinset and self-leveling compound, but they needed to leave the subfloor boards. The boards ran into the kitchen area, hallway and dining area. This time the builder was putting going with 1½-inch strip instead of tile.
This was a job for the wonderful work of a buffer and carbide disc. For this task we took the American Sanders Epoch 115-volt unit with two weights at low speed. We have the Ceno Dragon unit, but it was a bit on the heavy side for this task. The goal was to remove the thinset and leveling compound while sanding the lap boards flat for the install of new flooring. It worked like a dream and fast. The carbide disc (from Kyle Neuroh) and the new 5-inch five-head multi-disc from American Sanders together cut it and flattened the subfloor in short work. Here’s a quick video:
The install went great—the wood flooring is flat:

The installer saw the value of doing that prep not only in this area, but also in the new additions, where there was paint overspray and drywall mud. We used the carbide disc on the new OSB subfloor—it cleaned the subfloor, flattened the seams and found every nail not set.
It was my recommendation to the builder and installer to always run the buffer on the subfloor before every install. Yes, the builder asked, “How much more will that cost?” and the flooring contractor asked, “How much should I charge?”
A few thoughts came to mind about subfloor prep, so here was my response to both:
1) Wide plank (over 5-inch) with concerns of moisture should have the subfloor cleaned and treated with a class 2 (low permeability) roll-on moisture retarder. In my opinion, the risk of a class 1 (very low permeability) retarder is that it will stop the moisture but, in the long-term, cause damage and rot to the home. Find out what the class rating is for the products you use, because a subfloor needs to be permeable. Price is always driven by the area, but $1.00 a foot for prep and a roll-on moisture retarder is not unfair to the builder.
2) Getting the subfloor clean and flat shows the homeowner or builder who is a professional. In my job doing job-site reviews, I see many installers sweep, then hit the high spots of drywall mud, paint and plain old dirt/mud from the subfloor. Once the subfloor is covered, the mess can’t be seen, but it can cause problems with the install. Not setting nails/screws in the subfloor and not getting the mess off the subfloor can prevent a flat install, and not getting the seams flat will cause big trouble for the install.
3) The better the subfloor prep, the better the install and the better the sand-and-finish. They all work together and, more importantly, the quality and finished flooring looks outstanding.
The size of the job matters, but most of the time a half day of prep goes a long way to reduce stress and extra work on the back side of the job. When the builder sees the subfloor clean as the day it was installed, they know the rest of the job will be done right. Doing the extra and showing the pride we take in our craft builds confidence with the builder or homeowner.