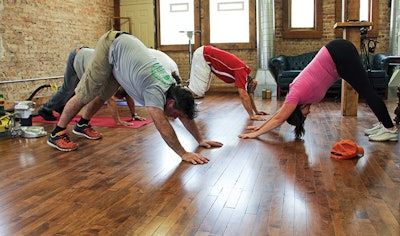
"If I don't stretch, I can't work," says my brother Mike McDermott—owner/operator of McDermott Hardwood Flooring in Evergreen Park, Ill., just outside of Chicago. While I am a certified yoga teacher, I have also worked with my brother in his business. Over the years of seeing him and other wood floor guys on the job, watching what they put their bodies through (and yes, even I have personally experienced the "wrath" of what a day on the edger can do to the hamstrings), I began to think about how yoga and stretching could help them and be integrated into a workday. What exercises would be most accessible and effective in alleviating pain and stress from this tough, physical job? Today, Mike does many of these stretches on a regular basis.
In the following pages, Mike and some of his fellow wood flooring guys—O'Cephus Starks Jr., Kevin Flamm and Luis Zapata—demonstrate many of the exercises, poses and stretches that counteract the demands of their work. There are many exercises here that cover the body from head to toe, and of course you don't have to do them all—simply pick and choose the ones that serve you best when you need them. Been bent over edging for an hour? You might want to choose one or two of the back stretches. Waiting on the job before that next coat? Try some standing poses that give you energy or exercises that increase flexibility. Here we're using yoga mats and props, but you really don't need special equipment to do any of the poses on the following pages—you can do them anywhere with things you probably have in your truck.
If you'd like to see these poses in action, you can view the video version at the bottom of this article. To get started learning how to feel more comfortable and take care of your body during your work day, scroll down.
Before you start:
|
Essential GuidelinesKeep these things in mind for every exercise:
|
Neck Turns
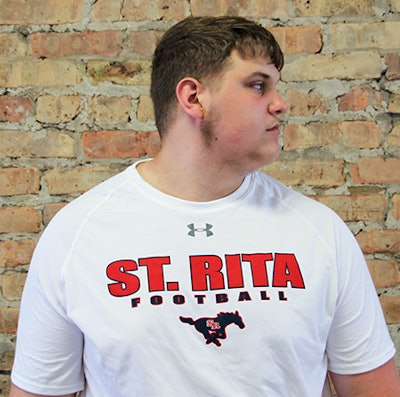

Great for: Beginning of your workday; any "kinks" in the neck; any time your head has been in a fixed position for an extended period.
How to: Either standing or seated, inhale, then on the exhale turn your head to the left, breathe in again, and turn your head a little farther if possible. Take one more deep breath in and out here, looking as far as you can over your shoulder, keeping both your shoulders relaxed downward toward your hips. On your next inhale, slowly return your head to center. On the next exhale, repeat this sequence to the right. Aim for two to three rounds. This can help restore natural range of motion and alleviate tension.
Isometric Neck Stretch

Great for: Any time you are feeling stressed or having stiffness in your neck and shoulders. It can be done standing or seated. This is a strong stretch that will also strengthen your neck.
How to: Kevin starts by tipping his head to one side. Then, pressing the fingertips of his two "peace fingers" into his temple, he gently applies pressure to increase the stretch. From here, he creates an isometric action by pressing his temple into his fingertips at the same time, thus creating resistance. He simultaneously presses the palm of his opposite hand down toward the floor with his arm fully extending downward, which also stretches the shoulder. Although the body appears to be still during this exercise, it is very isometrically active! After five deep breaths, release the pressure and tip your chin toward your opposite shoulder to feel another great stretch, then slowly bring your head back to neutral. (This is one of my favorites I learned from my yoga mentor, Judy McNicol.)
Shoulder Stretch with a Back Bend & Forward Fold


Great for: Counteracting "slumped" shoulders; if your chest is feeling closed off or tight; if you haven't raised your arms in a while; if you feel like you just need to "reset." Helps release tension in neck and back.
How to: O'Cephus is using a jump rope, but you could use a T-shirt, towel or anything else you have on hand. To do this, separate your feet a little wider than hip distance, with toes pointing forward or slightly turned in. Slowly arch from the upper back, keeping your focus forward/upward. Take note of sensations felt in the front of the shoulders, but also elsewhere (back, hips, legs, arms). Take 5–10 deep breaths. Can you go deeper with each exhale?
At right I'm helping him with the opposite stretch, a forward fold. Take the rope behind your back and hold it at shoulder distance or wider if needed. Slowly hinge forward and lift your arms up and off your back toward your head. This will also bring a good stretch to the back of your legs. If you get lightheaded or dizzy, bend your knees slightly, release the rope, and slowly return to standing, lifting your head up last.
One-Legged Chair Pose

Great for: Tight or sore hips; stiff legs; if you feel like testing your balance and concentration; any time you are standing around and have a smooth, firm surface to stand on.
How to: Here Kevin starts by shifting his weight onto the right leg. Then, he slowly raises his left knee, and with the foot flexed, props the outside of the ankle onto the top of the right thigh (standing leg is slightly bent now) just above the knee. If needed, you can use anything—a wall, a sander—to help balance with one hand. Once you feel stable, you can try to sit a little deeper, let your knee turn out more to increase the stretch, or take your arms and focus upward to work balance.
Standing Forward Fold

Great for: In between and after edging or nailing down a floor; tight back (it will help lengthen your spine); increasing blood flow to upper body; bringing relief to tight, overworked hamstrings. Can also aid in digestion.
How to: With feet slightly separated, take a deep breath in and stretch your arms and whole body upward. On the exhale, bow forward and reach your hands toward the floor. Breathe in again, and as you let your breath go, see if you can extend the top of your head toward the floor, moving deeper into this stretch that targets the hamstrings. Take hold of your elbows and stay here with a slight "micro-bend" in your knees. You can also sway side to side, bounce a little up and down, shake or nod your head—whatever feels good to you in the moment. When you're done, bend your knees a little more and slowly return to standing by rolling up, one vertebrae at a time, and lifting your head last.
Side Arch Pose

Great for: Waking up in the morning or midday; tight sides, back or shoulders; increasing lung capacity (it stretches the intercostal muscles of the ribcage).
How to: Luis starts with his shoulders aligned directly above his hips, with feet a little wider than shoulder-width apart. He stretches his right arm up (keeping it in line with his ear), then takes hold of his right wrist and slowly stretches to the left. With each breath out, he reaches his right hand out more to the left, using the left hand to gently guide him deeper into his side. To ensure good alignment and add a stretch, turn your focus upward, making sure to look under the armpit, not over the shoulder.
Standing Quad Stretch


Great for: Overworked, stiff legs; after an extended period of time on your feet such as after sanding, buffing, edging, installing or coating a floor; whenever you catch yourself standing around with a little time to spare.
How to: Here this stretch is shown two ways—O'Cephus is balancing by himself, and Luis is using the wall and a yoga strap (you can use a towel, rag, etc.) to help hold the ankle. Balance on one leg, then grab your foot or your pant leg and draw your heel toward your backside, making sure your shoulders stay aligned over the hips. If you can balance on your own, try stretching your arm up as O'Cephus is doing. You may also get an added benefit of a front shoulder stretch.
Across-the-Shoulder Stretch

Great for: After running a drum sander, buffer, multi-disc sander; after moving heavy objects; during downtime.
How to: Standing or seated, extend one arm out in front, then lengthen it forward from the shoulder. Draw it to the opposite side, crossing it over your chest. Take hold of your forearm or upper arm, or let your arm rest inside the other one like Kevin (center). You can change the feel of the stretch slightly by making "micro-adjustments." Inch your arm a little up or down, or hug the arm in more and twist to the side—whatever feels best. Breathe and hold for 5–10 breath cycles per arm.
Wall Stretch & Warrior 3


Great for: Tight shoulders, neck and upper back. Warrior 3 is great for increasing balance, which you may want to check in with and reset after running the machine or installing all day.
How to: Bend forward with your hands on the wall, then adjust to create a 90-degree hip angle with your feet hip-distance apart or a little wider. Allow your chest and armpits to sink toward the floor as you feel your upper back begin to arch. Engage your core by pulling your abdominals inward. Bending one knee in this position can increase the stretch in the opposite shoulder.
From here, you can easily transition into Warrior 3 pose, which is great for strength and balance. Extend one leg back, keeping your front hip turned down toward the floor. Flex the foot that's in the air, and direct your heel backward, isometrically extending your leg as long as possible through the knee and hip. Activate your core, and patiently try to "fingertip" away from the wall to see if you can balance this more advanced pose by yourself! Make sure to do both sides, noting the differences in right versus left.
Crescent Lunge

Great for: Regaining energy and increasing circulation; bringing attention to the hip flexors, quads and back, and increasing flexibility in these areas.
How to: Take a long step forward (about an entire leg length or so), curl your back toes under, then bend your front knee into a standing lunge, which in yoga we call "Crescent Lunge." It's important to keep your knee aligned directly over your ankle and shoulders directly over your hips. Distribute body weight evenly into your front foot and the ball mound of your back foot. Turn your palms facing inward as you extend your arms up, then relax your shoulders downward, away from the ears. Arch your back a little to stretch your spine if you like.
Triangle Pose Sequence


Great for: Re-aligning or "resetting" your entire body; stretching the side of your body (intercostal muscles), which are commonly skipped over; relieving some types of back pain; increasing balance, lung capacity and energy. "This sequence feels like a self-adjustment for my back," Mike says.
How to: From the Crescent Lunge, straighten out your front leg, turn your back foot out 90 degrees and make sure your front heel is aligned and centered with the arch of your back foot. Take both arms straight out to the side, then extend and reach forward over your front leg, creating length in both sides of your body. Next, reach down and rest your hand on your leg below the knee joint (never push weight into your knee or any joint). Now, aim to keep your top hip aligned directly over the bottom one. This is most important, and can be done by tucking the bottom hip under, turning the top hip up and keeping the torso open and facing sideways. Finally, take your top arm and sweep it over your head, keeping it in line with your ear. Hold here for 5–10 breaths, keeping your focus either on your foot for balance or forward toward your front hand if possible.
Edging Dos and Don'ts
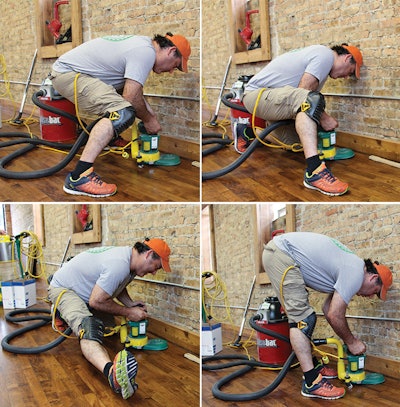
Many pros have a hard time, especially as they get older, with all the bending over involved in edging, but Mike says he could do it all day! Here he's showing edging positions that are good for your body and one that will end in a strained back (the bottom right photo). |
Balancing Table & One-Handed Tiger


Great for: Any time you are working on your hands and knees and want to lengthen out; challenging your balance and flexibility in many areas at the middle or end of a work day.
How to: Starting in "Table Pose" (on all fours), lift one leg off the floor and extend it long through your heel. Then, slowly begin to lift the opposite hand off the floor, extending your arm forward and making as long a line as possible from your foot to your fingertips—this is Balancing Table. Pull your belly in toward your spine, and with every breath see if you can isometrically extend longer and balance better. On an exhale, bring your body back to Table Pose, then switch sides.
From here, if you have enough flexibility you can go into a pose called One-Handed Tiger (photo on the right). From Balancing Table, bend your outstretched leg and reach back to grab your foot or pant leg. This gives you not only a strong quad stretch, but a good back and shoulder stretch—always important for wood flooring pros.
Downward Dog


Great for: Increasing energy levels; helping circulation; stretching many areas of the body at once. Also helps increase upper body strength.
How to: From all fours, lift your knees up and press your weight back and into your legs (keep your knees bent if you need to). It is very important to have an open shoulder angle, so keep your arms in line with your ears. Create the feeling of a nice long spine by pressing forward and downward into your hands, sending more weight into your legs and feet. Keep your focus between your feet or up at your belly.
Once you feel comfortable in Downward Dog, you can try the second variation, One-Legged Downward Dog. As you lift one leg up, make sure the rest of your body stays in correct alignment.
Cat/Cow Sequence


Great for: Counteracting the forward bending from edging, nailing, doing repairs, etc.; anytime you find yourself working down on the floor and need quick and easy back relief. Also increases mobility in the spine.
How to: Come onto all fours (Table Pose), and as you inhale, let your belly sink toward the floor as your hips and focus move upward (that's the "cow" part). As you exhale, round your back up little by little, pulling your navel in toward the spine, then dropping your head last and looking to your belly (the "cat" part). Repeat this sequence at least five times, making sure to breathe smoothly.
Pyramid Pose


Great for: Stretching tight hamstrings, especially after edging; increasing circulation; after kneeling or squatting for an extended period. Can help with digestion.
How to: From Triangle Pose, turn your back foot in to the point where it's now just slightly turned out. Take your hands down to the floor and bend your front knee if needed. Here Mike is showing two ways to do this. In the top photo, he is using props to support his hands—a great option if you cannot yet reach the floor. In the bottom photo he is showing how to do the pose with no props (Mike is very flexible!). Either way, drop your head toward your shin and see if you can go a little lower with each breath.
Sphinx & Cobra Pose


Great for: Recharging and increasing energy; stiff hips and back; after installing, lifting or making repairs.
How to: Start lying face-down with your forehead resting on top of your stacked hands (you may get a subtle back stretch here). Next, lift your head and slide your elbows directly under your shoulders. Then press your hands and forearms into the floor, keeping them parallel with each other. You can keep your head neutral or hang it heavy to stretch the back of your neck, but keep your lower body muscles relaxed so that your back can release. This is Sphinx Pose (middle photo). To go deeper, push up off your elbows and press into your palms for Cobra Pose (bottom photo). For an extra stretch, take a turn looking over each shoulder. Then release back into resting your forehead on your hands.
Seated Twists


Great for: Beginning and end of the work day; after heavy lifting or any stressful activity; loosening up a tight spine.
How to: From a cross-legged seated position (I'm sitting on a yoga block, which makes sitting like this a little easier if you have stiff knees), inhale deeply, lift your shoulders up toward your ears, then roll them back and relax them down toward your hips on the exhale. Feel how your chest has expanded. Inhale and sit up tall, then exhale and turn to one side, taking hold of the opposite leg right above your knee. Repeat for about five breath cycles, sitting up tall, then twisting a little more and looking over your shoulder as far as you can with each breath out. Return to middle and repeat on the other side. (This stretch is also effective from sitting in a chair if the cross-legged position on the floor is not an option.)
Foot & Ankle Stretch


Here, Mike shows how to get a good foot and ankle stretch while you work. The trick is to stay aware of your feet and periodically go back and forth from flexed to extended.
When your feet are in plantar flexion or "pointed" (top photo), keep your ankles straight with your weight centered on the tops of your feet. Avoid rolling your feet in and allowing yourself to sit on the inside of your ankles. When you switch to dorsiflexion, or "broken toe pose" (as we call it in yoga), curl your toes and press into the ball mounds of your feet. Mike always wears flexible shoes on the job so he can do this. Switching up your fixed foot position every few minutes promotes better circulation and prevents the foot and ankle joint from becoming overstretched, "feeling stuck" and numb.
Straight Talk from Mike
We all know that most of you aren't going to be doing a whole yoga routine. But we also know how wood floor pros like us are—we think if we burn the candle at both ends and work harder and longer we'll make more money. That's fine, except that most of us don't have the body we had at 22 anymore, and at some point we're going to get hurt. Then we aren't making any money! My dad always said, "Slow and steady wins the race." I take time on every job to do some of these stretches. If I didn't, there's no way I'd be able to continue to do this job. |
Reclined Leg Stretches & Twist


Great for: After long periods on your feet; when your hamstrings, inner thighs or back feel locked up; whenever you feel the need to lay down and stretch.
How to: Lying on your back, use a prop (Luis is using a yoga strap looped around his ankle, but you could loop a rope or old necktie around the bottom of your foot instead) and begin to pull your leg up and toward your body, keeping your other leg straight on the floor. Keep your shoulders relaxed, as we tend to tense our upper body when stretching our lower body. Next, hold onto your prop with the hand opposite your foot and release the other arm out to your side. Begin to cross your top leg over the bottom one, and notice the spinal twist you get. Turn your head to the opposite side for a gentle neck twist. Return your leg and focus back to center, switch hands and let your leg drop out to the side to target the inner thigh. Look the opposite way. When you're done, bring your leg back to center, bend your knee, remove the strap and repeat on the other side.
Happy Baby & Corpse


Great for: Ending a workday; calming and relaxing; counteracting or rebalancing after any back-bending or twisting exercises. Aids in digestion.
How to: From lying on your back, take hold of your feet from the outside (grab your ankles if you can't reach your feet), and open your knees and feet to about shoulder width. Apply weight downward to compress the hips a little, then rock side to side (that's Happy Baby). Next, hug your knees into your chest, holding on right below your knees (top photo), or behind your knees if that feels better. Draw your knees and forehead closer together and breathe. If you like, rock front to back to gently massage the spine. Slowly release your arms and legs down to the floor, allowing your body to completely let go like the guys are doing in the bottom photo (Corpse Pose). Take at least 10 more deep breaths while you absorb all the benefits of your stretching and exercise. Namaste!
|
Straight Talk From O'CephusI've worked in some physically demanding positions in my adult career. Due to the wear and tear on my body, I was forced to have back surgery about 12 years ago. Yoga has been instrumental in helping me regain balance and strength in my core. It has also helped with my flexibility and breathing. I believe these practices are the reason why I haven't had a serious injury since I began. |
Final NotesLet us know of any successes you've had from doing these, or any way you've incorporated stretching into your day. Do you have suggestions, questions or requests? Email [email protected]. |


