I’ve been in construction since I was 16. One of my many jobs included working for painters, and one of our tasks back then was sanding decks. We would do 2,000-square-foot decks with just hand-held orbital sanders. It was torture. I hated it. It was hot, and you’re on your knees with the sun burning the back of your neck, and those old-school guys are just telling you “Man up!” and “Keep going!”
I actually started getting into decks because my old boss told me he would not do them. When I was working for him, I would see a lot of decks on our job sites that desperately needed maintenance, and I knew when I decided to go on my own I wanted to do something about that.
Here in Montana, there are tons of decks that get no maintenance, even though (when the weather is good) everyone is living outside. We’re close to Glacier National Park, and most people are here because of the amazing views and outdoor lifestyle. So when we decided to start doing decks in our company, we created a slogan: “We want your deck to look as good as your view does.”
With my background in painting and wood flooring, doing decks seemed like a no-brainer. Honestly, without that background, I wouldn’t even begin to try to tackle these jobs, because they require a lot of knowledge and the right conditions to do them successfully. Here are some things we’ve learned about doing decks successfully.
Decks must have optimal conditions


 I take multiple moisture readings on top, between and underneath boards before I start the job and through the job. I use a moisture meter that shows the moisture content percentage (top photo, showing a super-dry deck) and I also use my moisture meter that reads high/low but also reads temperature and humidity, which is extremely important when doing decks.
To start with, in our area here in Montana, the deck’s moisture content needs to be less than 18%. Anything above this level can lead to excessive material removal. The sweet spot is 17%—at that level, you’re not taking off too much material but you’re also not having to combat the moisture in the wood.
One of the biggest challenges we face with deck projects in Montana is the limited window for refinishing due to constantly changing weather conditions. You can go through every season in one day here, but the correct temperature and humidity levels are crucial for proper refinishing, and any rain or direct hot sunlight can completely disrupt the process and create problems in the coatings. Once in a while we’ll have decks that are covered or in a spot where I can hang plastic, but usually we are at the mercy of Mother Nature.
Another issue is that if you apply the coatings outside the correct parameters for temperature, humidity and moisture content, depending on your system, the hydraulic lift will actually push the coating off of the wood. The coating will just be sitting on top of it, causing flaking, delamination or peeling.
Navigating these challenges requires both careful planning and flexibility to do a good job. As I write this, I was supposed to start a deck job this week, but the humidity was too high—it needs to be between 30–55%—and the moisture content of the deck is also too high ( it’s been raining on and off). Our targets are very hard to hit when you have an atmosphere that does not want to play nice with you.
Because of this, I’m constantly looking at my weather app hour by hour when I’m doing these jobs. For a lot of finishes, we need three days of dry, clear weather starting from the time we coat, so if there’s any rain in the forecast, I can’t apply my coatings. On a recent job, I had a deck all sanded, and then it rained. But then we had a nice, sunny, hot day, and when I checked the wood, it was dry. The forecast was good for the next three days, so that night, I got up at 2 o’clock in the morning, and I applied my coatings using floodlights. By 6 o’clock, the sun was coming up and I was just finishing up. You can’t have the sun hitting it while you’re applying it, but once you’re done, it helps the curing process.
Just like with wood flooring, there are coatings that are topcoat finishes and finishes that are penetrating. After experimenting with many different coatings, we now use a penetrating oil system, as we’ve found it’s the most durable in our harsh climate.
What I look for during bids
Just like when you are bidding a wood flooring job, you need to inspect a deck carefully. I look for rot, I look for mold, and I look to see if it needs any replacement boards. I also look at how it’s wearing and if it’s flaking, or if it has any stains that might not come out.
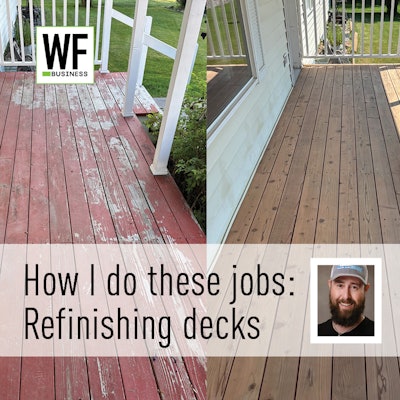
 This deck was peeling after the homeowner used a mix of oil- and water-based products.
You have to look at the species they used. With decks, you’re dealing with some of the softest and the hardest woods. Is it pine? Fir? Ipé? Cedar, which is popular because bugs don’t like to eat it? I had one deck that was tigerwood, which is even denser and harder than ipé. Again, if I didn’t have my flooring experience, I wouldn’t even touch dealing with these jobs.
And just like I can tell which finish is on a wood floor, I can tell by looking at the deck which type of product was used on it previously. Was it paint? A solid state? Semi-solid state? Oil-base? Water-base?
 Looking underneath a deck (when possible) is an important part of inspecting it before taking on a job, because a lot of damage to a deck happens from below.
I’ll always have a moisture meter with me to check the moisture content, because moisture content is so massively important for these jobs. I’ve looked at decks in the middle of the winter with snow on them, so then obviously I don’t do a moisture check, but of course I’ll be checking it before I do the job. I’ll also pay attention to if the deck is near water, like a lake or a pool. You’ll have more ability to control that moisture if it isn’t right next to water.
Sometimes we’ll have bids in winter and the clients pay in advance for the summer to ensure they secure the current pricing and get on our schedule. As I’m writing this in mid-May, we have five or six decks already booked for this summer. If I cannot get to them this year because the weather windows don’t cooperate, they get moved to next year, but they’re already prepaid.
My process and equipment

 I think a lot of wood flooring pros shy away from doing decks because the chance of destroying your good equipment is high, or you have to buy old equipment you use only for decks. I found that buying a dedicated machine built for deck sanding (I use the FG Blitz) paid for itself in its first job; I can easily sand an entire 1,000-square-foot deck start-to-finish by myself in a day.
If I’m dealing with old finish, I’ll go straight to sanding. And then anywhere I see stained areas, I will just try to spot-fix those. Once I’ve sanded it down to bare wood, I’ll apply my tannin remover and see what it’s doing. While it’s drying in the sun, I’ll go do something else on the deck (because we need to always be moving and working!). A lot of the time you’ll see the tannin on the underside of your joists because it always drips down the cracks, so sometimes I will sand the top and the bottom, and sometimes I will coat the top and the bottom (unless it’s too close to the ground). I give the customers the options (more on this on page 39).
When it comes to sanding the top sides of the decks, I used to use a buffer. I never wanted to put my drum sander on a deck, because I knew it would ruin the drum on my sander. Setting nails or screws on the decks is a problem because doing that can crack the boards. Even if you don’t see the cracks right away, later as they expand and contract with moisture, they’ll pop, and pieces can break off. For me, finding a brush system for sanding was a game-changer, because you’re literally sanding the wood but rolling right over the fasteners. That way, I don’t have to cause any harm or damage to their deck in the resanding process. It’s also a cost savings—I bought the whole brush system last year, and on my first job it paid for itself. Now I don’t have to pay for abrasives (I’m still using the same brushes I bought last year), so my product cost dropped immensely on these jobs.
 For pickets, handrails, treads and risers, I use a hand-held wirebrushing tool; this one is the FG Terrassen Randy. Its brushes come in the same grits as the bigger machine.
The brushes come in different grits just like regular abrasives, and just like with floors, we choose the abrasive needed based on the deck’s condition and work our way up. Most commonly, I’m starting with 60 and finishing with 80.
Most brush systems have metal brushes; the one we use has fibers coated with zirconium. Now that we use this modern system, you couldn’t pay me a million dollars to go back to doing decks the old-school way.
Dealing with edges


When I do a wood floor, I always do my field first and then the edges. With decks, I find it much easier to blend my edges with the field if I do the edges first.
You can’t put an edger on a deck: With the uneven surface and gaps between boards, the wheels on an edger will make it will hop and skip and dig into the boards. Depending on the size of the deck boards, I have sometimes used the US Sander mini-toekick edger. Most of the time, though, I’m doing edges with an orbital sander.
When you’re doing a wood floor, you’re trying to get it as flat as possible. I want my edges to match the sanding I’ll have in the field, and for a deck that will be wire-brushing. So I need to sand with the orbital in a way that will dish out the wood to some extent, just like wire-brushing does. To do that, I cut a maroon pad into 5-inch discs and use those to back my abrasives. This will help the sanding with the orbital give the contoured wire-brushed look. I used the same grit sequence with the abrasives as I’m using for the brushes in the field.
We think it’s worth it
Although there are some challenges, we’ve found refinishing decks is a great way to diversify our business and our client base—and increase our profitability. I also enjoy getting to work outside and seeing our Montana views and wildlife, although that can keep you a little on edge when you’re working in the middle of the night (thankfully, no grizzly bears yet!). As wood floor pros, we have the perfect skill sets to take advantage of this part of the market.
The ultimate challenge: scheduling
 Sometimes your best chance at getting a deck coated is in the middle of the night.
My wife, Kassie, does our scheduling, and I'll be honest: She hates decks. She says when you're scheduling decks, you might as well throw a dart at a dartboard. We basically leave our entire summer open for the deck jobs, and when we take on a deck job, we spend a lot of time explaining to the deck clients all the parameters we need to do their job correctly. I'll literally show them my hour-by-hour weather app and explain that if we don't do everything correctly, all of our work will literally be for nothing. So we're very clear when discussing this with clients, and it's all spelled out in our contract, too. If they don't want to wait for the right conditions, that falls under the category of "Some of your best jobs are the ones you choose not to do."
Once the contract is signed, we're in constant touch with clients as we have updates based on how the weather has been. Even during a job, it can start and stop, of course. Last summer we had a large deck job that was $30,000, and we had three weeks of steady weather to work on it, but then we had to take off a week when it rained and come back when we had another good weather window.
If we have a stretch of bad weather, we can call up a wood flooring client and let them know that we're available to come do their job. Or, because the deck work is so intense and often during nights and weekends, we'll just enjoy having a nice rest week.
Changing your expectations
 Realistic expectations about how much staining and damage you can remove from a deck is in important conversation to have with the client and with yourself!
When I was first doing decks, I wanted them to look just like my floors … get every little thing taken care of, make sure that weird mark goes away, make sure it looks cohesive and perfect. But, like my friend T.J. Haas says, when it comes to decks, that's like chasing the wind. You might have huge rings of damage where flower pots were, or you might have stains from ice melt or tiki torch oil, or the grill, or the tannins in the wood, or a million other things.
There are different things you can use to try to clean the deck. Sometimes I'll use a power washer to hit the deck first—yes, it puts moisture into the wood, but on hot days, it will cook out very fast, and of course I'll always check the wood with my moisture meter before I actually sand. There are different tannin removers you can use that I apply with a backpack sprayer, which helps control how much moisture I'm introducing to the wood.
Stains that remain after the power washer and/or the tannin remover are a conversation you need to have with the homeowner. You can only sand off so much, or you can replace those boards, so you have to let the customer decide if they're OK with not having the stains completely removed or if the boards need to be replaced.
Working from below


When I'm doing my visual inspection, I'll go under the deck and look for mold, mildew, tannins, rotten boards, screws or nails that are popping and anything that looks like it's structurally not good. When I'm writing my bids, people can choose the options of what they want to deal with.
Sanding the underside of a deck is not fun. If you thought scraping corners in a house was horrible, try doing a deck with all those little tiny corners, including the underside of the deck. When you have your arms over your head all day, your arms get wrecked. A lot of the times, I will talk the customer into letting me do just a mold/mildew remover and a tannin remover and applying the finish underneath without sanding, because it's not going to be worth the time or the money—anytime I go under a deck, it's a hefty price.
On this job, that's what we did. You can see the deck in the photo on the top left as it was when I got to the job. I sprayed it with mold and mildew remover and rinsed it. Then I soaked the wood and sprayed it with tannin remover (you have to soak the wood first so the tannin remover penetrates the wood) and rinsed that. It's important to rinse well, since chemicals left behind will interfere with your coatings. The photo at the top in the middle shows the deck wet in the middle of the cleaning process, and at top right is the clean deck. I'd show a photo of the deck after the coating was applied, but it would look exactly the same as that third photo.