I’ve noticed many discussions about polishes on wood floors in various social media posts, and frustration is a basic element of the conversations. Like almost every wood floor pro, I am no fan of polishes, and I refuse to use them. “I do not like polish in a can, I do not like them, Sam I am!” In my mind, there is no good or acceptable polish (I am referring to the acrylic and/or urethane copolymer varieties). They may be chemically similar to the “polyurethane” we use, but as wood floor pros, we have access to the professional stuff that lasts decades instead of days or weeks.
Things I’ve tried to remove it
Naturally following the polish conversations is the topic of removing them. Ammonia is a solvent for these polishes, but it’s so stinky I’d rather use the commercial solvents instead. They are more potent and pure science, much more like dish soap than ammonia. I have the Nylex buffer disc I was told to buy, and I was led to understand this is the maximum horsepower ticket—but I used this tool only twice.
I also used the factory machines from Karcher (re-branded to other big names), but still, I found they just don’t work well on wood floors maintained with many zealous applications of the polish.
Because of the popularity of the polishes, I have had the joy of responding to many pleas for assistance for polish residue from unhappy homeowners. One lady in particular called me crying so hard she had trouble speaking clearly! (She feared she ruined her floor!) Using the polish remover product and my Nylex brush, I fixed her floor easily because there was barely any polish on the floor. I doubt she’ll ever buy polish again!
But, more commonly than not, I’ve become accustomed to floors with so many polish layers the floor color has changed. It’s a darker shade of gray because of all the dirt suspended in the polish before it dried.
What I discovered that actually works
Despite this, I’m not leading down the path of doom here—quite the contrary, because I’ve discovered a solution that is amazing. It all started with a client that used a particular polish once a day—for years. The polish thickness was between 1/16 and 1/8 inch. I placed my polish remover tool in one place for over an hour at that home, and it didn’t even make a dent. That customer was unhappy, and the calls kept coming to me about polish issues, and I was determined to find a solution.
I have come up with the final answer from the most unlikeliest of inspirations: cleaning adhesive residue with solvent-moistened rags. Once the rag is dry, it stops working—the solvent works only when wet.
So the answer I found was to keep using the remover-type products to remove the polish—but keeping the removers wet so they stay chemically active. The way I do that for long periods of time is to cover the wet area with plastic. My favorite is the thin stuff, like 0.71 mils—much like dry cleaner bags they put over your shirts.

The steps for my process
I spread the remover and cover it with the plastic, using a T-bar over the plastic sheeting to make sure I don’t leave any air bubbles. Then I wait about 20–30 minutes. I only wet small areas—approximately 3 by 10 feet or so. The trick is to work in one area while another area is “soaking.”
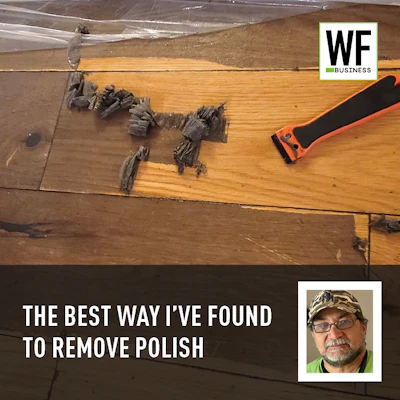
After the area is soaked and the plastic is removed, my main tool of power is a plastic razor blade (I buy them from Amazon). They are mostly used by those who wrap cars, because they use them to smooth out bubbles. They are not real razors that cut—only the shape is a razor. I also like the plastic handles you can use to hold the blades. This helps a lot when you have vast areas to remove.
 After soaking in the remover covered by plastic, small plastic razor blades easily remove the layers of dirty polish.
After 20 or 30 minutes, the polish turns a blue color of sorts, and I test out the softness with the plastic blade. If it comes off lickety split, I keep going. If the floor has bevels, I use a toothbrush in the bevels, and it comes off easily.
We have one small waste basket lined with plastic per person and throw the polish “scrapings” into the waste bucket. If you neglect this and the scrapings dry on the floor, they are even more difficult to remove than before. Once your waste bucket is full, take it outside so it can fully air dry, which won’t take long. Once dried, the scrapings won’t transfer to other objects and make messes along the way. Once the waste can bag is dry, the scrapings will be a hard mass of plastic to throw in the trash.
 Clean up any scrapings right away, because they will stick to anything until they have air-dried.
When done, the floor is back to brand-new status. I’ve sold a recoat every time on these jobs, but after the polish is removed, the result is so pleasing that a recoat is not necessary—we are back to pristine aluminum oxide (these are usually prefinished floors). I had spec’d recoats only because I had no idea where this was going during the estimate, and I don’t mind if I go home early at this point.
I price this service the same as a natural sand-and-finish, and I add in the cost of the remover solvent, the plastic razor blades and everything else I need to get the job done. There’s no dust, and “de-polishing” a regular home can last from hours to two days depending on how many workers are on the job and how many square feet it is. Best of all is the satisfaction of seeing a floor go from having a thick grimy haze to looking brand new!