|
|
As most of you probably know, I’m an easy mark for old structures with a story behind them. Give me a building or house with solid roots in history, and I’m putty in their hands. With that in mind, St. Luke’s Episcopal Church in Atlanta had no problem getting my attention when they were looking for help with their historic floors.

The crème de la crème of pine floors
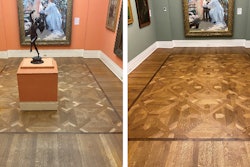
My first tour of duty at St. Luke’s was part of a major restoration in 1999–2000. I was called into the project by two of their most ardent guardian stewards, Bobby Mays and Cotten Alston. Part of the restoration involved the removal of all 56 church pews in the nave to expose the wood floor underneath. Each rectangular section where the pews sat measured 60 by 20 feet, to give a total of 2,400 square feet in need of restoration. Once the pews were removed, it was obvious the floors had never been machine-sanded. I looked for hand-planing markings but found none. The pieces of wood had small variations in height, so the wood may have been carefully milled, put in place, and a finish applied, which was not unusual for floors of that era.
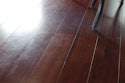
The wood flooring was 2¼-inch-wide longleaf yellow pine that was all end grain or quartersawn. The lengths were very generous, and the floor was in excellent shape and structurally sound. There were no gaps, no compression set and very little splitting. I’ve worked on a lot of old pine floors and knew it just doesn’t get any better than this version of heart of pine.
With this information in hand, we went about the business of restoring the floor using Passive Refinishing. We removed all surface accumulations and got down to bare wood with no sanding or loss of original material. One of the biggest perks about getting down to raw wood without sanding is that you’re preserving that thin layer of aged wood on the surface, the original face. When it’s left intact, you don’t need to stain it to get an aged look because it’s already there. If you machine-sand it, you lose the aged surface—the newly created surface from sanding is seeing the light of day for the first time and is going to be much lighter and a totally different color. We buffed in a clear oil-base sealer, and the wood responded beautifully. We followed that with multiple applications of a high-grade waterborne finish. The pews were brought back in, and the church went back to its normal service schedule. That was the easy part.
Getting oars on the floors
Fast forward to 2021. Like many churches, St. Luke’s had to close its doors to protect its members in the midst of the pandemic. This gave them a window of opportunity to address some maintenance issues, one of which was the condition of the 20-year-old finish we had applied in 2000. Bobby Mays had noticed a wear pattern that needed attention. As parishioners came down the hard tile center aisle and entered the pews, their shuffling movement with their shoes had created a significant wear area that extended into the pew rows about 6 to 8 feet from the aisle, as you can see here:

Bobby asked what could be done, and I agreed to a clean and recoat.
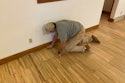
Of course the elephant in the room was 52 pews attached firmly to the floor with a kneeling bench that could be lowered for parishioners when they were praying. We had our work cut out for ourselves, and I think Jenna, my business partner, thought I was one taco shy of a combination plate for agreeing to do this. But I had a secret weapon …. my 52-year-old Clarke FM-15!

With a low profile, I could manipulate the buffer and get up underneath the pews to do the wet cleaning and dry surface prep:

Sure, there was some hand-sanding to be done, but all these variables had been taken into consideration when I priced the project. I also explained to Bobby that since I couldn’t have dust containment on this buffer, there would likely be some dust created. He was good with that, as the church was getting other work done that would require some cleanup.
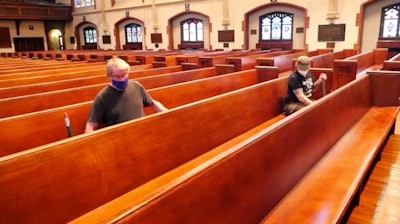
The next part of the puzzle was applying finish. How to get an even application of finish between 52 pews and the kneelers? Jenna and I put our heads together and cracked the code. We used the standard cut-in pads on a shorter pole and worked in tandem with each other. Think of paddling a canoe. We were getting our proverbial oars on the floors. One of us would be in front of the other and start the application and pushed finish under the pew and beyond the kneeler directly under them:

The person sitting behind would continue the motion and we would slide down the pew to the end:

We then leap-frogged to the rows behind us and continued like this until all 52 rows were coated in, and it worked like a charm.
The clean-and-recoat sandwich
But before we leave this subject of applying finish, I want to highlight a step we’ve added to our clean-and-recoats menu. As I mentioned, there was visible wear for the first 6 to 10 feet at St. Luke’s as you moved into the rows of pews. The rest of the floor looked pretty much OK. We see similar conditions in residential houses around doorways, the kitchen triangle and other high-traffic areas. To help make sure we get sufficient finish down on these spots as well as a uniform look, we make a “sandwich.” We go through our typical wet prep with Basic’s IFT and Squeaky, and after the floor dries, we follow that with a dry surface prep with the maroon pad. By this time, the high-wear areas are easily visible. We then single out these locations and make two applications of finish just to these locations. We know these locations are subject to higher wear, so we get the buildup we need there to replace any finish that’s been worn away. Once these locations have been addressed, we make two applications of finish over the entire floor. In one of the photos during our application at St. Luke’s, you will see me sitting on a pew with the cut-in pad and pole applying the finish. To my right, you will see a strip where finish had been applied earlier and allowed to dry. I was making the second application to the entire floor so the area with higher wear was getting its second application:

Aside from the additional protection, this gives us a surface that has uniform reflection and no dry-looking areas where the damaged areas absorb more finish.
The recoat sandwich has become standard practice with clean-and-recoat for Jenna and me, and it gets resounding approval from homeowners. Our approach to recoating an older floor takes longer and involves more trips, and we charge more than the competition, but homeowners and property managers are satisfied they are getting more bang for their buck and don’t object.
The work at St. Luke’s went very well, and it was a fantastic place to work during the pandemic. We had the whole place to ourselves, and were under no pressure for a completion date. We enjoyed the work, learned a lot, no one was shooting cannons at us or trying to burn down the town, the canoeing was fun, and the recoat sandwich always looks good on our menu.
See a video about this project here:
You can see more about this project and my recoating process in this video:
SUPPLIERS: Cleaning products: Basic Coatings Squeaky and IFT | Finish: Bona Traffic | Maroon pads: 3M