|
|
In the majority of cases, we know that one walks on the finish on wood floors, not on the bare wood, and that by practicing good maintenance procedures, the finish should last for years. Over time, though, all finishes will need some love, and, potentially, recoating. Recoating can be challenging, to say the least. Frankly, it can be a total crap shoot unless you know what is on the floor in advance or you know how to determine what coating is on the floor. Knowledge is power! There are millions of square feet of wood floors out there that will eventually need to either be recoated, sanded and finished or ripped up. By educating yourself, a huge market opens up. Here are some steps and tips that can help you be successful when pursuing this lucrative market.
Find out what you’re working with
You wouldn’t coat a waxed floor with a urethane finish—it would peel like a tourist on Miami Beach who spent too much time in the sun! This is true across the board (pun intended); you have to find out what you are working with. There are more horror stories out there than even Stephen King could imagine! Think about this: You took on a simple buff and coat, did the work and the client is not happy. You attempt a do-over. Still no happy campers in sight. You come to the conclusion that you bit off more than you can chew and aren’t going to get paid. But wait, it gets worse: The homeowners hold you responsible for permanently damaging their floor and demand that you pay to have it removed and replaced. You start doing the math … 1,500 square feet x $$$$ ... You decide that maybe you should learn plumbing. It boils down to knowledge and keeping up with changing products and techniques in your trade. Oh, by the way, plumbers have their crappy issues, too.
1) Does it have acrylics and/or oil soaps?
The following apply to factory-finished floors or job-site-finished floors (besides penetrating oils—more on those later):
Test the coating first to make sure it hasn’t been “maintained” with a “refresher” acrylic or an oil soap. Ask a lot of questions, and don’t be afraid to ask the consumer to show you what they have been using to clean or maintain the floors. You will be surprised at what you will find. The best way to contend with oil soap, even if you are not positive it was used, is to deep-clean the floor with one of the more aggressive professional wood floor cleaners on the market (products such as Basic Coatings IFT, Bona Prep, etc.). To test for acrylic:
- Drip ammonia on the surface. Some products with acrylic in them will turn whitish, and the ammonia will soften the acrylic. Note that this is not a guarantee! Some acrylic products will not turn white. If you find or even suspect acrylic on the floor, there are a lot of products out there made to remove acrylic top coatings: Basic Coatings’ Dissolver, Bona Polish Remover, Floor Science Floor Stripper, Zep Floor Stripper, or you can use a homemade cleaner. Here is a process for a homemade cleaner that works to remove acrylic:
- Mix 1 gallon of white vinegar with 1 cup of cream of tartar. Make sure the tartar is completely dissolved in the vinegar.
- Mop the floor with the mixture.
- Rinse and dry the floor with clean rags.
- Mix 2 gallons of hot water with 2 cups of ammonia and 1 cup of powdered dishwashing detergent.
- Scrub the floor with a buffer and a red pad.
- Rinse.
- Clean again with the white vinegar and tartar mixture.
 “Refresher” type of products like these are commonplace and can cause finish adhesion problems when recoating, so they must be detected and removed before a new coat of finish.
 A few drops of ammonia on a wood floor in an inconspicuous place can sometimes reveal if the wood floor finish is contaminated with an acrylic “refresher” type of product—the spot will turn white, as you can see in the photo above.
TIP: Before you recoat, always clean!!!
Once you know what’s on (or not on) the floor, before you think about recoating the floor, you have to clean the floor with the appropriate cleaning agent. Floors with oil and wax finishes have their own processes (see those sections in the article). For other finishes, clean aggressively using a buffer and red pad or an autoscrubber, if you have one. TSP (trisodium phosphate) is a robust cleaning option that removes grease, stubborn junk, and mildew from both painted and unpainted wood. After cleaning and buffing, do a test spot in a place where contamination would be likely to be present to ensure the finish you are going to use bonds before proceeding.
2) Is it aluminum-oxide or ceramic-coated factory-finished?
Factory-finished floors with UV-cured urethane may contain minerals like aluminum oxide or ceramic to make the floors more scratch-resistant, and these minerals can make recoating much more work. If you encounter one of these floors, you need to know what it is ahead of time so you can plan for the extra time and expense, and have the right abrasives, too. Aluminum oxide is the most common, but there are also wood floors with ceramic in the coating. If you suspect you’re dealing with one of these floors, here’s how to test for them:
- Using a permanent marker in an inconspicuous spot, make a mark on the finish and wipe it up right away with a clean rag. If the coating contains aluminum oxide, the marker will leave a shadow. If it is ceramic, it will wipe off cleanly.
- Abrade a small inconspicuous area with a true ceramic or diamond abrasive; use a 180 or 220 grit. If the finish powders, you may continue by buffing the floor with either a ceramic screen or equal, or ceramic paper placed on a maroon pad, or multi-disc. This process leaves micro scratches that provide a mechanical bond between the old coating and the new.
- If the permanent marker test shows the finish to contain ceramic, use a chemical bonding system (like Bona Prep or Basic Coatings’ TyKote) after cleaning the floor.
 UV-cured urethane without aluminum oxide or ceramic will powder easily when abraded with a ceramic or diamond abrasive.
 The Sharpie test (in an inconspicuous spot!) is helpful for determining which type of finish is on the floor. If the Sharpie will not come off with a clean rag or paper towel, the finish is not ceramic (this floor is aluminum oxide). If the finish had ceramic, the mark would wipe off.
 In these two photos above we have an aluminum-oxide-coated prefinished floor, which will powder when you abrade it with a ceramic or diamond abrasive.
3) Has it been waxed?
If you think it’s possible the floor has been waxed, there are a couple ways to test for it:
- Drip alcohol on the floor (again, in an inconspicuous place). The wax will turn whitish if the alcohol is left on the floor.
- Another way to check for wax is by wetting a rag with mineral spirits, then wiping the floor. If the floor is coated with paste wax, the wax will come off on the rag (usually a yellowish color).
If you find the floor has wax, know that waxed floors must be recoated with wax. When wood is waxed, the buffing process drives the wax deep into the grain of the wood and between the side-match and end-match of the boards. It is always safer to rewax. The process is pretty straightforward.
First, thoroughly vacuum the floor and tack it with mineral spirits to make sure you don’t scratch it on the next step.
Using a buffer with a pad driver and either steel wool (000) or a red pad, buff the floor with a product like DuraSeal Renovator or mineral spirits. Keep changing the pads until the floor is clean and no heavy wax residue is left on the pads.
Apply either paste wax or liquid wax. Paste wax must be applied just like waxing a car. Apply a thin uniform coat, then using a thick white polishing pad or lambswool buffer bonnet, buff until the floor has a uniform low luster. With liquid wax, you may use a lambswool applicator or pour the wax on the floor and buff it to a low luster. Make samples so your client knows what to expect.
Here’s a waxing trick of the trade: Fill a white cotton sock with paste wax, tie the open end and use it to apply the wax. The natural holes in the cotton coupled with the heat of application will meter the wax beautifully.
If the client wants a film-build coating, the floor must be sanded to bare wood and finished. Even if you do sand to bare wood, know that there may be spot adhesion issues or discoloration (especially in the deeper open-grain areas and side and end joints). The bottom line is you don’t get paid until you fix the floor. Err on the side of rewaxing, or simply turn down the job.
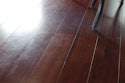
 This floor is waxed, but there’s no way to just look at it and tell—to know for sure, there are a couple simple techniques.
 One way to test for wax is to use mineral spirits on a clean white rag or paper towel and rub the floor with it. If it has wax, some wax will come off on the white rag or paper towel, as seen below.

 As seen above, wax will turn white when liquids are allowed to sit on the floor, and you can use this to your advantage when testing for wax. Place a few drops of alcohol on the floor in an inconspicuous place and let them dry to see if the floor turns white (this could take 30 minutes or a couple hours). These white spots were incidental when an alcohol cleaner was accidentally spilled onto the floor.Photo courtesy of Daniel Boone
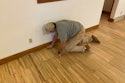
 This wax floor has been rewaxed every year for 17 years so far; here you can see wax has been applied and a buffer with a horsehair pad is about to go back over that area to work the wax into the floor.Photo courtesy of Daniel Boone
4) Is it an oiled floor?
You also have to determine if the floor is coated with an oil (a hardwax oil, linseed oil, any type of oil)—this could apply to a job-site-finished floor or a factory-finished floor. Ask questions. For job-site-finished floors, try to find out which brand of finish was used, and for factory-finished flooring, try to find out the brand of flooring. If you aren’t sure if the floor has an oil finish, test it with a clean rag and lacquer thinner in an inconspicuous spot. If the floor is oiled, some oil will come off on the rag.
For recoating oiled floors, some clients may ask to have a coating that has a film build over the oil. To do this, clean the floor with a mild detergent recommended for oiled floors. Then buff with a fine abrasive pad and coat with the finish of your choice. I have coated over oiled floors with various brands of water-based and oil-modified urethane finishes with no problems over the past 20 years, but it’s always best to check with the manufacturer of the finish to CYA.
Recoating oiled floors is simpler than recoating film-building finishes, as oils are designed to be easy to repair and recoat. If you can find out what brand of oil was used, use the same cleaner and oil to recoat. If not, clean with an oil soap cleaner made for oils—all manufacturers of these products make a cleaner like this (do not use an off-the-shelf cleaner like Murphy’s oil soap!). Then apply the oil as you would normally.
 When deep-cleaning before re-oiling, use the cleaning product recommended for that brand of oil.Photo courtesy of Jorge Perez
 Oil-finished floors are designed to be easy to recoat.Photo courtesy of Travis Morse
5) Is it shellac?
Experienced wood flooring pros may be able to tell a floor is shellac by the orange color and the look of the finish. Usually floors with shellac are topcoated with wax (in which case, you have to do the wax testing discussed on page 38). If the floor has only shellac, it may be recoated with more shellac or coated with a urethane (after cleaning the floor, of course). Shellac may also be waxed. Shellac is still used in woodworking, but not much in wood flooring with the exception of sealers. It is available in wax-free and shellac/wax. It gives wood a nice deep, rich color in the brown/yellow hues.
 This floor has a sealer coat of shellac.Photo courtesy of Benny Powell
Before-and-after for an oiled floor
Danny Stenhouse of York, United Kingdom-based Sandhouse Floor Sanding and Refinishing shared this project that was re-oiled. “This super-old, top-nailed, triple-herringbone quartersawn French/English oak was cleaned, scrubbed and recoated in hardwax oil. It’s the gift that keeps giving, this floor.”


Recoating vs. resanding
Educate your customer as to the facts of life with recoat versus a total resand. Recoating will not remove deep dings, scratches, discoloration due to sun damage, water damage or color change under furniture and rugs! If any of the above are in play, the onus is on you, the professional, to educate your customer.
On that note, make sure the floor is sandable! Is it engineered with a deep bevel? Is there enough wear layer to sand without sanding through to the core? How much wear layer is enough? This depends on the expertise and experience of the craftsperson. The equipment they are using is also very important. A good rule of thumb is nothing less than 1/16 inch (2 mm) of wear layer and then be very, very careful; most folks won’t touch a floor with less than 3/32 inch (3 mm) of wear layer left. Measure from the face to the top of the tongue with a feeler gauge to determine if there is enough veneer to sand. Use the finest paper you can to get the job done. Some folks will do the entire process with a multidisc to ensure they don’t sand through the face. Let the customer know that bevels will be either reduced or removed as part of the process. In any case, don’t be too aggressive. Sand with the finest grit possible to do the job even if it takes a little longer to complete. Your job is to remove the existing finish while leaving as much life in the floor as possible.
Before you start, also note if there will be any board replacements needed because of severe damage or discoloration due to water. Is there attic stock available to do replacement, or will you have to add time to fabricate replacement planks?
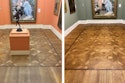
 Before you attempt to sand a floor, make sure it has enough wear layer left for sanding. How much is enough? That depends on your skill and the equipment you use. Just looking at the circa-1969 red oak strip flooring above doesn’t offer any clues about how much wear layer is left. Once an air register is removed, below, you can see how much wear layer remains.

 Clients need to have realistic expectations about what a deep clean and recoat will do—and won’t do. It won’t disguise the dents from dog claws in the white oak floor shown at left, and it won’t eliminate the edge damage and dog claw scratches in the yellow birch floor at right.
Practical info on wood flooring species, finish & wear
Wood as an engineering and building source has been in use for thousands of years. The descriptions in Greek mythology of the prowess of Daedalus the builder and his use of wood, the joy in working it, the beauty of the finished product are, simply, poetry. The fibrous cellular building blocks of wood make it one of the most workable and durable building materials known to humanity. Unlike other building products, wood fibers compress with time and use; the fibers become more dense and harder. Like stone and marble, each piece of wood has its own unique decoration, grain and color. How wood is cut from the log shows different characteristics as well as performance in use (i.e., quartersawn, riftsawn, plainsawn and livesawn).
How do species affect durability?
Both the species of tree and the climate where it grows are factors in how it is used and for what. Railroad ties, baseball bats and floors require different species and have to withstand different stresses than, say, a table or a wardrobe. Over the millennia, woodworkers have learned which species work best for various applications. As with stone, there is a hardness scale for wood species: the Janka scale. Austrian-born American emigrant Gabriel Janka (1864–1932) devised a test that measures the resistance of a sample of wood to denting and wear.Northern white oak (Quercus alba) is the standard medium of hardness for traditional flooring.
Why is species important when choosing a wood floor?
Knowing the hardness and durability of the species one chooses for wood flooring is much more important than it is when choosing wood for furniture—we don’t usually walk on our wood furniture. Our floors, in comparison, are going to take a beating. So, consider lifestyle. For clients with an active family and pets, or who entertain often, choose a harder wood. If the area with wood flooring has high use (traffic), don’t pick American cherry or walnut. Instead, consider a harder species of the same color or consider a stain color on a harder species.
How does finish affect wear?
Keep in mind that the finish on the wood, whether it is a urethane, oil or wax, won’t make the underlaying wood any harder. Basically, you walk on the finish, not the wood. So, choosing the right finish for the application and maintaining it is critical. There is an old tradesman’s saying: “If you can’t cut it, you can’t install it.” Wood, stone, or tile can all be cut, and that means they all will scratch, ding and dent. Finish cannot prevent this from happening completely. Some of the hardest, most durable coatings on the planet are used in the automobile industry, yet we all know our cars can be scratched and dinged.
 The descriptions of Greek god Daedalus, the builder, and his love of working with wood are poetry.Dick Osseman

One company’s deep-cleaning method before recoating
“This was our process to clean and recoat wood floors at Microsoft retail stores,” says wood floor pro David Friedland of Orlando-based Friedland Hardwood Floors. “It became their standard operating procedure because they loved that we didn’t trap dirt between the coats. We used a maroon surface preparation pad on the buffer and buffed it with Basic Coatings Dissolver [photo at bottom left]. Then we added Basic’s Squeaky cleaner to the floor scrubber to clean up the dirt that was removed from the wood [middle photo].” You can see the difference in the photo on the right: the existing floor before cleaning and recoating is on the bottom, and on the top of the photo, on the other side of the transition, is the cleaned/recoated floor.

 If a surface finish is properly maintained, it can last for many years; this one was just recoated.courtesy of Christopher Cook
A quick guide to finishes and their maintenance
Let’s go through wood finishes and their maintenance. But keep in mind that EVERY finish we discuss requires dust-mopping and vacuuming first.
Urethanes: Simply put, polyurethane is a plastic. It is a liquid that, when dry, forms a film. The basic difference between these coatings are the solvents used to keep the plastic in a liquid form so it can be applied. Following are some examples:
- Oil-modified urethane (OMU)
- Solvent-based urethane
- Acid-cured urethane (also called “conversion varnishes” or “Swedish finish”)
- Water-based urethane
Some of the products above have chemicals that are high in VOCs (volatile organic compounds), carcinogens or mutagens. Some are actually banned in certain states; others are very low-VOC. You can see what the VOCs are for every finish by reading its SDS (safety data sheet). Some of these finishes are single-component, while some require an added cross-linker or hardener. Some wood floors that are factory-finished with urethane may contain minerals or ceramics to make the finish more scratch-resistant.
Urethane maintenance: Use the cleaner recommended by the finish manufacturer. Stay away from caustic or acidic cleaners or “home remedies,” like a dilution using vinegar or other concoctions you see on social media from “experts.” When dusting, spray the cloth or microfiber with the wood cleaner, not the floor first. Do not use oil soaps, solvents or acetone on urethane-finished wood. (Be really careful with nail polish remover!) DO NOT use mop-on acrylic refreshers advertised for wood floors; they may dull, scratch, peel/flake and yellow with buildup over time, and will make recoating more difficult. The bottom line: If a surface finish is properly maintained, it can last for many years, and the wood itself can last a lifetime.
Natural oil: Like shellac, oil finishes have been around for as long as people have been working with wood. There is linseed (aka flaxseed), hemp oil, non-perishable nut oils, and so many more. These finishes have come back in use in recent years and generally go under the umbrella of “penetrating oils.” There are single-component and two-component oils (two-component oils cure faster). Penetrating oils are available in a prism of colors and range from zero- to high-VOC. Oils are easy to repair, moderately easy to apply and may be re-oiled as needed.
Oil maintenance: Every manufacturer of an oil finish makes a cleaner specific to their product. They are usually called “oil soaps” and contain both a cleaning agent and oil. If the wood floors or furnishings were factory-coated with oil finish, you can call the manufacturer for recommended cleaners. If you are dealing with wood floors that were oiled on site but you don’t know which finish it is, try a cleaner for one of the oil finishes in an inconspicuous spot. Never use detergents or other types of wood cleaners on oil finishes.
Wax: Wax is made both from natural bio sources, such as palm, carnauba, bayberry, or soybean, as well as petroleum. Beeswax must be mixed with another wax such as carnauba or it will remain sticky and difficult to polish. Of course, natural waxes are more environmentally friendly than petroleum-based waxes.
Wax maintenance: High-traffic areas can be buffed to return the luster. Consumers can rewax and buff areas as needed. Remember to apply the paste wax very thin, then buff. You can buff with a small machine made for home use with lambswool or terrycloth bonnets. Wipe up all spills right away, as wax is permeable; it will become cloudy when exposed to water and may stain more easily. Wax floors can be renewed professionally without sanding and finishing, even repairing light scratches, if the wood is in good condition.
Shellac: Shellac has been used for thousands of years. It is made from the excrement (yes, the poop) of the lac beetle from Southeast Asia. The flakes are mixed with a solvent (usually alcohol). It is still in use, as it gives wood a rich patina, and it sticks to almost anything. It is not very durable and is often overcoated with another, more durable coating. Shellac is available with wax and de-waxed.
Shellac maintenance: If it’s in good condition and just needs cleaning, use a mild, biodegradable liquid dishwashing soap diluted in warm water. Ring the rag out well before wiping. Never use “oil soap” to clean a natural historic finish like shellac. It may be cleaned and recoated as needed, and scratches are moderately easy for a pro to repair.