Some pros shy away from doing recoats because they’re afraid of running into the unknown. Here are some tips that can increase your chances of success.
Step 1: Evaluate the floor
Should the floor even be recoated? Some floors are too worn, like when the wear goes through to bare wood. If they are hand-scraped or have bevels, that adds difficulty. Some people choose to not do recoats because of the risk, and that’s OK. Others pick and choose their recoats to minimize their risk.
Step 2: Discuss the potential for a resand
Before you touch the floor, you need to have a conversation with the homeowner about the fact that you might start a recoat and realize that the floor needs to be resanded. This (and the costs) must be in your contract.
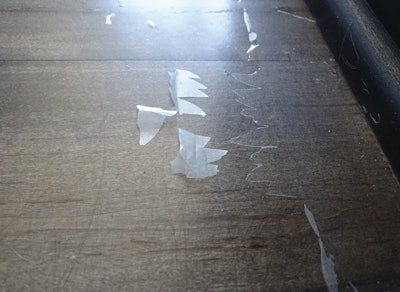
Step 3: Do a test area
Following the same steps you will take on the entire floor, try a test area on the floor. The test spot should be in a main area that’s had all the traffic and cleaning products used on it. If I see anything unusual while I’m spreading finish on my test area, like creep/crawl or fish eyes, I’ll wipe it up immediately and know the floor needs more prep (or it might need to be sanded). After my test area finish dries, I scrape it with a plastic putty knife to test the adhesion.
Step 4: Clean the floor
Before abrasion, you need to clean the floor thoroughly. What this means depends on what’s on the floor. Did they use an acrylic polish? If so, you’ll need a product designed to strip acrylic off of floors. If there’s a penetrating oil finish, you should follow the directions of the oil finish company (although many oil finishes can be recoated with a waterborne finish). For surface finishes, use the cleaning process recommended by the finish you’re going to put on the floor. Trisodium phosphate can be useful because it’s actually a cleaner and mild abrasive.
Step 5: Abrade the floor
This could be with an abrasive or a chemical abrasion system designed for recoating. If the floor is scraped, wire-brushed or has bevels, a simple buff will not be enough. Abrasive nylon bristle plates on a buffer are great for hand-scraped floors, as is the machine with a nylon bristle drum. Oftentimes getting into bevels will fall to handwork. The newer “spongy” foam-backed sandpapers on the market are good for this, as they conform to variations in the floor.
Step 6: Coat the floor
This happens only after you are confident the finish will stick to the entire floor! When in doubt, some pros use dewaxed shellac as a first coat. An isocyanate two-component waterborne finish also has what I call “great stickums”—it will even stick to glass if it’s clean. When in doubt, call your finish rep before you have a problem, not after!