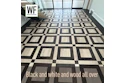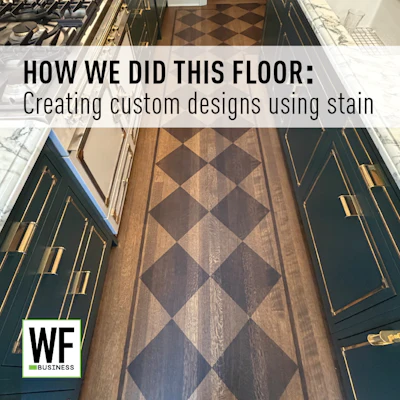
Although at a glance this space might look like a hallway, it is actually a kitchen with more than $140,000 just in cabinets in this little space. The whole condo is over the top, even though it’s only a seasonal home. It is located on the ninth floor of a historical mid-rise building on Lakeshore Drive in Chicago’s famous Gold Coast. When we are working in buildings there, we are typically working with a designer and many times never even meet the homeowner, and this was similar, although I did meet the customer briefly when she poked her head in one day.
The bulk of this project was rift-only herringbone white oak, but they wanted to incorporate the color of walnut into the kitchen in diamond patterns while still seeing the wood grain. Being a wood floor pro, I advocated for using actual walnut diamonds, but the designer’s vision was to have this stain pattern. Before we actually started, they added the idea of the border, as well, which added to the complexity of laying everything out.
This was our first time doing a stain pattern on a scale like this. We actually explored having another company that does faux-painting handle this pattern—we had seen their work on our jobs before doing things like layering colors with floral designs in borders. For this project, though, with just the geometric shapes, we decided it was within our skill set to make this happen.
An immediate concern as we thought about how to handle this was bleedback from the stain under the tape getting into unstained areas—how would we get really crisp lines? We were using oil finish, so I explored different ideas on how I could potentially use the finish and considered doing contrasting colors of squares with the different colors of oil, but if we built up more coats of finish on some squares, I thought the sheen might look different.
So we looked at our options for stains. We were concerned that if we used typical oil-based wood floor stain, it might seal off the wood from the oil finish and also create a sheen difference. Ultimately we decided to do water-based stain for the squares and two coats of oil finish over the entire floor.
I posted on the Real Masters of Hardwood Facebook group asking for any input on the best ways to lay out and tape out a wood floor for a large diamond pattern, and I got a lot of comments that mentioned using “blue tape and a razor blade.” In my mind, I was envisioning that we would map out the lines on the floor and then tape up against the lines.
Then I got a call from my friend Casey Ditsworth (of Woodshed Flooring Inc. in Pearl City, Ill.), and he said to tape the floor, map the lines on top of the tape, and then use a straightedge to razor through the tape. As you do that, the razor creates a tight line and seals the edge of the tape into the channel made by the razor.
Before we did anything on the actual job site, we created tests in my shop with the wood flooring and tested colors for the squares, as well as our entire process of taping, razoring and staining to make sure what we planned was going to work.
Before we started the process you see here of layout and taping, the floor was sanded to 120 with a Mesh screen, then buffed with a tampico. The tampico does a really good job of getting the fine dust out of the floor, and that way when you water-pop, it doesn’t raise the grain as much. Removing that fine wood dust also helped ensure the tape wouldn’t be sitting on the dust instead of adhering to the actual wood.
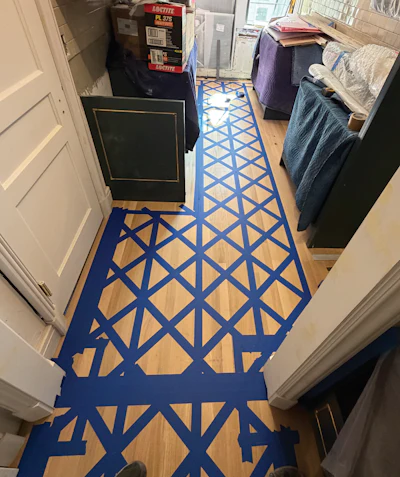

1) Figure out layout and start taping
Given the size of this kitchen, we could have just taped the entire kitchen—you can get really wide tape—but we ended up just taping the areas where we would be placing our lines. We used the most expensive FrogTape you can buy that says it has “Edge Lock Technology,” which is supposed to be good for preventing bleedback.
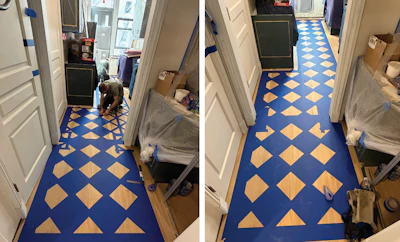
In this photo above you can see we are in the middle of the taping process. We mapped out our center lines and taped those first, then all the diagonal lines. When we made marks on the floor, we used pencils and straightedges—this floor was final-sanded, so I wasn’t going to risk getting chalk on the floor. It took a full day to do the layout on this floor.
To press the tape into the wood, we used credit cards or a room key and really pressed over the tape, smoothing it. We use credit cards any time we tape off trim or baseboards, so this was a similar process.

2) Add tape to fill in
In the first photo above, we are filling in the squares where we aren’t going to be staining, and in the second photo, we have finished taping everything but we haven’t started razor-blading yet.

3) Start the cutting process
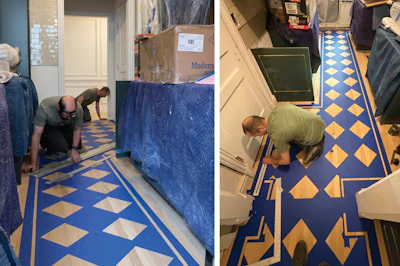
In the photos above we are in the cutting process. We used framing squares and Festool tracks as straightedges to run the razor down the lines for a nice crisp cut. By this point we have checked and rechecked our layout, making sure everything is square and correct. Once you start razoring into the floor, there’s not much going back—that was the terrifying part, putting razor cuts into a freshly sanded floor.

4) What we’re left with
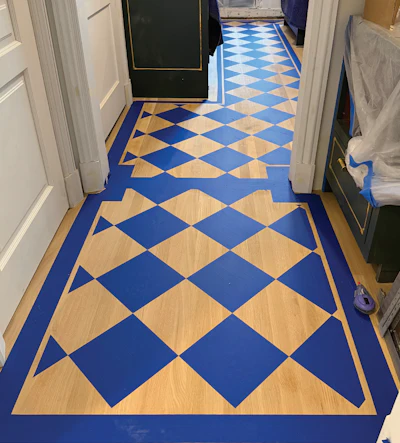
At this point you see above, cutting has been completed and we pulled the tape, so you can see the final pattern of where the stain will go. Once it was all taped and laid out, the razoring took a full day. This tape is activated when it gets wet, so after we cut all the tape out, we used a damp rag to wet all the edges. It would also get wet during the staining process, but we weren’t taking any chances on bleedback, so we decided to pre-wet the tape.

5) Carefully apply stain
While we were staining, we were careful to start in the middle of the diamonds and feather out to the edges to help prevent bleedback. We applied the stain with a white pad by hand, then carefully wiped it even with a rag.

6) Pull the tape (I’m nervous)
In the photos above we have pulled all the tape. I was very nervous about pulling the tape. We had contemplated leaving the tape until the next day, but I was too nervous wondering about bleedback, so as soon as we finished staining, we started pulling the tape. I don’t know if it was the “Edge Lock” technology or the razoring or both, but we didn’t have any touchups after we pulled the tape. Once I saw how clean it was, that was a huge relief.

7) Water-pop and apply hardwax oil
With all the tape pulled, once the stain was dry, we also water-popped the entire floor—any time we use hardwax oil, we always water-pop to make sure it penetrates into the wood.
In this case, I was particularly concerned about the oil not taking as well in the squares we had taped, and about the potential for water-popping pulling the stain, but we had tested all of this on our samples in the shop.
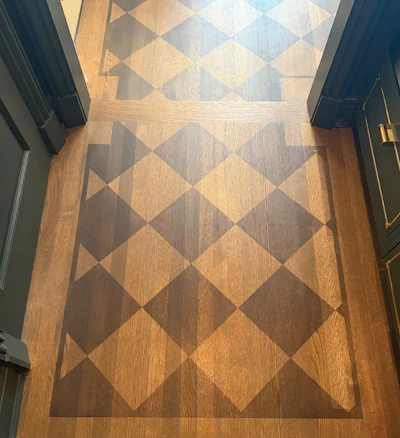
In the photo above you can see the final floor coated with a custom blend of two colors of the hardwax oil.

Final thoughts
After all was said and done, it definitely was more time-consuming and tedious to do it with the stain patterns than using actual walnut diamonds, but I do think it looks pretty cool.
For anyone considering a floor like this, I would caution them the same as I would for every other wood floor: Preparation is everything. Take your time, and make sure the prep work is done properly.
SUPPLIERS:
Abrasives: Lobasand, Norton Mesh | Adhesive, Moisture barrier: Wakol | Edger: Pallmann Gecko | Filler: Loba Easy Fill | Finish: ProCoat Unocoat | Stain: Rubio Monocoat Precolor Easy | Sander (multi-head): Pallmann Spider | Tape: FrogTape | Wood flooring: Sheoga
 Here you can see the wood floors with the herringbone in the adjoining dining room.