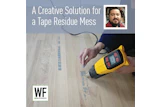
The Problem
I was called out to a job site to inspect damaged surfaces caused by masking tape. Tape applied on walls and the wood floor had pulled off the paint and the floor finish.
The Procedure
The flooring contractor applied masking tape to the walls to hang plastic for dust containment. He then sanded and finished the floor with a urethane finish. After the finish dried, he used masking tape to protect the floor with red rosin paper while workers completed additional remodeling over the weekend. On Monday, he removed the tape from the walls and the paint peeled off along with it. The same thing happened with the floor — the tape pulled up the finish along the baseboard.
The Cause
Improper use of masking tape may damage floors and walls in several ways. The most common is poorly bonded coatings. In this case, I could see the tape was pulling up the last coat of floor finish. Many contractors try to blame the tape and finish, but when the flooring contractor uses incorrect procedures, there may be nothing but gravity holding the finish on the floor. When I asked the flooring contractor about his between-coat sanding procedures, I found he didn't adequately abrade between coats. He buffed the floor with a well-worn "used" screen and neglected to hand-sand the edges. This resulted in poor intercoat adhesion, so the final coat of finish was easily removed by the tape — the weakest link broke.
As far as the wall damage, the contractor didn't carefully select his tape. Instead of using a medium or low-tack adhesion tape, he used a high-tack adhesion brown tape. Additionally, he left the tape on too long. Different types of tape are appropriate for different amounts of time and surfaces.
How to Fix the Floor
In this case, the contractor had to resand the entire floor because the finish damage was extensive. I suggested the contractor try better finishing procedures, such as using between-coat abrading systems — not an old, worn-out "used" screen — and hand-sanding the edges where the buffer didn't reach. I also told him to follow the directions of the finish manufacturer for between-coat abrasion.
In general, if you can isolate the damaged areas,you may be able to hand-scrape the areas and restore the finish as you would in a standard finish repair. However, if the primary adhesion of the finish is gravity, the entire floor should be resanded.
To fix the paint on the walls, the flooring contractor had to pay a painter to touch up the damage — he was just lucky it was not expensive wallpaper.
In the Future
There are many procedures flooring contractors should follow to avoid masking tape problems. One is testing and evaluating the tape in an inconspicuous area, such as a closet, to make sure it doesn't damage the surface. You can evaluate the adhesion after you apply the tape and remove it after 30 minutes. If protecting the floor with red rosin paper, tape it to the baseboard, not directly to the floor. It's easier to touch up the base moldings than to resand the floor. Also note how long the tape can remain on the surface. Tape can be left on for one hour or up to 30 days — read the manufacturer's label and inside the tape core. Don't use the same tape for every application. In most cases, a medium-tack adhesion tape will be adequate. This tape usually has ample holding power and can be left on for an extended period of time while minimizing the potential for damage.
Use low-tack tape for delicate surfaces such as wallpaper or dry, uncured coatings. Keep in mind that it doesn't hang dust containment plastic well, so you may need to use the double-taping technique: Apply low-tack adhesion masking tape to the surface first, then use higher-tack tape over it to hang the plastic.
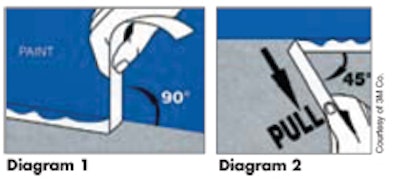
Don't be careless when removing tape. Many problems can be avoided with the proper technique. Moderate removal speeds are best — yanking the tape too quickly may damage the finish, and pulling it too slowly may leave adhesive on the surface. Temperature is also a factor. When it's hot, adhesive transfer is more likely, but it's easier to remove the tape.

When it's cold, the tape becomes brittle and tears more readily, making it more difficult to remove. The angle of removal is also important. Use a 90-degree angle to pull up the tape if there's adhesive transferon the surface. (See diagram 1.) If surface damage is a concern, use a 45-degree angle while pulling the tape back on to itself. (See diagram 2.) If you follow the correct procedures, these sticky situations shouldn't be a problem.