The first time we got involved in a potential floating stairs project, I wasn't scared, but I wasn't really sure how to go about it. I thought about just asking them to find a company that specialized in doing these sort of stairs, but then I told myself: Wait a minute, these stairs are getting more and more popular—if we don't try this project and understand the whole process, we will start losing projects. That was six years ago, and although I thought floating stairs were a trend that would die down, they are only getting more popular.
Architects and designers prefer to work with as few trades as possible on every project, and today they seek us out because they know we can do both the wood flooring and the floating stairs. Here are some of the things I've learned so far about doing these beautiful stairs that are so popular here in San Francisco and beyond.
Types of floating stairs
There are three main ways of doing floating stairs:
1) The more traditional style that has railings on each side. These are built with a thin metal plate between the railings.
2) Treads that are installed above one big metal piece underneath. The metal has plates for the treads that extend on either side, for example, 1½ feet on either side to make a 3-foot tread.
3) Treads that come out of the wall on one side. Metal is installed into the wall and has metal plates that come out 90 degrees from that metal piece. In my opinion, this is the most beautiful way of doing floating stairs.

 These photos show how we build each half of the treads so they are ready to wrap around the plywood surrounding the metal treads. We then install them, gluing them together with yellow glue and then clamping them, as you can see above.
Engineers plan the metal work
We aren't involved in the planning of the structure of the stairs. The engineer, architect and metal fabricator work together to design the stairs. After they have finalized their plans, we meet with them to determine what our requirements are and the thickness of the stair treads. I always advise them to make a wooden frame around the metal treads for us to glue our wood treads to, because the vibration of the stairs can break the glue bond between the metal and the wooden treads. We typically ask for ½-inch plywood on the top, bottom and sides of the metal so we can glue our treads onto the plywood. Before we are able to touch the stairs, the metal work has to be inspected by the city.
In some cases we will do the plywood ourselves. In that case, we'll glue the plywood to the metal and also drill into the metal and screw the plywood onto the metal. That way it bonds really well, makes it easy for us to put the wood flooring on top and makes the stairs more stable—the more layers of plywood on the metal, the stronger the whole structure becomes.
The architects should know the codes
There are special codes for floating stairs, and the architect should know the codes. The main codes are:
1 - The gap between steps cannot exceed 4 inches.
2 - The steps need to overlap each other by at least 1 inch.
3 - Each step has to have a depth of at least 11 inches.
As wood flooring pros, we aren't responsible for following the codes when these stairs are being built—that falls on the GC or architect—but since we have done so many floating stairs now, the architects use me as a resource on the codes, and it helps us get more projects.
 These are in-progress photos from the white oak stairs on the cover of the October/November 2020 issue. In the top photo, with the wall still open, you can see the metal structure in the wall supporting the stairs. The top two stairs in that photo are still wrapped in plywood only; the rest have the two halves of the treads installed; you can see the clamps holding them together while the yellow glue dries. Above left, you can see the mitered ends of the engineered flooring as it wraps the plywood, as well as the Thermo Ply sheathing we use that protects the unfinished stairs for months while other trades are working on the job site. Above right, figuring out how we will reach the stairs to work on them is an important part of planning and budgeting the job.
We always use engineered wood
Once the plywood framing is ready, surrounding the metal for the treads, we deliver the wood. We always recommend engineered wood flooring instead of solid due to its stability. If the wood gains moisture, solid wood will be much more likely to cup, especially on the mitered edges.
RELATED: Step by Step: How to Install Wood Treads & Risers for Boxed-In Stairs
Typically we use 7-inch engineered wood flooring just because that seems to be a standard width. If the budget is an issue, we'll use ⅝ inch instead of ¾-inch-thick engineered wood flooring. We have done one set of prefinished floating stairs, but typically we use unfinished engineered flooring that we sand and coat on-site after installation.
 These walnut floating stairs (below) were unusual because instead of an entire metal tube for the treads, they were filled in with plywood, as you can see in the photo at the top left. This made it easier for us, because we could nail right onto that plywood. The metal fabrication is always precise, so each step is exactly the same. Because of that, we were able to make a jig (above center and above right) in the exact dimension of half of the tread, and we put our boards right over that to create our mitered treads.

Calculate for a lot of waste
When doing floating stairs, you have a lot of waste. On my first floating stairs job, I measured my square footage, added my usual 10 percent for waste and then realized I had made a big mistake—I didn't have nearly enough flooring. Your typical box of wood flooring has a lot of flooring that can't be used to build your floating treads. You can't use the 2-footers, and if you cut down a 5-foot piece, the other 2 feet are waste. The same happens if you cut an 8-foot plank—you have two 3-foot pieces but 2 feet of waste. So you have to ask the supplier what the average footage is on the material, and to be safe, I add anywhere from 30 to 45 percent to the square footage to be sure to have enough long-length planks to build the treads. Additionally, we are careful to match up the grain of the flooring pieces so the treads look as seamless as possible. Particularly when you are a high-end company, you don't want to have to go back to the client and ask for more money when you realize that you made a mistake calculating your materials.
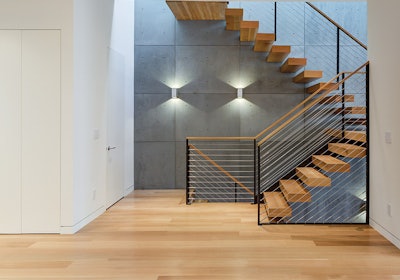
 These rift-only American white oak stairs had unusual metal treads compared with what we usually work with. Because they were so thick, we didn't frame them in plywood and instead just created our mitered wooden treads and slid them right over the metal. At first I was concerned that they might have movement in the future, but they have had no issues. In the photo above right, you can see the rays of natural light coming through the stairs; the fact that floating stairs allow natural light to enter through them is a major reason designers and architects here in San Francisco use them.
 In this photo, if you look extremely carefully toward the top left and bottom left of the side of the tread, you can see tiny filled nail holes; those are the only topnails we use when we build these treads.
Bad vibrations
Before you start actually installing the flooring, it must be engineered so well that you don't feel any vibrations in the metal plates. If the steps have a lot of vibrations, the mitered edges will crack before long, even within a month. In particular here in San Francisco, the stairs have the most foot traffic of anywhere in the house, and if they are vibrating too much, the wood will come apart.
We never install treads tight to the wall. No walls are truly flat, and there will always be some minimal vibration on any stairs, which could make squeaks. (In San Francisco, we also get major vibrations from earthquakes!) We keep at least 1/16 to ⅛ inch of an opening between the tread and the wall, which actually looks really nice. You will see where some contractors put caulking in the gaps, but within three months the caulking cracks and looks ugly, so I think it's better to stay off the walls.
Protecting the stairs during construction
Because of construction schedules, we always install the stairs and then come back and do the sanding and finishing after the rest of the trades are done. We've found it's extremely important to be sure the stairs are protected well in between installation and when we come back to sand and finish. On the first stairs we did, the builder said he would protect them after we had installed them (the stairs were only rough sanded at that point). He covered them with rosin paper, and after one month of all the other trades going up and down the stairs, most of the rosin paper was gone and there were areas on the stair edges that had chipped; we had to replace a couple of the steps.
Now, when we do a floating stairs job, I tell them that they have to pay for covering the stairs properly, but we will be the ones to cover them and will be responsible for any imperfections. When we cover the stairs, we use a brown paper that is similar to rosin paper (we never use rosin paper, because if it gets wet from a tile contractor or someone else, it can bleed its pink color into the unfinished wood). Then we cover that paper with Thermo Ply sheathing. We don't cut it all the way through but instead cut it just enough so it can wrap down around the treads. Then we tape that to make sure it all forms a tight covering around the treads and won't come apart during the two to three months when the other trades will be on them (see the photo on page 40).
RELATED: Building a Stairway to ... a Niche for My Flooring Business
How we install them
Before we build the treads, we leave the wood flooring at the job site about a week to make sure it's acclimated to the job site. Usually we have one room in the home that becomes our workshop where our saws are set up so we can build the treads on-site. To create our treads, we cut all our miters and assemble them using tiny nails and yellow glue (we use Titebond). We glue up the front half and back half of each tread (see the photo on page 39). We don't install them right away but instead allow plenty of time for them to settle and the glue to completely dry.
When it's time to install the treads, we cover the plywood in yellow glue and put on the half of the tread with the tongue. Then we slide on the groove piece, using glue and clamps to secure them during drying. We never use any nails except the micro ones that we put into the mitered edges. If you were to put a 16- or 18-gauge nail into these stairs and then use filler, it would look ugly. When I look at the finished stairs, of course I see the seams, but the client should aesthetically just see one piece—that's the look we are trying to achieve.
Sanding and finishing
As I mentioned, with the exception of one job, we are always sanding and finishing our treads on site, and we plan to do the sanding and finishing at the same time as the rest of the flooring so that the color of the stairs and flooring will be an exact match. Having to sand and finish all sides of the treads means that you usually have to plan for and budget for scaffolding.
We've used oil finishes on these projects, but typically we use a commercial-grade waterborne finish. You must be very careful and slow when coating; we have two people on each tread: One on top and another person on the bottom following and making sure there aren't any finish drips. We do the final coating right away on the bottom of the treads, but because the stairs get so much traffic, we wait to do the final topcoat on the tops of the treads until the project is almost final. Any job with floating stairs is extremely high end, so we want to turn over the completed project in as flawless a condition as possible.