
Woodworking has been an interest of mine for around 50 years, starting during my final years in high school. Over that time it has evolved from a hobby to a one-man millwork shop that has kept me really busy in a trade I still enjoy. For full disclosure, I've never installed or finished a wood floor in my life! However, I previously had a job working for Emerson Hardwoods at their Crosscut division, and the same building housed their flooring division, Emerson Hardwood Floors. I met a lot of the local flooring contractors, and they would occasionally ask if I could make a custom molding, transition piece or some flooring-related item not usually in stock, including mitered returns on stair treads. My friend Kevin Delay, a master stair builder and owner of Rutledge Staircase, showed me a great way to install mitered returns, which I still use to this day. This is a process that I wanted to share with flooring contractors so they could offer their customers mitered returns on treads they might be installing on a flooring job. It's pretty straightforward woodworking, and after taking special care to make the jigs, you can repeat the process hundreds of times, like I have, with great results. Here's how I make my mitered returns.

Step #1
The first step in this process, pun intended, is to organize your treads so that the best side is facing up. Then determine what type of return is needed, left or right, and lay the template on the tread. I made mine from 1/2" Russian birch ply. The stop that hooks over the bullnose is also attached on the other side so the template can be used for left or right returns. Take your time when cutting the template for the female portion of the return and also with the matching male template, making sure they are an identical match.

Step #2
This batch of eight treads are all going to be left-hand returns. Lay the template on the tread and mark a pencil line on the edge of the tread.

Step #3
Cut the waste side of the tread on the pencil line as straight as possible with a jig saw.

Step #4
Back off the template from the end cut on the tread so the tread stock will overhang the template by about 1/16". The piece on the top of the template is also 1/2" Russian birch and brings the surface level with the stop so that you can run the router base without getting hung up. This top piece can be used on the other side in the same manner when a right-hand return is needed.

Step #5
Clamp the tread, template, and 1/2" filler piece together on the front and back of the tread with enough room so the router base doesn't hit the clamps when trimming the end. Shown is a spiral-top-bearing flush trim bit. This particular bit is not being manufactured anymore, but almost any top-bearing flush trim bit can be used. The bit I presently use is a Infinity brand model 06-692 upcut/downcut design that cuts super clean with little tearout.

Step #6
The progress of the cut here shows how the flush-trim bit cuts along the template.

Step #7
Here all eight treads are cleaned up and ready for the return pieces to be attached.

Step #8
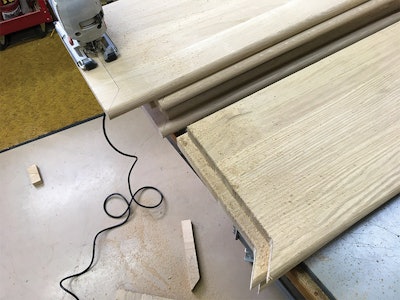
Rip the return stock from an extra tread. Try to rip a solid piece and avoid the glue line in the tread for the return pieces. In this case I'm ripping it about 15/8" wide, which will give me about 1/16" overhang on my jig for cutting out the male sections of the returns.

Step #9
Rough-cut the return blanks to length. In this case I cut them at 14".

Step #10
Rough-cut the 45-degree miter. Arrange the mitered return pieces so that the best side is up when being attached to the edge of the tread.

Step #11
Here the rough-cut tread returns are ready to be milled on the jig template.

Step #12
This is the jig I use for cutting the male return ends; the 45-degree rounded miter matches the template I used for cutting the tread ends. The distance from the stop block to the edge of the template is 19/16".

Step #13
This is the underside of the template jig. You can see how the rough-cut return blank slightly overhangs the template.

Step #14
Mounting the same bit in the router table I used for cutting the tread ends, the router bit cleans the return insert to match the template.

Step #15
Now the return end is milled to match the template.

Step #16
Here I am lining up the milled return end in the milled tread end.

Step #17
Glue both surfaces before clamping.

Step #18
Apply light pressure on the clamps running the length of the tread until the glue just squeezes out, then do the same with the clamp running the length of the return to pull in the miter. Check that the top face of the return is even with the top of the tread before tightening the long clamps.

Step #19
The Bessey clamps I use allow me to stack all the glued-up treads and minimize space.

Step #20
Now all of the treads are out of the clamps and ready to be sized and sanded.

Step #21
I like to sand the little protrusion where the return meets the front of the bullnose tread. A hand-sanding block works just as well.

Step #22
Sanding the treads with a wide belt sander makes the process a lot easier, especially for a stack of treads with returns. You can possibly rent some time with someone who offers this service, or you can get very good results with a portable handheld belt sander.

Step #23
Cutting off the excess return to 13", this leaves a 11/2" projection from the back of the tread.

Step #24
You can see three treads cut to width, waiting to be bullnosed.

Step #25
Here I'm setting up the 1/2" roundover bit in the router table to finish off the bullnose. This bit in a handheld router will also work, even though it makes a little more sawdust to clean up.

Step #26
Now I'm running the edge of the return past the cutter on both sides and also both sides of the front bullnose so they all match.

Step #27
Now all treads are bullnosed with the router, waiting for final sanding.

Step #28
After sanding all the bullnosed edges, run the sander on the back-side edges of the tread about the width of the pad. Then, turning over the tread, sand the whole top face, paying close attention to the cross-grain scratches across the return left by the wide-belt sander.


Step #29
Here are closeups of a finished mitered return (top) and the backside of the finished mitered tread returns (bottom).

Step #30
Here are the finished treads with mitered returns, ready for installation. In the pic on the next page you can see similar treads installed that are right-hand returns.

Thanks for checking out the process I use, hopefully you can utilize it in your flooring business. No doubt there are other ways to create mitered returns, but I'm glad I can share the method I use. Best of luck, and many "happy returns!"
|
|
Watch the author explain this process step by step:
RELATED: Stair Treads Dos & Don'ts
Epic mitered tread fail
Just for fun, here's an example from some returns another company delivered to a customer a few years back. Needless to say, they got a hold of me to make some returns for them that could actually be used.