Making the Cut
We have always started our sanding process with 36 or 40 grit—is that correct?
Russ Watts, sander specialist at Denver-based Palo Duro Hardwoods Inc./Lägler USA, answers:
Every job is different, so you should start with the highest grit possible that does the job. With new installations, it may be possible to start with 50 or 60 grit. This all depends on the amount of over/underwood and the overall flatness of the subfloor.
The purpose of the first "cut" in any sanding job is to get the floor as flat as possible. The subsequent cuts are to remove the marks from the previous grit. The higher the starting grit, the less effort will be needed to achieve a great finished floor. Also, remember that the amount of wood removed from the floor affects the lifespan of the floor—the more wood you remove, the less wear surface you leave on the floor.
No matter which grit you start with, you should use, at minimum, a three-step process, and never skip more than one grit per step. For example, typical correct sequences would be 40-60-80, 36-50-80 or 60-80-100. Remember, the starting grit depends on each individual floor.
Measuring Moisture
I recently started requiring my crews to use moisture meters on all of our job sites, but it doesn't seem like there's any consistency to the readings they are getting. Are they doing something wrong?
Frank Kroupa, technical advisor at the NWFA, answers:
That's great that you're requiring moisture testing on all your job sites. Now, you need to make sure everyone is using your moisture meters correctly. If you have several crews, it helps for them to all have the same type and brand of moisture meter. It sounds obvious, but make sure you read the directions for that specific meter. Simple things can easily go unnoticed. For example, for pinless meters, many people don't realize that you need to hold them down with 3 pounds of pressure. That can make a difference in the reading of two to three points, which is considerable. With pin meters, to get an accurate reading, the pins must be pushed down to their full depth, and the pins should go with the grain. Also, many pin meters need to be adjusted for temperature (the default setting is 70 degrees).
Meters come with a default setting, which is usually Douglas fir or pine. The readings need to be adjusted for the specific gravity of the species you're using. This is usually pretty straightforward with your domestic species, but it can get more ambiguous with many exotics, which may have the same name but be from many different subspecies.
You also need to take plenty of readings—at least 20 for every 1,000 feet, making sure you check the most likely spots for moisture, such as by doorways, windows and chimney openings, and find the average reading. Documenting your readings is extremely important. When I use a pinless meter, in every place on the subfloor I take a reading, I trace the outline of the meter on the floor and write down the date and the MC reading. Other people actually take digital photos of the moisture meter and the readings. When I go back to retest the moisture, I take the readings in the exact same spots. I do the same thing with the flooring—if I test certain boards from a bundle, I retest those same boards.
Once you are using the same meters correctly, you can develop your own historical data, learning what readings are expected in your geographic area for the subfloors and the flooring you normally use. Having this data as a comparative reference is extremely useful. And, if you find that one meter is consistently giving readings that don't seem right, you'll know that it probably needs to be recalibrated or replaced.
Maintenance 101
What should I tell my customers when they ask how to maintain their floors?
Dave Posey, technical director at Hastings, Mich.-based Floor Style Products Inc., answers:
Most people think they need to spray some special cleaner on their wood floor every day, but that's not the case. Hardwood floor maintenance is simple.
The most important thing is to keep grit off the floor, since any grit that gets tracked into the house will leave scratches when it's walked on. All doorways should have walk-off mats or rugs, and the floor should be vacuumed or dust-mopped with a microfiber mop as often as possible. If the vacuum has brushes that contact the floor, they should be turned off before the vacuum is used on the wood floor.
Weekly, the floor should be cleaned with the cleaner recommended by the finish manufacturer (note that most of them don't recommend oil-based cleaners). Most finish manufacturers offer their own maintenance kits, including a cleaner in a spray bottle and a microfiber mop. The floor should be sprayed (not flooded) with the cleaner, then cleaned with the microfiber mop. The mop heads can simply be thrown in the washing machine when they're dirty.
I highly recommend providing each customer with a maintenance kit when you're done with the job. That way you'll get them in the habit of using the right cleaner. Just make sure they wait until the finish has cured (check the finish manufacturer's directions) before using the cleaner on the floor.
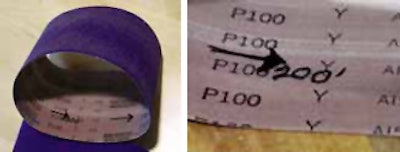
Trick of the Trade: Write This Down

At the end of a long day of sanding, contractors often take all the abrasives and throw them in the trash, even if they have some life left in them. Or, they keep all the used abrasives and use them on the next job until there isn't an abrasive particle left. Neither extreme is a good option. Here's a good habit to get into for sanding belts that aren't worn out: Mark the used belt with how many feet it was used on and the direction it was running on the machine. That eliminates the guessing game the next time the belt is used.