|
|
In my inspection business here in the Northeast, there’s a type of complaint that has increased in numbers over the years: problems with “engineered” flooring exposed to low RH for extended periods of time. Issues can range from face splits to end-gapping, but the most common one of all is what the industry now refers to as “dry-cupping.” In this article, I’ll explain exactly what forces (literally) are at work to cause these issues, and also how they can be minimized or prevented. These problems can happen with any engineered wood floor, but as our example, I’m going to use the most common engineered flooring I see: a sawn ¼-inch-thick wear layer (lamella) of white oak adhered to Baltic birch plywood.
Factors that affect performance
The factors that affect the performance of this category of “engineered” flooring are:
1) Overall width of the flooring: Wider pieces of wood shrink/swell more than narrow pieces.
2) Shrinkage factors of the components: Tangential/plainsawn pieces shrink/swell more than radial/quartersawn pieces.
3) Density and strength factors of components: Denser/stronger wood creates more force during shrinking and swelling.
4) Thickness of the wear layer (lamella): Thicker pieces of wood create more force during shrinking and swelling.
5) Magnitude of moisture content (MC) variation: This is critical when the wear layer is adhered to the plywood core and/or at the time of the initial sanding when site finishing. The greater the amount of MC variation, the greater the amount of shrinking or dry cupping or face-splitting.
Why dry-cupping happens
During normal seasonal changes in interior relative humidity, wood changes MC. That, in turn, causes wood to shrink and swell.
White oak (Quercus alba, as well as other species colloquially referred to as “white oak”) has an estimated shrink/swell factor in the range of 10% (tangential or plainsawn) to 6% (radial or quartersawn) from its fiber saturation point of 28% to oven dry at 0% MC. (These numbers can be referenced in the “Wood Handbook” by the U.S. Forest Products Lab, which is available in PDF form for free online.) Baltic birch (Betula pendula) plywood has an estimated average shrink/swell factor of 0.5%.
When MC varies from a high of 9% (50% RH) in the summer to a low of 4% (17% RH) in the winter, the result would be shrinking. Bear with me while we go over the results of the relatively simple math:
The expected shrinkage perpendicular to grain for 5-inch solid white oak boards would range from 0.039 inch (radial/quartersawn) to 0.075 inch (tangential/plainsawn). The expected shrinkage for Baltic birch plywood 5 inches wide would be an average of .0036 inch. The expected shrinkage for Baltic birch plywood 50 inches long would be an average of 0.036 inch.
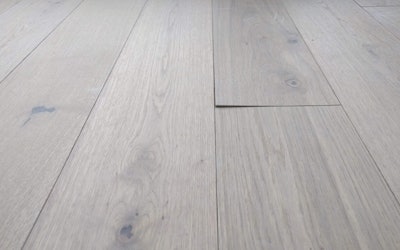
As the 5-inch solid white oak face shrinks 0.039 inch, the Baltic birch backing is shrinking only 0.003 inch. This asymmetrical shrinkage generates stress, which results in the individual boards becoming concave on the exposed face: cupping, or, in this case, what the industry now refers to as “dry-cupping.”
When cupped floors are sanded
If the floor is sanded while it is cupped, it is possible that individual boards will become convex when interior RH increases during the summer. The wood flooring industry refers to this convex appearance as “crowning.” Crowning is not as easily observed as cupping of the same magnitude. Also, lower reflectance of the surface reduces the visual impact of any surface irregularities.
What happens with the tops of grooves
The process of gluing the wear layer to the plywood backing restricts, to some degree, the dimensional changes in the wear layer. But with a standard tongue and groove for this type of flooring, there is little or none of the Baltic birch plywood left under the portion of the ¼-inch white oak wear layer along the groove edge—and nothing to restrain movement of that portion of the wear layer during seasonal shrinking and swelling. This can result in accentuated distortion in shape along the groove edges. The adjacent tongue edges are not similarly distorted, and the groove edge protrudes slightly above the smooth finished surface, which increases the visual effect.
RELATED: The Cause of 'Dry-Cupping' in Engineered Wood Floors
Why end gapping happens
Because of its construction, plywood dimensional change is isotropic (the same) on its X (0.5%) and Y (0.5%) axes. Solid wood dimensional change is anisotropic (not the same), with different shrinkage on the three axes: tangential (10%), radial (6%), and longitudinal (0.1%). The Baltic birch plywood backing shrinks at 0.5% as the white oak wear layer shrinks 0.1% longitudinally. The net effect can be some end gapping proportional to individual board length during winter’s low-RH season. This asymmetrical longitudinal shrinkage can also result in bowing of any loose boards: The ends of some individual boards rest on the floor surface while the middle of the board is raised up.
Why prefinished flooring has bevels
An additional factor that exacerbates the appearance of seasonal shape changes of this flooring is the flush, square-edge joints formed when the floor is sanded and finished on site versus a beveled or eased-edge that is used with prefinished wood flooring. When exposed to RH that is low enough to cause a substantial drop in MC, the appearance of the site-sanded, square-edged surface transitions from being uniform, flat, and monolithic (after it is initially sanded and finished) to one that accentuates each individual piece of flooring, with parallel lines running along the longitudinal axis of the floor. These changes in shape are normal, but they are not as noticeable when the edges are beveled/eased. Of course, the reason prefinished flooring has bevels or eased edges is to minimize the change in surface appearance during seasonal changes in moisture content (or with uneven subfloors).
Keep in mind that all of these changes are caused by changes in MC that result from NORMAL seasonal changes of interior RH, and since changes in MC are directly related to changes in environmental RH, it is possible for changes in shape to continue to occur seasonally.
How can we reduce dry-cupping?
One method of reducing this differential shrinkage is to increase interior RH, which decreases the magnitude of MC loss and resulting shrinkage during the winter heating season. In the example we discussed above, maintaining interior RH to be no less than 30% would result in a greatly reduced MC difference from summer to winter. Cutting the MC difference in half from 4% to 2% reduces shrinkage of the face from 0.039 inch to 0.019 inch. Less shrinkage also limits the amount of force that causes the cupping.
The ultimate preventive measure is to purchase engineered flooring from manufacturers that dry the lamella to 4% or 5% MC before it is adhered to the core, thereby preventing excessive shrinking when exposed to low RH on-site.
Low RH environments are tough on engineered wood flooring. Remember that in order for warranties to be maintained, most wood flooring manufacturers stipulate that interior RH be maintained in the range from 35% to 55% for both solid and engineered wood flooring.
RELATED: Mixing Water And Wood: Why Relative Humidity Matters