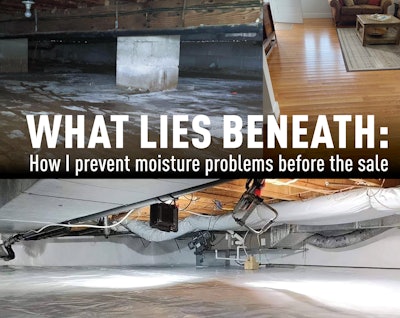

On most estimates I do, I go in the basement or crawl space—even if we're not installing and will be just sanding and coating. I want to know what's going on down there, because if you don't control the moisture underneath your wood floor, you're going to have problems. If nothing else, I can instruct the homeowners regarding better things to do that will help their entire house and their health, and I might even potentially prevent a home fire. I find that most homeowners are unaware and have not been educated about what's actually going on in their house. On the following pages I show you situations from real jobs and how we dealt with them.
My perspective on partners:
I have people I consider partners on my jobs: a moisture pro, Gary Szymanski of Ocean Township, N.J.-based Nash Everett Environmental, who handles things like indoor air quality, dehumidification, and crawlspace encapsulation; and a structural pro, who does French drains, joists and things like that. If I'm going to call out the issues in potential customers' houses, I need to provide solutions, and these guys can speak with authority about what needs to be done. Many times if I call Gary during an estimate, he will come out that same day, and sometimes he's been able to come while I'm still at the estimate, which makes me look competent. It's important to find out what the issues are and if the customer is willing to resolve them. I'm not going to work on a wood floor that's just going to end up with moisture problems. I've had a few customers who get overwhelmed by all the information, but the majority really appreciate having the information I'm giving them. It's even happened that people have hired Gary but not me—but I figure if nothing else, I helped educate the homeowner, which makes me sleep better at night. On the following pages are some real-life examples.
The moisture expert's perspective
by Gary Szymanski

I think for wood flooring contractors, not addressing these moisture issues is largely based on fear of not getting the job. My relationship with Adam works because he's a stickler for quality and wants his wood floors to last without issues. I get the majority of my work either because someone is having health problems from mold or because Adam has referred them to me to address moisture problems in their house.
People don't mind spending money on beautiful wood floors, but nobody likes to spend $10,000 on their crawl space. Nobody goes in there, so they aren't aware of any potential issues happening there—but moisture in your crawl space or your basement affects your wood flooring, the other building materials in your house and your health. When there's a moisture issue, you can bet there will be a mold issue right behind it, and then there will be rot, and then structural degradation.
A typical problem floor

Believe it or not, I didn't get called to look at this job because of the cupping. The owner of this rental was upset about that scratch you can see in this photo. The floor's moisture content was between 12–14%. I told her we couldn't refinish the flooring unless we figured out why it was cupping—if we sanded it like this, we would remove most of the life of the floor, and then it might just cup again. This is a typical example of a home in this area that was flooded by Hurricane Sandy and then never properly taken care of by what I call "storm chasers"—fly-by-night contractors or a contractor who just doesn't understand the value of a clean and dry environment below your home.
This was the crawl space


As soon as I peeked in the crawl space to see what was underneath the wood floor, I could see it was horrible: The slab was obviously wet, and I have no idea what that white blob in this photo is. On the underside of the plywood subfloor, you can see it's loaded with mold. I'm very sensitive to mold, but surprisingly, I couldn't smell this crawl space from the upstairs. Gary works with a nurse investigator who helps people who don't realize that in some cases, their mystery illnesses are caused by the toxic environments in their homes—like this one.
The problem with vented crawl spaces

You can see that this crawl space is vented—the vents allowed dirty brackish water to enter the home from Hurricane Sandy, and that was never taken care of correctly. That vent also allows moisture to come into the crawl space, as humid or dry as that is. You can also see the insulation falling down, and efflorescence on the bottom of the block wall. The efflorescence comes from water dissolving salts and moving them to the surface of bricks or concrete. That's a telltale sign that there's been moisture in that area ... which always leads me to wonder: Is it still there? Usually it still is (on this job, the answer was obvious).
Although this was the state of the crawl space, the homeowner chose to not resolve these issues in this rental home, and I walked away from the job. In cases where the homeowners do choose to hire someone like Gary to fix these issues, I tell them it generally takes two to three months after that work is done before we can sand their floors—we need the moisture meter readings to be on target before our work can begin.
Also common: A bad DIY job


When I look at a house, either I see nothing done to take care of the crawl space (like the job above) or I see it done incorrectly, like this one. Here we have a house where either the builder or the homeowner tried to cover the dirt but did it incorrectly; they probably went to the big box store and bought 6-mil plastic—not a proper vapor barrier. You can see they sealed the seams with duct tape, and at the walls, there's a gap.
I probably see only one job out of 200 where the crawl space has been properly addressed.
A solution: crawl space encapsulation
by Gary Szymanski
Every home has its own challenges. This one is a typical example for this area: It was built on a historic inlet that was filled in with soil, and as the tides rise and fall, the crawl space was filling with 1 to 2 inches of water twice a day. We also have a lot of wetlands in this area, and in that case, the crawl space might not fill with water, but the block in the foundation will become saturated. Any of these homes are good candidates for crawl space encapsulation.
Many problems: The "before" pic

Steps for remediation

HEPA VACUUMING: Mold remediation is always first: Here the guys are doing HEPA vacuuming of all the wood, plumbing, etc.

POLY: To start encapsulation, we grade out the floor and lay a 12- to 20-mil poly reinforced vapor barrier. It's thick—almost like a pool liner. We cover the entire ground and go up the foundation to the top of the concrete foundation, where we seal it and also use a nail gun—you don't want it to eventually fall down from its own weight. We also seal off all the vents with thick foam.

BRINGING IN CONDITIONED AIR: The temperature and relative humidity in the crawl space should be within 5% of that in the living space above it. To do this, we cut a vent in the floor upstairs.

BRINGING IN CONDITIONED AIR (cont.): The vent we just cut connects to this ventilator (above left), which has a humidistat to monitor the air; it adjusts accordingly. The ventilator works in tandem with the exhaust fan (above right) to then push the air outside through the vent you see at right.
People will ask: What about dehumidifiers? In a case this extreme, of course, a dehumidifier simply isn't enough, and in many cases, it just isn't. Also, a system like this doesn't require any maintenance in terms of changing filters and emptying water.


THE "AFTER" PHOTOS: We always say that you can drink tea in our crawl spaces when we're done—you want it to be that clean and comfortable. We have a saying in our business: "Water always wins" ... but we do our best to not let that happen. I visited this crawl space one year after we did this job, and it's still perfect. Of course, the tides still rise around this foundation twice a day, but now they aren't penetrating this space.
The job where we did everything: The "before" photo

Sometimes my estimate turns into major work, and I become less like a floor guy and more like a GC. That's what happened on this project on the following pages, which was one of the most involved projects we've had to date.
This house was a real gem. It was an 1890 house and they really wanted solid hardwood flooring. When I got there, the old 3-inch pine tongue-and-grooved board subfloors upstairs were really wavy. Usually houses like that have white pine wide plank on an angle, but this had vertical-grain heart pine (I actually saved a bit to use in repairs in other jobs since we have a lot of vertical grain heart pine around here—I have a storage unit that smells wonderful!).
This is what the basement looked like when I got there to bid the job—it was a real mess. Everything I've ever had to do in a house we did on this job: We ripped up all the subfloor, replaced all the joists, put in a dehumidification system, installed footings in the basement walls and installed French drains. Yes, I'm just the floor guy, but I try to look at everything and fix it if they will let me. It's amazing what people don't realize is wrong with their house! Sometimes they don't know what they are getting into when they call me, but the things we end up fixing don't just help the flooring I'm going to be installing, they are important for the health of the owners and the structural integrity of the entire home.
Efflorescence

This is a brick foundation wall of the house in the basement. You can literally see the efflorescence coming through the brick. Recently I went to a unique situation where the carpet tiles had cupped, and efflorescence was coming through the tiles. Underneath the tiles there was standing water! All of these issues are avoidable.
Hydrostatic pressure

In this photo, you can see some Portland cement coating that was coming off of the basement foundation walls because of hydrostatic pressure (water being pushed through the walls).
Dealing with the standing water

In the photo at the top left, this is what the basement looked like at the wall edges when we were bidding the job. Because there was a whole lot of water that had to be managed, we had to call in the structural contractors, who ended up putting in two sump pumps and French drains. In the two photos at top right, the concrete slab wall has been skimcoated with a special Portland cement (visible as that dark gray on the walls) that can handle the hydrostatic pressure. This house was so old that there were no footings under the foundation walls. The slab itself has been cut into, and you can see that between the OSB sticking up and the walls they have poured new cement. Against the OSB you can see at this point we still have standing water. This was a unique situation and the first time I have seen them have to put in footings before installing the French drains. The photo below shows a more typical French drain situation without pouring footings.

Checking joists

When we bid jobs we use laser lines to see how bad everything is before we give them the numbers. We always check the bottom of the joists against themselves and each other—then we know how bad the subfloor is before we rip out the existing flooring. A large part of the problem in this house was that the original joists were cracked. They were too small and too long; the deflection was crazy. I wasn't around in early 1900s when they were building, but it seems like back then everyone was OK with deflection and floors that weren't flat. On this job, every single joist was cracked (you can see a crack indicated by the red arrow), so the structural contractor replaced every joist with LVL (laminated veneer lumber) manufactured beams.


Looking at lally columns

I see a lot of crazy structural things when I go in people's basements. We frequently see what are supposed to be temporary lally columns in the basement that have been left to be used permanently. Lally columns that have pins, (like the two top pics here) are intended for use as temporary columns. The entire weight of the building on that column is depending on the strength of a pin or a thread. Permanent columns (like the two lower pics) have a concrete core and are set permanently into a metal plate.
Humidification is vital

This is the humidification system that we put into the basement on this job. On most jobs I feel comfortable knowing what to recommend for a humidification system, and usually they do it. These systems aren't cheap, but they are pretty simple to install, and most people can hook it up themselves. Having it is peace of mind long-term and improves the indoor environment for the wood floors and the people living there, too.
Long-term monitoring

I encourage customers to use a monitoring system (I use Fidbox) that is installed with the floor and reports and records conditions remotely. I don't have it on every job, but I do when the project is over radiant heat, and if a new project is big enough, I'll throw it in with the job. I also have two builders I work with that give me so much work that I include it on all of their jobs. I can log into the app and see all of the jobs where they are installed. It isn't inexpensive, but if you have a situation where it ended up saving you $50,000, it would be worth it.
The "after"

This is how that basement looked after it was finished. There's a dehumidifier and a humidification system, every joist has been replaced, footings have been installed at the bottom of the foundation walls, and French drains have been installed. This job also had a crawl space area that was encapsulated. This is a basement that will actually have structural integrity and won't have moisture problems, making it healthier for my wood flooring and for the people who live there.
Peace of mind: LGR dehumidifiers

Over the years I’ve sometimes learned the hard way about how to deal with moisture. Once I had a 31/4 white oak install in new construction, and the builder promised he would bring in a dehumidifier but instead put a portable AC unit there instead. I put too much faith into the all-in-one adhesive’s promises about blocking moisture, and the floor cupped. (After it dried out and we refinished it, they installed a dehumidification system.)
Today we own two LGR (low grain refrigerant) commercial dehumidifiers, and if the builder hasn’t taken control of the environmental conditions in the basement, we use one or both of them (depending on the size of the space) to reduce the RH to be safe for our flooring. Builders must turn on the heat but don’t always run dehumidification (or humidifiers), and this eliminates those issues. They cost about $2,500 each, and I should probably charge for putting them on jobs, but I don’t—they are worth it for my peace of mind. In the new construction at right, when we got to the basement, it smelled horrible and measured 70% RH. These LGRs quickly brought the RH down, and after we installed our flooring, the homeowners installed an in-line dehumidification system.—A.B.
Why you need to have good trade partners

This is a gas line under the existing floor; we just got lucky to not hit it before we found it. About a month ago we did hit a gas line like this; there was a hump in the subfloor and when we cut into it right where the wall meets the subfloor, we smelled the gas. Nothing blew up, but five fire trucks and six police cars showed up. It took about an hour for them to leave after they shut off the gas. Luckily, because I refer so much work out, I was able to call a plumber who was willing to come quickly in an emergency and get it repaired.
I will not do any work that should be done by another trade: When I’m bidding, I tell customers that no floor guy is licensed to connect or disconnect anything when it comes to natural gas or water. If a floor guy tells you it’s OK for him to disconnect your toilet, he’s full of B.S., and I don’t care what his price is. Why put yourself at risk? I think that, as a wood floor pro, you need to have these trade partners, and without them you can’t be successful.—A.B.