Secrets to a Flat Floor
What can I do to ensure the floor I am sanding turns out flat?
Mike Summers, technical director at Greensboro, N.C.-based UFloor Systems Inc., answers:
Four factors contribute to obtaining a flat floor:
1) Maintenance. If your sanding machine is not cutting properly or is suffering from deferred maintenance, even your best effort could be for naught. Common problems include out-of-round wheels, damaged or out-of-round drums, ill-performing tension roller systems, bad bearings or other issues that cause excessive vibrations.
2) Angle of attack. The first cut with your sander should be at a 7- to 10-degree angle to the direction of the wood in order to reduce drum deflection caused by overwood, cupping or crowning. Making the first cut parallel to the direction of the wood often produces chatter marks that will be transferred from one pass of the sander to the next.
3) Feathering. Many sanding errors are the result of “drum marks,” sometimes referred to as “stop marks.” This occurs when the abrasive contacts the floor but the machine is standing still. The art of easing the abrasive on and off the wood floor is referred to as “feathering.” Be sure your machine is in motion as you feather the abrasive into contact with the wood floor, and feather the abrasive off the floor before you bring the sanding machine to a stop. Perfecting your feathering technique is critical to a craftsman-quality job.
4) Gait. The final component is how smoothly you walk behind the machine and how quickly. Uneven or jerky motions can easily be transferred to the floor through your sanding machine and result in an uneven sanding job. Also, you need to maintain an even speed going forward and backward. Different speeds may result in uneven sanding lanes, which, if not erased by the buffer, may reveal themselves when the finish is applied. Sometimes then the visual result is blamed on the finish coats.
Technical, you bet. Remember, the biggest variable in the process is you. Happy sanding.
Do Fasteners Cause Gaps?
I did a floor about a year ago that developed gaps that remained through the summer. The homeowner objected and hired an inspector. The floor showed gapping throughout about 50 percent of the floor, and the inspector said the gapping was caused by the lack of fasteners. Is that possible?
Mickey Moore, technical director at Memphis-based NOFMA: The Wood Floor Manufacturers Association, answers:
Gapping is caused by shrinkage of the wood, and fastening does not cause the wood to shrink. So no, it is not possible for lack of fasteners to have specifically caused the gaps. The gapping does indicate the flooring was at a higher moisture content when installed. This is another issue that should have been identified by the inspector.
While lack of fastening won’t affect how much boards shrink or expand, it may allow boards to move, and that can cause a problem. For example, if two boards shrink individually and now there’s a 1⁄64 gap along each board, that probably will not be an issue. But if those boards shrink as one and also move away from an adjacent board, that gap is now 1⁄32, and that may very well be objectionable. It’s the same overall amount of gapping, but now it’s located in one place.
Sometimes lack of fasteners can also be associated with panelization. If you get a group of boards that are stuck together and they aren’t nailed well enough to hold them in place, instead of normal gaps between all the boards, you’ll get a big separation. Not all panelized floors have a lack of fasteners, but again, it can contribute to the problem.
I’m seeing more cases like this with inspections I review: If a contractor misses one item and it’s listed on the inspection report, the contractor becomes the fall guy for fixing the floor at his expense, regardless of whether that one error had anything to do with the problem. So, more than ever, be sure you do your jobs by the book.
Nailing the Joists—Or Not?
I’ve heard I should always try to nail 3⁄4-inch flooring into the joists. Does that help?
Peter Fahey, product manager at Alliance, Ohio-based Clem Distributing Co. and NWFA-certified inspector, answers:
It hardly helps at all. In the field, a 2-inch cleat or staple is driven at a 45-degree angle above the tongue. With a 3⁄4-inch subfloor, the fastener penetrates less than 1⁄4 inch into the joist. That’s not much hold, especially since the cleat point is tapered and smooth. Like many wood flooring contractors, I’ve spent a lot of time snapping chalk lines so my fasteners would hit the floor joists, but unfortunately, that was all pointless work!

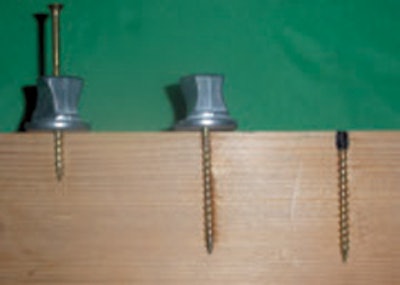
Trick of the Trade: It's a Snap
Wood flooring contractors are always looking for an easy—and inconspicuous—way to tighten a wood flooring board down to the subfloor in order to eliminate squeaks. Here’s another technique to add to the arsenal: The Counter-Snap screw. Its clever design allows you to drive a screw down into the board, then snap off the screw head at a point below the surface, leaving a hole the size of a finish nail. For more info, visit www.oberry-enterprises.com.