The more custom jobs you do, the more likely it is that you will need to create stair nosing. Whether you are building an entire staircase or you just need a replacement nosing, learning to create your own nosings can save time and help customize a floor. Though you can purchase pre-made nosings, knowing how to build your own could help you in a pinch if you need a quick replacement, or it can expand your horizons by allowing you to use any species of wood you desire.
Necessary tools and supplies:
- table saw
- circular saw
- 1-inch nails
- nail gun
- five-minute epoxy or wood glue
- safety goggles
- 1/2 -inch round over bit
- wood fillers
- and paper or palm sander (optional)
Step 1:

First, find a board of the correct species that can be cut down to 3 1/2 inches wide, which is the size of standard stair nosing. Here, I am using a 4-inch piece of flooring. Cut the tongue side off so the board is 3 1/2 inches wide.
Step 2:

To create the bottom part of the nosing, use a smaller board of the same species,such as this 3/4-inch-thick, 2 1/4-inch-wide piece of strip flooring. Cut both the tongue and the groove sides off the board so it's 1 1/2 inches wide.
Step 3:

Take the 1 1/2-inch-wide board and rip 1/4 inch from the bottom so it is 1/2 inch thick. This will match where it rounds over the riser, creating a 1/4-inch rise.
Step 4:
Align the 1 1/2 inch board on the edge of the bottom side of the 3 1/2 -inch board. Secure the two boards with five-minute epoxy or wood glue. Five-minute epoxy works best on the job site because it dries faster.


Step 5:
Using 1-inch nails, secure the boards together with nails placed 3 to 4 inches apart, using at most four nails. To prevent splitting, fasten from the bottom side of the board up, and don't use nails that are too long, or they will punch to the other side and split the wood.
Wipe off excess glue from the edges, then allow the glue to set as long as necessary to create a strong bond.


Step 6:
Clamp down the board to secure it while routing. Using a 1/2-inch round over router bit,rout the topside of the board, then flip it over and rout the bottom side.


Step 7:

Cut the ends off of the boards to match the length of the stairs.
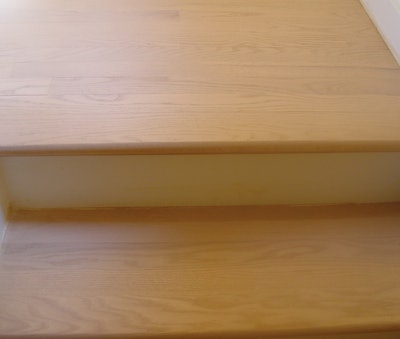
Step 8:

Now it's time to clean up the tread. Apply wood filler to areas where the seam between the boards is visible.
Step 9:

If you were on the job site, you would now install the tread on the stairs and sand the tread and nosing together. Here, because I am making a replacement nosing in the shop, I hand-sand the tread with a palm sander using 100-grit paper.
Step 10:

Next, I apply stain and finish to the tread to match the existing stairs.
Step 11:

Finally, the tread is ready to be installed on the stairs. A mock staircase here in the shop gives me an idea of how it will look on the actual job site.