


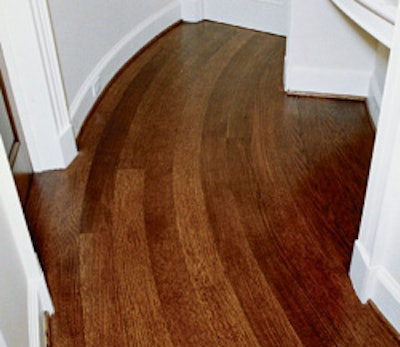

One of the hallmarks of a truly high-end installer is the method of "bending" wood, which involves cutting a board into strips that are narrow enough to conform to a curved detail in the house and gluing them into place. There are several reasons why you should bend wood to match the curved detail versus simply cutting it out of wide boards. A bent piece will be stronger, longer and look better if it is done properly. When done correctly, a bent board appears as if it has simply conformed to the shape of the wall.
Whether you do it right on the job site or create the pieces in a form back at your shop, this is a labor-intensive process. When pricing "bent" wood installations, be certain to include all your costs for the extra time involved.
Necessary materials:
- wood flooring
- PVA or carpenters glue
Necessary tools:
- table saw
- hammer
- drill
Step 1:

Choose a board that has straight grain with no defects. Mark it by making diagonal marks on one end of the board. If you are ripping more than one board, make a different number of diagonal marks on each board. Also place a perpendicular alignment mark in the middle of the board to use during gluing.
Step 2:

Rip the board into strips using a table saw. You can determine the width by trial and error. Before cutting the actual boards, cut some test strips from the same material and make sure they are flexible enough to bend.
Step 3:

If the curve is circular, you can cut the radius with a router. If the shape is not circular, use a jig saw. Here, a circle has been cut into the field using a router.
You will need to screw down blocking for the wedges at a consistent distance. A good rule of thumb is to leave the width of the final piece, plus 2 inches, to allow room for the wedges that will force the wood into shape.
Step 4:

An easy way to mark the distance is to cut a scrap piece of flooring to the correct length and scribe the mark around the radius.
Step 5:

Once the line is marked, screw the plywood blocking into place.
Step 6:
Oftentimes the rips get out of order somewhere between the table saw and installation. Using the marks you made before ripping the board, assemble the pieces back into the proper sequence.


Step 7:

Then, spread the rips out flat in a spot where they can temporarily be secured into place. After this point, everything that happens will be time-sensitive, so all of your materials must be in place and ready for action.
Step 8:

Use the appropriate glue (such as PVA or ordinary carpenters glue). This allows five to seven minutes to apply the glue, put the pieces into the area, and wedge them into the final position before the glue starts to set. If you aren't experienced with this process, make several dry runs first.
When you're ready, apply the glue liberally.
Step 9:

Place the rips in order one at a time, then use the precut wedges to press the pieces tightly together.
Step 10:

Continue placing the wedges all the way around until the entire bent piece of wood is secured.
Step 11:

After you get the strips wedged into place, take a block and tap the strips flush with a hammer. Because glue can be slippery until it starts to set, it's always a good idea to screw several blocks across the top of the piece to hold it down while the glue sets. After the glue is set, the wood is ready to be sanded and finished like the rest of the floor.
Using a Wedge Jig
When using wedges for clamping during bending, it is important that they be uniformly made so they are interchangeable. They are approximately 5 inches long, tapering from 2 inches at the wide end to 1/8 inch at the narrow end. I use wider plank scraps from more dense species, such as white oak, maple and Brazilian cherry, because they stand up to use during gluing. To cut the wedges, I use a homemade jig on a table saw that cuts the same angle on each wedge. Once it's made, not only is the jig faster and more consistent, it's also much safer than trying to cut small pieces by hand on the chop saw or table saw. |


Using Plywood Forms
Many contractors simply build a plywood template with the appropriate curve back at the shop. That way, the bent wood can be installed just like any other part of the floor. If using a plywood template, you can apply paste wax to the surfaces inside the form to prevent the completed piece from sticking to the form. Here, blue tape was used instead. |


