


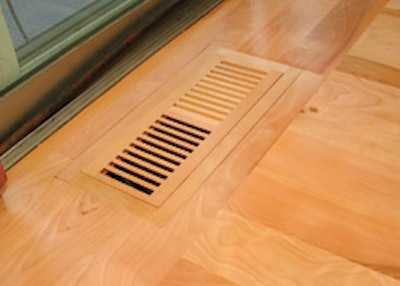

Even if you make your living by installing straight-lay strip flooring, there are still some relatively simple things you can do to upsell your jobs. For example, you can picture-frame a fireplace or a room, run flooring diagonally, or use a different species as a feature strip. Even easier than all of these, however, is installing matching wood vents that blend in with the new floor. If you're installing high-end wood flooring jobs, selling wood vents and registers along with the job should be a given—nothing looks worse than an old metal vent installed on top of a gorgeous, brand-new wood floor.
In today's market, you can get vents in a wide range of sizes and species to match just about any job, and they come prefinished and unfinished. In the following project, we show one easy way to install a yellow birch vent into an unfinished solid 3/4 -inch yellow birch floor using a standard template. As always, follow the recommendations of the manufacturer for the product you're using.
Supply List
- Wood vent
- Template
- Pencil or pen
- Router and bit
- Vacuum
- Nail set
- Hammer
- Corner chisel or standard
Step 1

First, locate where the duct was. Here we had measured out from the patio door so we would know where the duct was after the flooring installation. Now I use the frame of the vent to mark where I would like the vent to be installed. If the duct were in a spot that left an awkward amount of a board, for example, we would have some flexibility to move the template—the vent doesn't have to be perfectly centered over the duct.
Step 2

This vent didn't come with a template, but you can usually buy one for standard vent sizes at your local wood flooring distributor. This template comes with adhesive tabs that can be stuck onto the bottom of the template, keeping it in place once you find the right spot for the template using the outline you made in the last step.
Step 3

Since this is 3/4 -inch solid flooring, I'll need at least three passes with the router, cutting no more than 1/4 inch at a time (harder woods may require more passes removing less wood). The bit I use has a top guide bearing that allows me to cut out the area I need while running against the edge of the template. If you don't have this bit, ask your local wood flooring distributor. Here, I've adjusted the depth of the router so it cuts the first 1/4 inch of the wood flooring.
Step 4

Now I go in a clockwise motion to make my first cut with the router.
Step 5

Vacuuming between every cut is important to make sure you get a good, clean cut.
Step 6

My pass with the router revealed the top of a fastener, so I use a nail set to punch the fastener down and out of the way.
Step 7

Now I adjust the router to cut another 1/4 inch so it's cutting to a depth of 1/2 inch of the wood floor. Then, I make another pass—always going clockwise—and vacuum. Finally, I adjust the depth of the router to cut the full 3/4 inch, make my last pass and vacuum the floor again.
Step 8

With the full depth of the flooring cut, I remove the wood flooring where the vent will go.
Step 9

The router can't cut into right angles on the template, so I use a corner chisel to knock out the corners for the vent. If I didn't have a corner chisel, I could also just use a chisel and hammer.
Step 10

I gently use the handle of my hammer (I could also use a block of wood) to persuade the vent frame into the space for a dry fit.
Step 11

If necessary, you can shim and glue the frame so it's flush with the floor (you can see that this one is sitting a little low and needs to be shimmed). Then, toenail the frame and set the nails, and you're ready for sanding and finishing (the vent will sit loose inside the frame so it can be easily removed for cleaning).


