Copper Correction
I have to sand a floor with copper inlays. Right now the metal is higher than the wood. Do I need to knock it down somehow before I sand the whole floor?
Steve Seabaugh, director of technical training at NWFA, answers:
Yes, you should, but you need to be careful when sanding any metal, and the main concern is heat. Metal expands as it heats up, and copper in particular holds the heat for a long time. If it gets too hot, it will make the epoxy release. If the copper was inlaid with a very tight fit, typically it won't pop up. But if the fit wasn't that accurate, the metal will pop right out of the floor.
Edging tends to create the most heat. One method that keeps the floor cooler is to use a router with a carbide bit. I personally prefer a 1/2 -inch bit. That will cut into the wood next to the metal, also. You don't have to worry about that, since you're probably only cutting down about 1/32 inch, and you'll be sanding that off. I find it helps to see where I've cut with the router (if you just cut the metal, it can be hard to tell).
If you're the one installing the metal, there are things you can do to make the floor easier to sand. Dryfit the metal, making sure the floor was routed deep enough so the metal will sit slightly lower than the wood, and not forgetting to account for your epoxy. If you don't leave room for the epoxy, the glue won't have anywhere to go and will push the metal up.
Before you install the metal, clean it with lacquer and sand it to put a little scratch in it—that will give the epoxy something to bond to. There should be epoxy on the sides, not just on the bottom. It doesn't hurt to put nails in the metal, either. You'll need to drill the metal and use nails from a specialty store that are solid copper (or whatever metal you're using). The brass or copper nails you find at big-box stores aren't usually solid, so if you sand off the top, you'll see a small silver spot.
Moisture Target
I'm installing a hardwood floor over a wood subfloor and checking the moisture content using a moisture meter. What should the moisture content be?
Paul Laurenzi, vice president of sales & marketing at Towaco, N.J.-based Delmhorst Instrument Co., answers:
The ideal moisture content (MC) depends on the environment in which you are installing your floor and subfloor. For most of the country, wood should be dried to 8 percent, while desert and Southern coastal regions should be dried to 6 and 11 percent, respectively. The more humid the climate, the higher the equilibrium MC level will be. How the house will be maintained (including temperature and humidity) will also affect the target MC.
Checking the relative humidity (RH) and temperature of the air using a thermohygrometer will give you a general idea of the installation environment. However, to more closely determine the target MC, you should check other wood surfaces in the structure using your moisture meter.
Floor joists, roof rafters, wall studs and door jambs, as well as the wood subfloor, will all tell a more detailed story of the potential MC range. Before flooring is installed, its MC should be within 4 points of the subfloor MC (2 points for plank).
It is important to check the MC after the building envelope has been closed. Allowing flooring materials to be exposed to an open-air environment will skew your target MC or worse, damage the materials with overexposure to humidity. For this reason, wood flooring materials should always be delivered directly into the structure where they are to be installed, not left outside in the open air.
You should also pay close attention to the work of other installers. For example, the presence of spackle and paint raises the humidity level within a structure and will skew your MC readings. Ideally, all wet trades should be completed before installation of any wood flooring.
Adhesive Clean-Up
How do I clean up cured urethane adhesive from my wood floor after installation?
Mark Lamanno, technical market manager at Columbus, Ohio-based Franklin International, and D. Kevin McNew, vice president of sales at Minneapolis-based Sentinel Products Inc., answer:
Most manufacturers recommend cleaning up urethane adhesive as soon as possible in a wet state. You can use mineral spirits or the recommended cleaner provided by the individual urethane adhesive manufacturer. In the past there were only two ways to remove urethane adhesives when left overnight: remove the boards with adhesive on them, or sand and refinish the floor. However, following is a new way that works to remove adhesive after it has been down from 1 to 30 days. If adhesives cannot be removed when wet, we recommend the following procedure for removing fingerprints or other remaining adhesive residue from the wood floor surface without harming the finished surface. As with the use of most products, it is recommended that you test a small area first and follow the manufacturer's instructions. If possible, we suggest testing these procedures on a discarded piece of the wood flooring first.
1. Apply a liquid urethane adhesive remover to the area making sure to cover an area slightly larger than the adhesive spot itself. Allow the remover to soak for at least an hour to fully penetrate and soften the dried adhesive.
2. When softened, use a 1- to 2-inch plastic putty knife to break the adhesive free from the wood floor. Care should be taken not to scratch or mar the finish of the floor.
3. Use a melamine pad (like a Mr. Clean Magic Eraser) to remove any remaining adhesive residue or haze from the floor finish by saturating the pad with the liquid remover and scrubbing the surface. It is important to take care not to scrub matte finishes too hard, polishing them to a gloss.
4. Many of the removers leave an oily residue after removing the adhesives. These should be cleaned, along with the entire floor, with an approved wood floor cleaner Once steps 1 through 4 have been completed and the floor has dried, if hazy spots return, simply repeat steps 3 and 4 to remove all the adhesive residue.
Trick of the Trade: A Handy Line
By Daniel Boone

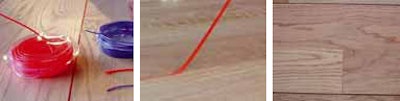
Moisture conditions aren't always ideal on the job, and sometimes wood flooring is installed with a lower moisture content than the contractor would like. In those cases, the traditional solution is to use "washer rows"—washers used as spacers between some of the rows. When installation is complete, the washers are removed, and the floor has room to expand when the humidity increases. A newer method to do the same thing is to use lawn trimmer string. It can be placed between the rows and easily rolled back up when installation is done.