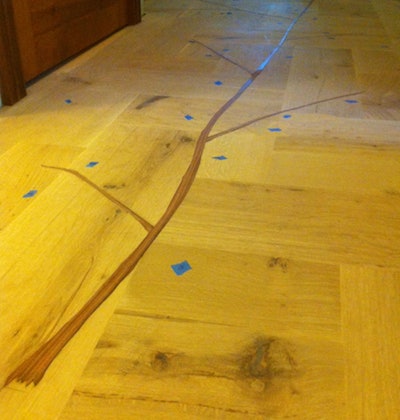
Here's the final post about installing a custom inlay. When we left off last week, we were about to plunge into the floor (oh, in so many ways). We have the main trunk and branches installed:

We are using carbide inlay bits, not the cheaper steel versions. Quick point: From your intermediate level and up, you need to stop buying cheaper tools, yet alone use tools for specialty work that are not designed for that. If you're doing inlays, you'd better have the tools needed. You'll find soon that the level of focus doing this type of work is very high. You want to have what you need to perform the task without frustrations on the way. Besides, you get more consistent results with better quality tools.
Okay, back to the inlay: The bits can be single or double flute. It means that they either have one or two cutters on them. First, I've used a ¼" spiral bit to do the heavier work of removing material fast. Second, I've used the smaller bits to get a hair from the line. You don't want to cut right on the line for two reasons:1) It's very hard to control the router to that precision.2) The bit leaves micro fuzz on the face.
As the router spins so fast, it pushes the wood fibers away from it. That's not a nice finished edge. Your hand motions with the router should be gliding-like against the wood-very gentle with small strokes. You want to remove a hair at a time. These small router bits cannot be pushed. Listen to the router motor as you work it. If it changes sound, you are pushing it. They are super fragile and will snap in half if you push them too hard. Oh yes, did I mention buy several bits of each size?
Next, vacuum the cavity and start working with your hands. Anything goes: chisels, carving tools, knives, dental tools, you name it:

The idea is to clean up the cut to your pencil line. A lot of those inlays have very acute, sharp points. Getting in there with even a small chisel is not an option. That's why you need the dental tools. A pick scraper or hook probe will do the job:

One is for slicing through the wood fiber and the other is for crushing and removing the waste. If you ever had a tooth filling done, you will know what I'm talking about. My dentist was kind enough to provide me with the tools I needed. As he said, we both did the same kind of work on a different scale. He has all the saws and hand tools as well. They are just smaller and run at a higher rpm. By the way, I asked my dentist for the tools instead of going online because he was able to provide me with quality tools. I could not tell by looking which hook was going to last for more than ten minutes and why one cost more than the other. You could, of course, go online and buy a set of six for five bucks or something. Again, down to the detail, no saving money on tools. Sorry. Saving does not live here anymore.
This last part of hand work is tricky. This is where understanding wood comes into play again. You need to know what the wood will do as you cut through it. If you push down with a gouge (curved-shaped carving tool) in the wrong direction you could have the grain collapse farther than you wanted to. You need to be able to look at the wood and analyze it. Meaning, you need to predict what hand motion will produce which result through the fiber. You can get to that level of knowledge by experience and studying wood anatomy. Or, you can just work your way by trial and error, which, of course, will produce a crappy inlay work. So, why don't you do it the right way? First, know your wood. Then work it.
As you remove material, you may end up erasing the pencil line with your arms on the floor. Keep track of where you are by placing the leaf on the floor to check the fit. Do that a few times until the fit is perfect:

Remember that you sand-shaded the leaves, so they are super fragile. If you try to tap them in place and there is just a tiny mini micro edge that's not right, the leaves will break.
Use traditional yellow glue to secure the inlay. I use a medical syringe because it is so cool. No, really I use it because it has a curved tip, which makes it really easy to apply glue to the walls of the cavity. It also has a small tip, which applies just the right amount of glue. You don't need a huge amount of glue, and you're not looking for a lot of squeeze out. The glue is just to secure the leaf, it is not for holding your floors together. If it is, we may have a bigger problem here. A bit of glue on the walls and the bottom of the cavity is enough. Tap the leaf in place with a flat block of wood that is larger than the inlay itself. The inlay should stand proud of the floor (higher). You are done!

Going back to the original post about this inlay, let's say that five different people look at the finished floor. They will analyze the floor according to their level of skill and knowledge. One may understand the full scale of what it took to make the floor. The others, well, it might just fly over their heads. So, next time you see a floor, try to appreciate the skill behind it, even if it is a traditional floor you've seen many times before, even if you think it's boring. There's always someone behind it with a passion. A passion beyond their skill, a passion to leave something behind. I respect that.