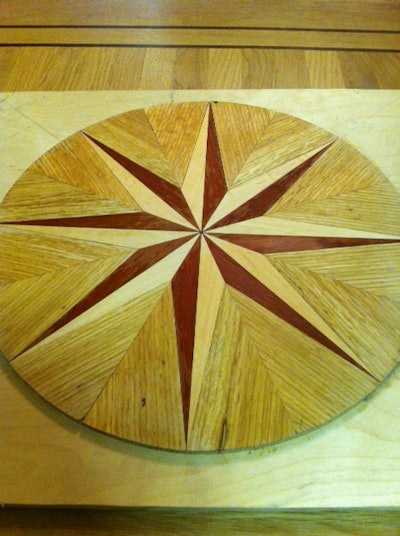
To finish the medallion we need to cut 16 more pieces to fill the void between the points. I will refer to them as leaves, with each leaf consisting of two pieces. Each piece has two straight sides and one short curved side (you could skip the curve and cut it straight essentially making an octagon medallion). Pay attention to the grain orientation. Each two pieces in a leaf should mirror each other. It is called book matching. Though you will find it hard to match the grain in each two pieces, try to have some sort of consistency. The last thing you want is to have one or two pieces that don't look like they belong in your medallion.
Generally speaking when I make medallions I work from the inside out. Once the main center piece is done (in this case the points) I place the work pieces on the full scale drawing and number each of them. As mentioned earlier, each piece has two straight lines and one short curved side. All we have to do is cut one long side and the curved side. Next, I make a jig for cutting the long side. I use my track saw for the straight cuts. Check your fit and tape the pieces as you go along. We will finish the curved side by using a router after all the pieces are glued to the plywood.
Whatever method you use (jigs or not) to cut your leaves it needs to be precision cut. Especially with repetitive cuts on a jig, any gap you might not see at first will multiply itself as you cut and fit more pieces. A gap that is 1/64" (.396mm) multiplied by just eight cuts will be 1/8" (3.175mm) by the time you are done.

Once all the leaves are cut you need to glue down the wood (points and leaves) to the plywood backer. After the glue dries use a router to trim your medallion to the right size. Attach a circle jig to your router and lower the bit so you can see it. Now move your router around while watching the bit. You want to make sure that your glue up was precise and that your router will not shave off some of the points. The other thing you want to confirm is that your router is centered in the medallion. If it is not now is the time to do some adjustments. This last cut with the router and a circle jig should create the final curved on each leaf. From here you can install the medallion in the floor as is or build more curved details around it. In the future I will cover more topics related to this blog like glue ups, radius work on medallions and floors and bending wood. Thanks for reading.