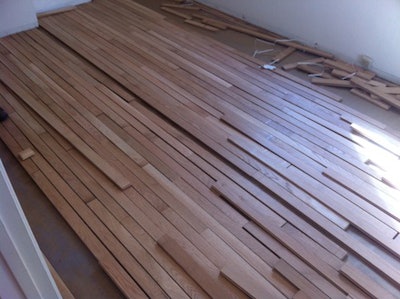
I finished my last post saying it was time to nail the floor. Well, not quite yet. Now it is time to what I call scan the floor. Scanning is basically checking your floor before you nail it for good. Now is the time to find and change things like the following:
- End joints that are too close, staircased (they look like steps going up a staircase), repetitive or some you just don't like (it happens).
- Boards that don't belong: too sappy (the white stuff, if you have not watched my wood anatomy video), too light, too dark, grain-related issues, too short in the wrong place, broken/split boards, out-of-grade boards or you name it.
- Inconsistency in the floor. The most common reason would be that you racked out the floor one bundle at a time. It was great-looking until there was one bundle that didn't have a mix of boards but a lot of the same kind. Now you have one area that has several boards that are very similar and they are all in the same spot.
When you scan the floor try to do it from different angles.
Now it is time to nail. When nailing a floor your speed is crucial. You can't be fast if your technique is poor. Let's break it down: you step on the edge of the floor board to be nailed. Yes, on it. That way you know your board is in contact with the subfloor. When you will install a wide plank floor without having this technique down…well.. you'll see. Anyway, left hand holding the nailer and right hand holding the mallet. Keep your shoulders tucked in and your arms close to your body (if your arms reach out your body will hurt at the end of the day and I mean more than usual). There you go: hit the nailer once and while lifting the mallet up move the nailer down towards you. The second the nailer is in position, the mallet goes down again. When the mallet goes up the nailer moves. You need to stand to the right of the nailer, not behind it. Take small sideways steps while moving along. Practice slowly and correctly, then work on fast.
Don't nail each row from one end to the other. Nail as many boards as you can in one area. Then move down a little and keep nailing. Basically, you nail the floor in groups in almost a stair case rhythm. Your cut man or woman should be in front of you doing a few things:
- Cutting the end boards.
- Watching your back so you don't miss a board.
- Putting the boards in place for you to nail.
A few more random things:
- Have your tools and fasteners close by. I keep my knife, tape, pencil, nail set and a Cleat Card in my tool belt. I have a pile of cleats sitting at waist high so I don't have to bend over every time I need to reload my nailer.
- Have your hoses behind you and your cut station close but not in the way.
- Don't leave the end joints with a hair line gap like this:

A gap like that will not take filler. It will just look like a black line.
- When you cannot rack out the floor because you're in tight spaces, pay more attention to the floor. Let's say you are wrapping the floor around a wall or a doorway. You have to nail a few rows first without being able to rack it. That means you don't have a chance to stand up and scan the floor before you nail it. When you are on your knees it is much harder to see the overall look of the section you are installing. It is especially important while working in spaces that will not have any furniture in the future like hallways or entry ways.
- Know your baseboard thickness and cut the expansion gap appropriately. If you can't have the expansion gap, you need either cut the sheetrock or don't install the floor.
- Work with what you have. Following the NWFA guidelines in regards to end joint placement is sometimes impossible with the material you have on site. If all your bundles have two lengths in them and they are all shorts or medium length…well… you get the point. You don't have to re-mill the floor to meet the guidelines. Just don't forget to communicate expectations to the owner.
- When approaching the walls, you can only get so close to them with your cleat nailer or stapler. That means you will have to install the last rows doing one of the following: You can use your nail gun to blind-nail, drill and hand-nail (don't ask me what this means please, it means hand-nailing), use a palm nailer or full-trowel glue.
- Pull your last rows tight and hit the face with a mallet to make sure the boards are flat on the floor. Ever edged a floor and all the edges are down or up? Can you say annoying?
What else am I forgetting? Oh yes, time for you to comment and add your suggestions. My friends already tell me I write too much. So, now you see how even a small rectangle room with a simple layout can involve so many things. Every installation is different. Every floor is different. Acquiring the right basic techniques will serve as your foundation to do the more advanced floors.