We're back talking about how I made this custom medallion (The Next Level: Process of Medallion Design & Creation):

You must have a full-size drawing of the medallion before you start. That means that:
- You must have the right marking tools (an oak plank is not a straightedge), such as fine rulers, squares, a compass, trammel points and fine pencils.
- You must know your basic geometry (circle, radius, diameter and arcs)
I usually start by drawing a rough, small version of the medallion on a piece of paper. Once I'm happy with the concept, I transfer it to a full-size precise drawing on my backer plywood. Which plywood should you use for medallion building? You guessed it: Oh, well, maybe you didn't. No, it is not $12.99 a sheet at the box store. It is a Baltic birch plywood (don't confuse with Chinese birch). It comes in 5' x 5' (1.524 x 1.524 meters) sheets and is only sold at specialty lumber yards that usually also carry hardwood lumber for woodworkers.
So, why have a full-size drawing? You need to have something visual to work with. If you only had a small drawing with measurements, things would be a little more complicated. You could still build it, but it would be more complicated. We don't like complicated.
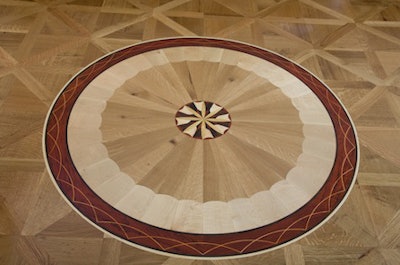
Once the full-size drawing was done, I took small pieces of the woods I thought I wanted to use for the medallion and placed them on the drawing. That is when I make my final decision on which woods to use. I cut and assemble medallions from the center out. For this one, I cut the starburst rift and quartered white oak (32 of them) and then scrolled the scallops on the ends. You can cut the starburst on a table saw sled or by using a jig with a Festool plunge saw ("track saw" to be politically correct).
Either way, when put together the 32 pieces of oak must come together in a beautiful harmony to create a full circle with no gaps:

No gaps mean no gaps. (Like the penguins when they are cold - nice and tight.) Every line must fall exactly where it should on the drawing. To be more specific: every two sides (the long edges) of an oak piece fall on the corresponding radii. (See my The Next Level: Process of Medallion Design & Creation from last fall on how to set up your cuts).
To remind you: Please use a cheap material to set up your jigs and test your cuts.
After I cut the starburst, I placed the pieces on the drawing and marked my scallop shape with a compass. Then I free-handed the cuts on my scroll saw. You can use a jig for that, also. I didn't use a jig because the curve was so mellow (I was able to use a #5 blade) and by the time I had the jig set up I already cut all the scallops. It really depends on time, quality of cut and how comfortable you are with your saw. Once all the oak pieces were cut I taped them together (just the face) with clear masking tape. Why clear? So I could see the wood.
Next came the maple scallops. Same procedure as the oak, only this time the scallops were opposite in shape. Again, no jigs on this one. I fine-tuned my cut (if needed) on a stationary belt sander. There you have it. All taped together oak and maple:

We only cut 64 pieces so far, and we are still at what I call the easy part. Or in other words, making a small mistake at this stage is not a big deal. We'll talk about what is considered big deal in the final stages of building this medallion.
Have a good week.