Hidey-ho, fellow wood flooring craftsmen. Keith Long here with Thunderheart Flooring in Greeley, Colo. Spring has sprung here over the course of the last week—the elms and cottonwoods are budding, and the apple, plum, and cherry trees have blossomed.
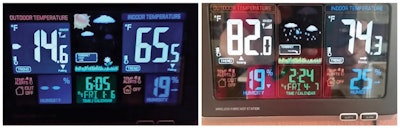
Remember just three months ago when I started blogging again, and we looked at temperature and relative humidity in our home during a Colorado winter? Well, the spring rains and warmer temperatures are here once again.

Notice that although the change in outside temperature is 96.6 degrees Farenheit (53.7 degrees Celsius), the variation in relative humidity inside our home is just 6 percent. So, our hardwood flooring is stable, without gapping or cupping, just as it has been for the last eight years since we properly acclimated and installed it.
Last week, I mentioned I would get into some of the finer points of what techniques I use while performing hardwood flooring jobs, and what order I do them in. I enjoy seeing the ways others do things. I have picked up many useful tips over the years, and continue to do so. I’m always open to learning about people’s methods.
I maintain that if a hardwood flooring contractor shows up on time and is tidy, that 90 percent of being successful is in the bag. Let’s get into the other 10 percent.
This is what I started with:

This is what it looked like with neutral stain and one coat of water-based finish:

Since this carpeted living room was just 309 square feet (approximately 30 square meters), and there was a good amount of existing hardwood flooring on this main level, it was going to be fairly time-consuming and expensive in relative terms to lace in all these rows and then be forced to resurface all the existing wood. It was much more economical for me to install the field on an angle and do this double picture-frame border. Less money, more interesting to look at, and less furniture to move off and back on again. Let’s get specific about how I transformed this space from carpet to hardwood.

I am methodical about everything I do pertaining to hardwood floors. When I walk up to ring the doorbell in the morning, I have my lunch bag, which contains my clipboard, moisture meter, kneepads, tape measure, food and water in one hand, and a toolbox in the other. I bring my lunch, and usually don’t leave the jobsite until it’s time to go home for the day. After getting oriented with the homeowner, I go back to my vehicle and bring in my other two toolboxes. This is one of the very few times I will deadhead back to my van with nothing in my hands—I’m a stickler for efficiency, and usually like to be carrying something and being productive on trips both in and out of the home.
Some people comment about my having three toolboxes, as if it’s too many for a one-man show. Let me just throw it out there that when you’re this sexy, it takes three toolboxes. All kidding aside, I like to have a place for everything, and everything in its place. I prefer to have three with ample space in each one so that they’re not too heavy and I can get at tools as I need them.

I prefer to have my utility blades sharp, especially so for cutting carpet. I cut strips about 3 to 4 feet (about 1 to 1.3 meters) wide. Typically, I roll the carpet over and cut from the backside, which is easier on the blades. This carpet and pad were pretty thin—and the room so small—that I just cut straight through the couple of strips needed from the top.

I flip carpet to have the rough bottom side up before rolling it. This way, when it’s rolled up, the soft side is out, and the rough side doesn’t risk scratching up door casings or anything else on the way out to be disposed of.

Some genius decided it was okay to set two built-in cabinets right on top of the carpet, pad, and tack strip. (I don’t suppose any of you fellow flooring contractors have ever run into anything like this, probably the only time it has ever happened in the history of construction…) So, I cut up flush to it, and used an oscillating saw to make a clean removal of the tack strip.

Once all rolled up, I take a load of rolls out while I bring my scraper, broom and dustpan in. Another load of rolls out, and my backpack vacuum and wands back in. Each time I go out, I bring things onto the jobsite I will need to complete the work.

Since I probably get more cut up during the few carpet-related things I deal with than all hardwood related things I deal with combined, I generally leave one small piece of carpet in the home to wrap the tack strip up in. I start at one point and go around the entire perimeter of the room, throwing the tack strips toward the center as I go. I’m not concerned about where they land, just somewhere toward the center. When they’re all up, I collate them all at once and get them out, while I bring extension cords and an edger in.

Although some of this may seem extremely specific, and many of you likely do some or all of these things, I believe there are benefits to recording this process, especially for those up and coming in this trade. The April/May 2017 issue of Wood Floor Business has an article describing many of the benefits of subfloor preparation, which we will carry on with next week as we remove and number baseboards, scrape and sand flat the subfloor, and lay some underlayment paper.
Until then, stay sharp!