Over the last decade, every year my goal has been to become more refined at the craft of producing high-quality hardwood floors that clients rave
about to their friends, family and people they meet. Laying wood floors is one thing; the condition of the subfloor is another. Although probably not the most sexy subject in our industry—and what is done in this preparation stage is not seen once the project is complete—subfloor preparation has a large bearing on the finished product. Consequently, these days I give it the attention it deserves.
I have found that subfloor prep is time well spent. Let's go over some of the key aspects of complete wood subfloor prep.
1) Recording moisture levels

When I ventured out into business for myself in this trade, the first thing I purchased was a high-quality moisture meter that can be adjusted for different species. Knowing what I know now, if I had the opportunity to go back and start my business again, it would still be the first thing I would buy. Not only has my moisture meter kept me out of trouble concerning potential hazards in the moisture content department, but it is also a huge way to build rapport with potential clients. On estimates, using the moisture meter to show homeowners how their floor is reading high in front of a dishwasher or other appliance with a water supply and offering my recommendations of how to address that issue increases my likelihood of landing the job (it also increases my chances of avoiding floor failure in the future).
I write down several MC readings of the subfloor throughout each job so I can compare them to the MC readings of the wood that will be installed and ensure the project is set up for success. The setting is different on my moisture meter for various species of plywood, which is also different from the setting for oriented strand board (OSB). The reason is that these products have different densities. The specific gravity of each product depends on how dense the wood is, combined with what type and quantity of adhesive is used to manufacture the product. Read the directions for the specific moisture meter you are using to find out what the correct settings are for your subfloors.
Each species of hardwood flooring also has its own specific gravity setting on my moisture meter, with a baseline of ipé (Brazilian walnut) being 1.00. Red oak is a 0.63 setting on my meter, since it is 63 percent as dense as ipé. Each species is a certain percentage as hard as this baseline. These settings allow a person to know the moisture content of each species of hardwood or softwood. I then compare the average MC of the subfloor to the average MC of the hardwood to be installed. It is recommended that for strip flooring, the difference in MC between the subfloor and hardwood floor be no more than 4 percent. For plank flooring, it is recommended the difference be no more than 2 percent.
2) Making sure the substrate is up to code
The manufacturer of the flooring you are installing has directions for the type and thickness of subfloor. Also be sure the subfloor meets the building codes for your area. The subfloor requirements also depend on your joist spacing. Depending on the flooring being installed, you might need to go beyond the minimum building code in order to have a successful installation without squeaks or other problems. For a typical ¾-inch solid floor, I prefer to use at least ¾-inch plywood. In many areas, ¾-inch OSB is also acceptable.
I have noticed different regions have different norms concerning this subject. There are many OSB subfloors in the relatively stable region where I live in Colorado, yet I see predominantly plywood subfloors in regions where there are greater swings in relative humidity throughout the year. I use the highest-quality substrate I can, which I believe gives me the best odds for success. I am personally a big fan of plywood and put it down when I am able to make the call for the substrate.
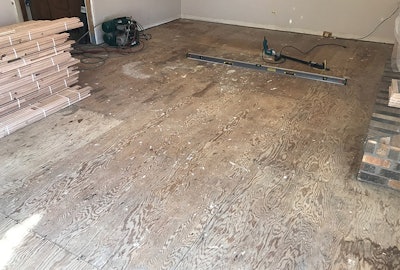
3) Setting nails and screws as I go

Nails and screws that are sticking up proud above the subfloor cause the hardwood flooring installed over them to ride up. These areas are more difficult to get flat while sanding. I have found the fastest way to acheive flat floors that satisfy homeowners (and also make it second nature for them to pay in full, then sing my company's praises to everyone they know) is to get the subfloor flat before laying the first board.

I run a scraper over every inch of the subfloor, as if I were scraping ice off a driveway. When the scraper hangs up on a carpet tack strip nail, I set it until it is at or below the level of the subfloor. When it catches on a carpet tack strip nail, I typically pull them up and out with a pair of dikes. When it hangs up on carpet staples that have been holding the carpet pad down, I typically can scrape them up and out. If not, I get a pair of dikes or a chisel (or whatever length I have to go to) to get it up and out so the subfloor is free and clear of obstructions.
4) Properly fastening any loose areas

I have yet to meet someone who has requested to have squeaky floors installed in their home. A subfloor that moves will be a wood floor that moves, and we all know floor movement is what causes noisy floors. I do everything I can to firm up the subfloor and keep it from moving. Adhesives, crown staples, shims, screws, framing nails, hand-drive nails, etc.—anything I can use to make substrates solid and set up for success is good and fair game by my way of thinking.
5) Sanding seams and high spots flat


The more I have given this aspect attention over the years, the better my floors have become. The industry standard is to get floors flat to within ¼ inch in 10 feet or 3⁄16 inch in a 6-foot radius, and I find the flatter, the better. You can use anything from a chalk line to a long level or straightedge to examine the variances in flatness.

I typically use 36-grit on an edger to sand the seams and high spots. If it's a glue-down project over a wooden subfloor, I have scarified the substrate with 16-grit paper on a buffer. I have seen amazingly effective (and some extremely expensive) tools for leveling and scarifying concrete that can be either purchased or rented. Although I don't have much experience with them, as we are mostly wooden subfloors in my region, they do exist, and there are contractors who specialize in this aspect of concrete subfloor preparation in areas that are predominantly slab construction.
6) Address low spots, if necessary

For wooden subfloors, at times I will build up the subfloor with plywood or shims. In extreme cases, I may pull the existing substrate, shim up or plane down the floor joists, then reinstall the sheets I removed (or install new, if necessary). There are leveling agents and floor patches that can be used over wood subfloors, but I rarely use them, especially if the height discrepancy is very large. Keep in mind that you can't nail through these products.
7) Sweeping and vacuuming
It takes all my fingers and some of my toes to count the times I vacuum a floor between landing the job and the final coat of finish. One of those times is before taking moisture readings on the subfloor. Another is after scraping the subfloor. Still another is after sanding the seams. Although it may seem redundant to someone not in the trade, each opportunity to clean that is seized upon is a positive step toward that flat, gorgeous floor we are methodically working toward.
8) Sealing or papering with appropriate vapor barrier protection

There are specific products that not only help prevent squeaks between wood floors and wooden subfloors but also provide the appropriate permeability rating for moisture to pass through between the substrate below and the hardwood flooring above. If underlayment paper is placed in the same direction as the boards will be installed in, it provides the added benefit of the boards sliding more easily while kicking them in to be installed. Concrete floors also need appropriate vapor-barrier protection. Options include epoxy vapor barriers and all-in-one adhesives. For the very few floors that I glue down, I take every precaution I can and use the best products I am aware of to set myself up for success.
Final thought: Life became easier
When I first started on my own in this industry, there were times I felt as if I were trying to beat a large square peg through a small round hole, not knowing why I had to grind and grind to get my floors as flat as I wanted them. The more I set myself up for success in the subfloor preparation department, it turned out the wood flooring mills' tolerances were tighter than I had initially thought—many of the high-low/overwood problems went away when I became more consistent at setting nails protruding up from the subfloor. When I became more meticulous at sanding seams and high spots, and sweeping and vacuuming more often and more thoroughly, I also got the wood to install flatter. Subsequently, as I was no longer trying to sand roller coaster floors, the side-cut and paper-tracking issues I had been having on my big machine simply went away. Properly preparing subfloors allows me to get flatter floors in less overall time. I now feel as if I am dropping a properly sized round peg with ease through an equally sized round hole, and my business and the floors I create are better for it.