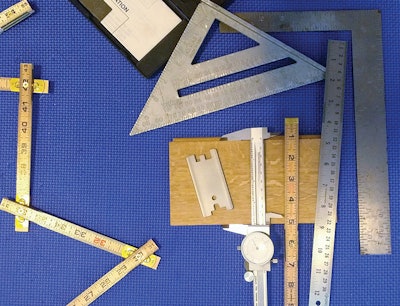
Measuring board width can be done using various tools; the caliper is the most accurate.
One of the most important fundamental tasks that we as wood floor professionals must do is check the flooring we receive from a third party. There is no such thing as too much quality supervision. The key word is "quality." Every time we receive product, it is our duty to check that it is what we ordered and confirm the quantity. When you purchase two new white trucks, you check to see if they are white or not, and you make sure you get two of them. Our industry should not be any different. The hardwood lumber inspector's mission is to determine the accuracy of the quantity, species, and grade that was purchased, and each time the lumber changes custody, it is counted and checked for species and grade. Let's apply this concept all the way through to wood flooring on a job site.
After we figure out how much and what type of flooring is delivered, checking that flooring requires a more specialized knowledge and skill set. The next level of inspection involves these steps:
1) Measure the width and thickness of individual boards
All of the boards need to be the same width and thickness plus or minus 1/100" = .01". In a perfect world, boards should not vary in width more than .010", but of course the world is not perfect.
2) Measure the moisture content of individual boards
Manufactured moisture content should be within the range from 6% to 9%. When installing in very dry or humid climates you should bring ALL of the flooring to its ideal MC. Wood flooring professionals should know what works best in their region. Yes, you will need to have a quality moisture meter and learn how to use it properly.
A correct tongue and groove profile should be snug but not tight—if you give them a shake when holding them like this, they should fall apart.3) Check the fit and configuration of the tongue and groove
The fit should be snug but not tight. A loose-fitting tongue and groove creates a high risk for squeaks. To check, put two boards 3 or 4 inches long together and hold them by one piece. If you give them a light shake, they should fall apart. If you need a sledgehammer to get them apart, they are too tight! Ideally, use a flooring gauge to verify the placement of the tongue and groove.
4) Check end squareness
The wider the boards, the more critical it is that the ends are square (90 degrees). Use a combination square, speed square, or DIY square to confirm the squareness.
All Things Wood Floor, created by Wood Floor Business magazine, talks to interesting wood flooring pros to share knowledge, stories and tips on everything to do with wood flooring, from installation, sanding and finishing to business management.


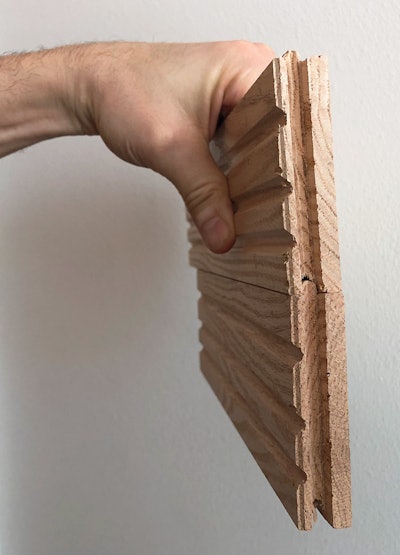 A correct tongue and groove profile should be snug but not tight—if you give them a shake when holding them like this, they should fall apart.


