


As a scuba diver, I learned to “Plan your dive and dive your plan.” From this, I adopted a “Plan your floor, floor your plan” approach to hardwood floor installations. Floor pros know there are some rules you never break. Let’s look at one: Never start your installation off a wall!
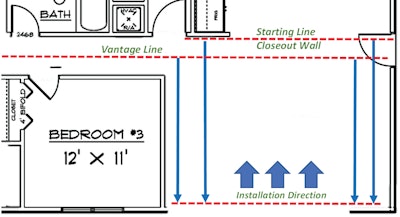
Although some walls are constructed amazingly square, once a floor has been installed against or following an existing wall, it’s far too late to hide wedge-gaps, crooked rows, and gaudy tapered filler-boards! Anyone with a roll of kite string will know the floor wasn’t started off a straight, square line. Let’s look at how to get a floor installation started properly using few simple measurements and a chalk line, starting with laying a starting line and then a vantage line.
When establishing a starting line, knowing where you want to close out the floor helps you get there neatly. If the room is reasonably square already (the walls measure parallel), snap a line parallel to the closing wall and simply transfer that line back to the starting wall and begin the installation.
If you measure the width of the room and divide by the width of the flooring, you can adjust for exactly how many rows will be installed. This information can be used to calculate what size boards might remain when closing out the installation.
If the walls are not as square as you would like, a “vantage line” (a line pleasing to one’s vantage point) is used so the flooring flows squarely through a hallway or open areas. The aesthetics of the line are often more important than how square the flooring is to walls, etc.
To lay a vantage line in a hallway, simply stretch a chalk line evenly down the middle of the hallway into the main installation room and either start on that line working in two directions using a spline to tie in the groove side, or transfer that line to the starting wall and begin there. A vantage line may not always be perfect, but it’s often the most reasonable option available.
Snapping vantage and square lines prior to laying flooring will lead to better decision-making and allow you the opportunity to present any oddities and alternatives to your customer. Ultimately it’s their decision, and one that should be made before the crew is on site to begin installation. If the math is there, the lines look good, and everyone involved knows the plan, fundamental flooring principles will lead to professional-grade installations and happy customers. When there's a crooked wall, you need to create a plan ahead of time with the homeowner regarding how you're going to handle it.


