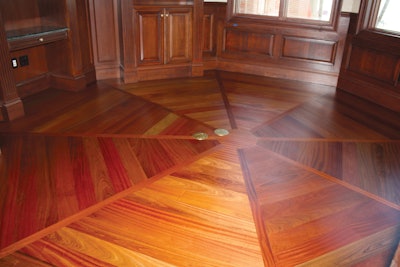
Even if your jobs aren’t as complicated as this one at a Floridian beach home, you need to be proficient at basic math to install wood floors.
Math, mathematics, arithmetic; call it and its branches like algebra and calculus what you may… “A rose by any other name would smell as sweet”—or not! I never liked math in school and decided at an early age that complex formulas would not do me much good, as I had no plans to be a scientist or engineer. Memorizing formulas and solving for X gave me that deer-in-the-headlights look. Little did I know then that using formulas, especially geometry, would become an integral part of my career. Here are some ways basic math is extremely important as a wood floor pro.
Figuring square footage
When I started in the flooring trade, we did all the calculations for square footage by hand. Simply finding how much material it will take to do a room requires knowing the formula for area for a rectangle:
area = length x width = ft²
And don’t forget to add a percentage for waste/cutting allowance!
To get the square footage of a triangle, you simply measure the base times the height, and divide that number by two.
A circle is a little more complicated. Say we have a circular room that measures 16 feet across, so the diameter is 16 feet. Half the diameter is the radius. You need the radius to calculate the area of a circle:
Πr² = area
3.14 x 8² = area
3.14 x 64 = 200.96 ft²
Squaring a layout
When I started in wood flooring, doing correct layout required learning how to square a space using the Pythagorean theorem (all without the aid of a calculator or a computer program). The Pythagorean theorem applies to any right triangle, meaning that one corner is a perfect 90 degrees. It is:
a² + b² = c²
An easy way for floor pros use this is to know that:
3² + 4² = 5²
(3x3) + (4x4) = (5x5)
9 + 16 = 25
So any multiple of those numbers can be used to make a perfect 90-degree angle for bigger spaces. For example, if we were laying out a floor and wanting to strike a perpendicular line to our starting line, we could measure from the center point on the starting line out 6 feet. From our center point, we would strike an arc out 8 feet in the area where our perpendicular line will go. From our 6-foot mark, we would strike an arc 10 feet out intersecting our first arc. Between where they intersect and our center point, we can now strike a perfectly perpendicular line.
These days many people would use trammel points or a laser to accomplish the same thing, although it’s always good to understand how to do it the “old school” way.
Random-width floors
Another situation where math is critical is when you are measuring for a random-width wood floor. Say the pattern is going to be 31/4, 5 and 7 inches. The calculations are as follows:
(Total ft² / Total of widths used) x Width in question = ft² of width in question
Don’t forget to add at least 5% as a waste factor for your total ft² needed for each width.
So, for a 500 ft² room:
Total of all widths = 3.25 + 5 + 7 = 15.25
500 / 15.25 x 3.25 = 32.79
32.79 x 3.25 = 106.57 ft² of 31/4”
32.78 x 5 = 163.90 ft² of 5”
32.78 x 7 = 229.46 ft² of 7”
Checking our formula:
106.57 + 163.90 + 229.46 = 499.93 ft²
Now add 5–15% for waste depending on the layout, keeping in mind that a diagonal layout will entail more waste than a straight layout.
Calculating waste factor
One important point that pertains to using math in our business: percentages. There are simple percentages, like adding a waste factor to a job layout, and there are percentages one uses to calculate profit for materials and labor.
For your waste factor, let’s say you have a room that measures 500 square feet, and you are using 5% for your waste factor, so:
500 ft² x 5% = waste factor
500 x .05 = 25 extra ft²
500 + 25 = 525 ft² required
Or you could skip the step of adding in the waste factor separately and just multiply by 1.05 to get your total square footage.
Another place where you use percentages is on the business side of your business. You need to add a profit margin to the wood you are selling and the labor to do the work. If your wood cost is $5/ft² and you want to add a 20% profit margin, you DO NOT simply multiply the $5 by 20% ($5 x .2 = $1 to get $6). The $5.25 would represent markup, not margin, and doing that can lead to you going broke! What you are looking for is a profit margin, so for the same $5 cost of material:
1. Change 20% to its decimal: 0.20
2. Subtract 0.2 from 1, equaling 0.8
3. Divide the original price of your product by 0.8: $5 /.8 = $6.25
4. So $6.25 is what your sale price should be if you want a 20% profit margin.
If you used a simple percentage instead of using a margin (markup) percentage, you are leaving money on the table!
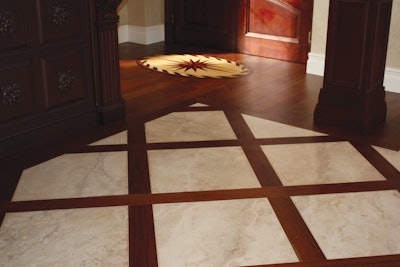
For this Brazilian cherry, we had to use math to calculate how much the wood would expand, as well as plan for where cuts would go.
How math saved us on this layout
Let me give you one more example where math helped me keep a customer happy. In a multi-million-dollar beach home, we were installing Brazilian cherry inside installed marble rectangular openings (see the photo above), with each opening running down a wide hallway. The designer had her finish carpenter install one of the areas. The wood was 31/4 x ¾ inch, and he started at one end of the 5-by-10-foot area and ended with a cut piece at one end with zero expansion space. To say the designer wasn’t happy is an understatement. Because we were making the custom parquets and medallions in the home already, she asked us to rip out the carpenter’s work and do it with every board being the same exact size.
First, my son Todd and I found out the specific gravity of the wood and calculated how much perimeter space to leave for the expansion of the wood based on the relative humidity of the space and the final width of each board, understanding that solid wood will get bigger across the width of each board and change significantly less in length. Then we determined how wide each plank had to be so every one ended up the exact same size. Sound complicated? Not really. It’s just a matter of getting an accurate measurement of each individual opening in the marble and then dividing to get the width of each plank, including leaving enough room for the expected expansion of the species.
If you still think math is too scary, trust me, I got through school with C- grades in math, and if I could do it, you can, too.
All Things Wood Floor, created by Wood Floor Business magazine, talks to interesting wood flooring pros to share knowledge, stories and tips on everything to do with wood flooring, from installation, sanding and finishing to business management.


 For this Brazilian cherry, we had to use math to calculate how much the wood would expand, as well as plan for where cuts would go.


