The phrase “Trust me, I have a plan” was used frequently during this project. My team was supportive, but I could occasionally catch a look that suggested they were trying to figure out whether I was a visionary or had finally lost my mind. The project wasn’t a typical building—it was a Texas castle rising from the rural landscape of West Texas. Designed to look as though it had stood for centuries, the structure was built to inspire awe, spark curiosity and give visitors a sense of adventure the moment they arrived.
A building like that deserved a floor with a story of its own, and creating it was our job.
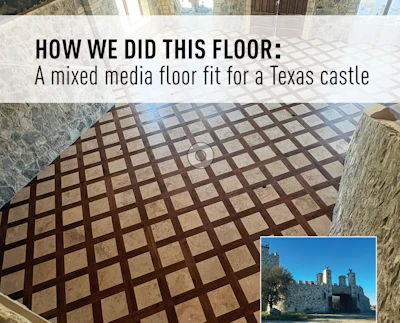
We had already installed pecan flooring milled from a pecan orchard on the property in another room in the castle, and now it was time for the flooring in the great room. The owner’s daughter is a designer, and she gave us the inspiration photos we used to spec the materials to create the floor. It became 7-inch-wide unfinished engineered Texas post oak woven around 18-by-18-inch travertine stone tiles in a basketweave pattern. This mixed media floor would span more than 1,600 square feet in a room with rock walls. Beautiful? Absolutely. Simple? Nope, which was why my crew were giving me those looks.
Wood flooring and stone have very different performance requirements. There were no published specifications or installation manual for this type of flooring assembly. We couldn’t simply look up the answers, so we had to create them as we dove in.
Here’s how we did this floor.
1) Figure out how to install the wood and stone together
Before we ever snapped a line or even thought about beginning the actual work, we had to figure out our installation system.
One of the biggest challenges was creating a perfectly flush transition between the wood—¾ inch thick—and the travertine, which was ½ inch thick. We ordered the wood to be thicker than the tile because we wanted room under the tile for the uncoupling membrane (more on that later), but we quickly realized that making the wood and tile flush was easier said than done.

After testing several options, we discovered that a standard saw blade kerf provided the ideal width of a slot where we could insert the tile-leveling clip spacers into the wood flooring (shown above). We used a table saw to cut custom kerfs into the wood flooring wherever stone would meet the wood. We also routed custom spline grooves to maintain tongue-and-groove connections between the pieces of wood flooring throughout the basketweave pattern.
We ordered the flooring without tongues and grooves or end-matching so we could control the precision of the milling.
2) Make an ultra-flat subfloor
On the jobsite, the first priority was subfloor prep.
We followed our usual moisture testing procedures for the slab to ensure everything was within acceptable limits, and we knew we would be using an adhesive that also has moisture protection.
Of course, flatness was critical. The wood flooring can accommodate minor variations, but stone cannot. To make sure the concrete slab subfloor was absolutely flat, we used our 10-foot straightedge and marked any areas where we needed to fill in low spots or grind down high spots so that we had the slab flat to within ⅛ inch over 10 feet.
3) Create precise lines
When a pattern goes across more than 1,600 square feet, even the smallest deviation can become a major problem. A tiny aberration that seems harmless in the first 20 square feet has a way of introducing itself again 1,000 square feet later—usually at the worst possible spot.
At first I used a tape measure to mark the grid lines, but after marking half the room, we realized there was too much variance with the tape measure—we were half an inch off. We had to wipe off those lines with a rag and start over. In the end we used trammel points to mark the lines.

To keep the pattern accurate, we used trammel points, laser layout systems, reference grids, and, after a massive amount of experimentation, custom-built jigs that perfectly marked the inside square for the travertine. That square had to be the size of the 16-inch-square tile plus 1/16 inch on all sides for the grout. Then we measured, checked and rechecked our lines.
4) Undercut the rock walls
The rock on the walls, which had been quarried directly from the ranch, went down to the concrete slab, so we used our undercut saw with a diamond blade and a dust port for a vac. We did two passes to eventually get the rock cut to the ¾-inch height of the flooring so the flooring could slide underneath for the cleanest look.
5) Install the wood flooring

Just like with a gym floor, where you start installing in the middle (shown above) to balance out any variances that happen during installation, we started our installation in the middle of this room. We began by installing the wood flooring, gluing it down with a moisture-barrier adhesive. As we installed it, we painstakingly checked and rechecked to be sure we were still precisely on our lines. Of course, we had to carefully spread the adhesive only within those lines:

As I mentioned, all the wood flooring edges were connected by a tongue and groove.
6) Figure out how to install under the stone walls
The building’s stone walls presented a challenge. First of all, the rock had enough of a contour that we had to scribe the edges of the flooring to match the shape of the rock. Second, with the design of the pattern, we realized it would be impossible to install some of the small triangle-shaped travertine pieces with thinset and the uncoupling membrane after the wood flooring was installed. So, those pieces had to be installed alongside the wood flooring as single assemblies. We figured out that a bed of urethane adhesive worked to hold those pieces in place for installation instead of using thinset.
7) Sand, stain and finish the wood
Once the wood installation was complete, we sanded, stained and finished the engineered oak. Because the wood had been so carefully milled, we only needed to sand it with 120 grit on our hand-held orbital sanders. Then we stained it by hand, ragging it on and off, being careful to not stain the rock walls or the little travertine triangles we had to install around the edges of the wood flooring, and then coating all the wood flooring with commercial-grade waterborne finish.

Once the finish had dried long enough, we put down 2-inch painters tape to protect all the edges of the wood flooring so we could install the tile.
8) Install the travertine
The travertine was installed over an uncoupling membrane, which absorbs any normal expansion or contraction of the subfloor and prevents it from affecting the stone. In our situation, it also helped the tile be at the same height as the wood flooring.
Of course, we had to cut each piece of uncoupling membrane for each opening for the travertine. I hadn’t used uncoupling membrane before, but I did read the official instructions! You apply the thinset to the slab, put down the uncoupling membrane, and then apply thinset to the uncoupling membrane and install the tile.

In our situation, the mortar bed for each tile opening had to allow the tile to meet the wood surface exactly. Typically what a tile layer does is lay down the tile, lift the tile to check transfer, then lay it back down. In our case, that wasn’t an option since the tile was surrounded by wood with only a 1/16-inch gap around it. I realized we had to measure what the exact correct amount of thinset was for each tile, so we developed a custom screed system that created a precise mortar bed:

By this point in the project, we had already modified the flooring, modified the installation sequence, and modified our expectations of what a normal flooring project looked like, so building a custom tool to measure a perfect mortar bed seemed perfectly reasonable!
The farther out to the edges you get on an installation like this, the harder it is to be precisely on your lines. I think we had a total of 380 travertine tiles, and we only had to cut down two travertines and add a small amount of wood to a couple squares (honestly, I was surprised we didn’t have to do more). You can’t tell with the naked eye, and it was nice knowing that even if we got beyond tolerances, there was a reasonable solution.
Step 9) Grout the tile and clean
Next we had to grout the 1/16-inch gap between the tile and the wood. You can buy flexible grout in caulking tubes, so we started with that, but it was tedious. Also, the more I thought about it, the more I realized we didn’t need tons of flexibility, because there was just one engineered piece of flooring between the tiles. We ended up using premixed acrylic grout, which is more flexible than regular cementitious grout but can be troweled on like normal grout. I did a test to see how this would affect the wood flooring, and I realized that we actually didn’t have to protect the wood flooring. With this grout, you spread it with a soft rubber trowel and squeegee it off at the same time. Then you immediately use a tile sponge to wipe up the excess. There wasn’t enough water residue to cause a problem with the wood flooring.

Once that was all done, we needed a deep clean of the surface of the travertine, and there were areas on the wood flooring that had a slight amount of haze from the grout. I experimented with a wax and polish remover, and that worked great on both the wood and the tile. So we sprayed the floor down with that cleaner, buffed it in, then had regular wood floor cleaner in the floor scrubber for a final clean.
I originally hoped for 800 man hours on this project, but I think by the end of this we had 1,000 hours. We weren’t there every single day, but in total it took about three and a half months.
Final thoughts

I’ve been doing this long enough that I don’t want the work to become routine. The projects that teach us the most are usually the ones that make us a little uncomfortable in the beginning, and this was definitely one of those projects. It seemed like every day we went out there, there was a new challenge, and we just kind of problem-solved them one by one as we went, testing every new process multiple times. On a project like this, the whole thing’s unconventional—you just can’t use conventional means to do a floor like that.
The team probably thought I was crazy more than once. Like I mentioned at the beginning, there were several moments when the phrase, “Trust me, I have a plan,” was met with some well-deserved skepticism. To their credit, they embraced the challenges every step of the way.
I’d like to recognize Hollie Garcia and Will Lightfoot in the office, along with our field technicians Jacob Ozmum, Joshua Luna, Justice Dumas, Jackson Dunham, Kenneth Collins, Paul Woods and Patrick Gause. Their willingness to adapt, problem-solve and pursue excellence made this project possible.
SUPPLIERS:
Abrasives: Bona, Norton | Adhesive: Bona Flow | Buffer: Bona | Dust containment: Bona DCS 2.0 | Edger: Bona Edge | Filler: Bona Pacific | Finish: Bona HD | Laser: Bosch | Moisture meter: Wagner | Router, Saws: DeWalt | Sander (big machine): Bona | Sander (palm): Festool RO 150 | Sander (multi-disc): Bona Power Drive | Software: Company Cam, FloorZap, QuickBooks, Protiv | Stain: Bona Special Walnut | Uncoupling Membrane: Schluter Ditra | Vacuum: Bona 50, Bona Back Vac | Wood flooring: WoodCo