Say the word "trigonometry," and unfortunately, many wood flooring contractors run for cover. Basic trigonometry is useful for the high-end wood flooring contractor, and it isn't that complicated. Understanding the basic principles can be the key to figuring out how to make your own custom medallions that draw top dollar and impress your clients.
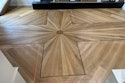
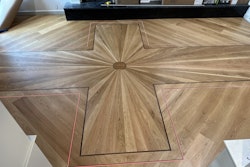
If you still need some convincing, read on. The following article will walk you through—from the most basic geometric definitions to figuring out the measurements for cuts in a custom radial inlay (such as the one shown below). They are concepts I use in my wood flooring contracting company every day, and they can benefit your business, too.
Taking the plunge
Your requirements to begin are simple. All you need is paper, a ruler, a drawing compass and, a little later, a calculator with trigonometric functions (the buttons are marked SIN, COS and TAN—I'll explain those in a minute). These are available at nearly any store for less than $12.
First, draw any straight line running from left to right and call this the X axis. Now, pick a point in the middle somewhere and use that point with your drawing compass to draw any size circle that best fits your paper. In our example, I use a radius of 5 inches, which draws a circle 10 inches in diameter. (Diameter is the width of the circle;radius is half the diameter).
Next, place the point of your compass on one point where the line and circle intersect, widen your compass a little,then draw two marks, one above and one below the center of the circle. Repeat the process using the second point where the X axis and the circle intersect, forming two sets of crossing marks—one above and one below the circle. Use your ruler to carefully draw a vertical line through those two sets of crossing marks. Amazingly, if all went well,your vertical line also went through the center point you used to draw your circle. Label the vertical line the Y axis. Label the intersection of the X and Y axes O (for origin). Your drawing should look like this:

This is the starting place for many designs. A helpful shortcut is to photocopy this drawing a few times so you have it to practice with until you get your medallion design looking the way you want it.
With this basic setup, pick any point on the circle and draw a line to the center point (this is the circle's radius). Now, draw a line perpendicular to the Y axis down to the X axis. You now have drawn a triangle inside the circle with some interesting features (See Figure 2). You will notice the triangle's hypotenuse, C, is opposite the 90° angle and is the same as the circle's radius. The other two angles are a and b and are opposite their respective sides A and B.

When a triangle is drawn in a circle with one corner at the circle's origin and the other on the circle's circumference, certain correlations exist between the triangle's interior angles,the lengths of the two sides and the hypotenuse. In other words, if we picture the hypotenuse rotating through different angles, the lengths of the two lesser sides vary in proportion to each other and the hypotenuse. These proportions, or ratios, are known as trigonometric functions and are defined as follows (q is the degrees in the angle):

What's the point?
I suspect you might ask: Why is all this information necessary. Well, it is amazing what we can do with these few things. You can use this to figure out: the quantity and sizes of wood needed to to cut an inlay, the board width required to create a custom design, the necessary angles to make a specified number of pieces, or the number of pieces that need to be cut to produce a full circle.
Let's do an example, and you'll see.
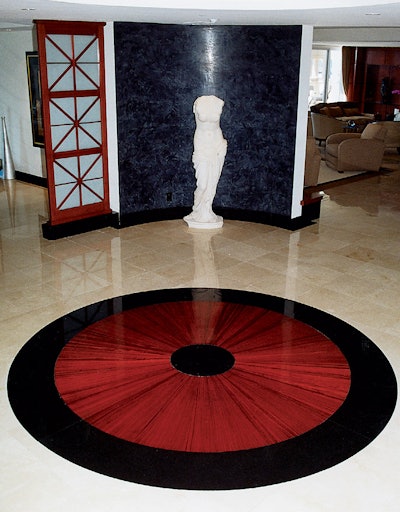
A customer wants you to make a 10inch-wide circular band in her entry foyer with the circle measuring 8 feet at the outside of the band. The floor is maple, and this design is to be made from purpleheart—not a cheap wood you can afford to waste!
Now we come to the crux of the issue: The outside radius is half of the8 feet, or 48 inches. The inside radius is 10 inches shorter, or 38 inches. So numbers don't get mixed up, it is a good habit to label these with either words or symbols. Symbols are shorter and easier to write, so let's make the outside radius ro and the inside radius ri.

From this information, we can calculate the circumferences for both inside and outside edges, namely Cx= 2prx (the little x is substituted as a label for the inside or outside numbers):

If the widest material you can get your hands on is 3-inch plank, then this will allow you to figure that you'll need at least 101 pieces to go around the outside edge:

That partial board won't do much for your design! I suggest keeping the number of pieces divisible by four,since it is easy to check the designs by90° sections, and making four identical sections will create the whole pattern. So, do the math a little differently,rounding up the number of pieces to the next number divisible by four:

This example gives us 26 pieces per quadrant.

Now you know you need 104 pieces. Use this to calculate the inside edge the same way:

So, if you cut 10-inch boards where the wide end is 2.899 inches and then arrow end is 2.296 inches, and you center the cut, all 104 wedges put side to side will make a circle as asked for in the beginning (see Figure 4).

Back to the trig
You're probably saying, "Hey, what happened to the trig stuff." That is used to set up your pieces on a table saw sled, or other jigs you may need to cut these pieces out, like this:
The earlier example needs to have a square block of wood cut at an angle on two sides. The angle we can figure out is precisely:

What?! Yep, that is the measured angle through the wedge you are going to make, and I don't know of too many saws that have that number on their angle scales. So, you can also use the trig functions to determine where marks are on your jigs or sleds to cut your pieces:
Mark a table saw sled to make the first and second cut passes. To get accurate marks, use trig functions to set up the guide fences as follows:
The sled is built so the inside blade cut is exactly on the sled's edge (see Figure 5). It is easier to establish working lines with whole-number dimensions rather than numbers like 2.694and 2.899 inches, so select whole number distances easily found on your ruler, such as 1, 4 or 7 inches, as your project dictates. Trig functions determine how far apart you'll make these marks.

The first pass cut needs to be half the final cut angle, so divide it by 2:

Use the formula for the tangent of any angle, like this:

Putting in the proper numbers gives us the information we need to mark the sled:

The value you get for the adjacent will give the distance from center of the circle to that point where the opposite side is 2 and 3 inches tall, respectively. A little algebra is needed to move terms around:

And for the 3-inch measurement:

These measurements (66.187" and99.281") are distances from circle center. Subtracting them leaves you with the difference (distance apart) they are to be marked on the sled.
99.281"- 66.187" = 33.094"
So, if you make two marks on your jig, with the first mark 2 inches perpendicular to the sled edge and the second mark 33.094" down the edge and 3" perpendicular to the edge, the line between these two points is1.7308° from the sled edge, and that is the edge of the angled fence. Fasten the angled fence to the sled securely.
Setting the stop fence on the sled isa matter of measuring the end distance (2.8999") from the angle fence to the sled edge.
Make the second pass cuts on this same sled by repeating the above math—this time for the full angle, flipping over the first pass pieces and resetting the stop fence at the required distance from the angle fence:

For the 3-inch measurement:

Remember: Subtracting them leaves you with the difference (distance apart) they are to be marked on the sled.
45.596" - 33.064" = 12.532"
Run 26 test pieces using masonite or other hard and inexpensive materials. These pieces should sweep 90°. If they are off, some tweaking will be necessary, since very small errors are multiplied by the quantity of pieces being cut. If the outside edges overrun the90°, then the angle is slightly larger than needed. Conversely, if the inside overruns the 90°, the angle is slightly smaller than needed. Using a piece or two of tape on the angle fence at the appropriate place is usually enough,because that small adjustment is multiplied by the number of pieces being cut (i.e. adjust fence by 0.02" x 26 cuts= total adjustment of 0.52")
The final dimensions from the narrow to wide ends of the cuts should agree with the mathematical division of the circumferences into 104 pieces,namely 2.296" and 2.899."
You've just completed your first trig for wood flooring lesson. Now go put this theory into practice. Accuracy in measurements, tool alignments, your skills and patience (a lot of patience in the beginning!) all will contribute to the success of making your wedges and beautiful radial inlays.