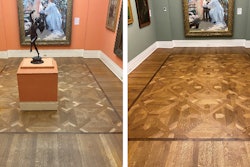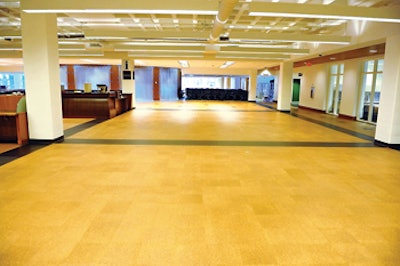
 photo of cork floor in Addleston Library on the College of Charleston campus
Earlier this year I was asked to look at a cork floor and give my opinion on what could be done to fix it. The floor was at the Addleston Library on the College of Charleston campus; the request came from the architect and the college. The building was approximately seven years old and had three levels, each with approximately 30,000 square feet of 3/16-inch factory-finished cork flooring in its natural color accented with dark brown cork tiles. According to the college staff, sometime around three to four years after installation the cork flooring began to exhibit loose tiles, severe surface abrasion with loss of the applied finish, and peaking edges, along with random cupping and severe uniform fading of both colors throughout the entire installation.
In an attempt to help restore the floor's surface appearance, the college had hired a flooring contractor who screened and recoated the cork flooring throughout the first floor. However, in random areas, the newly coated urethane was peeling from the cork's surface, and the finish also showed bubbles, blisters and encapsulation of the topical dirt, which, of course, now could not be removed by normal maintenance.
The college staff were in a bind: They were anxious and perplexed about having a fairly new high-profile library with a floor that already looked worn, damaged and faded, and they had conflicting opinions from multiple contractors and other individuals in the flooring industry regarding what to do. Should they replace the entire floor or resand it? If it needed to be resanded, how should it be done?
During my inspection, I focused on the first level, which was the major concern due to its being the main entrance. I could see that in addition to the other complaints, the substrate hadn't been brought to within industry requirements; there were differences in height of ½ inch in 6 feet and as much as 1½ inches in 30 feet. There was also the issue of covered channels under the floor where electrical wiring ran for the numerous computer stations.
When my inspection was completed, I concluded the cork flooring could be resanded and refinished after certain repairs were completed, such as replacing worn, loose and damaged tiles. I explained that the undulations within the substrate, which were highly visible telegraphing through the tiles, wouldn't go away, since the subfloor had not been flattened. On a positive note, I explained that, after sanding, the natural and dark tiles would return to their original colors (the color on the dark tiles goes through the thickness of the material due to heating during manufacturing) and would be protected by a urethane coating. In order to make the college more comfortable about my decision, I resanded and coated a small test area so they could see exactly what the cork would look like.
After a lengthy discussion, the architect and representatives from the college requested I provide a detailed specification including the required machinery, tools, products, abrasive grit, screen grit, urethane and methods of sanding and screening, as well as any other details. The final spec was sent out for bid, and the contract was awarded to J & J Floormasters based in Long Island City, N.Y., owned by Joseph Santiago, because the company has extensive experience with cork flooring, has the ability to perform on short notice with time restrictions, and has enough experienced manpower to tackle a job of this scope.
First Steps
I was hired to oversee the project along with Joe so we could collectively resolve any problems or changes to complete the work within the specification. Joe visited the job site, and within seven days, 12 men, all experienced in cork flooring, were on the job site starting to sand and replace tiles.
When working with cork, each job can be different depending on its density, thickness, type of substrate, substrate flatness, the way it was adhered, and its topical coating, whether applied at the factory or on-site (all which is dependent on specification). For this job, belt sanders and a multiple-disc sander were used, first cutting at a 45-degree angle to provide a cleaner cut to the tile edges and to help avoid the drum falling on the seams between the tiles. Typically 80-grit paper can be used for the first cut, but due to this tile being recoated with urethane not long ago, we had to use a more aggressive cut to remove the coating.
A belt or drum sander is not usually the first choice for sanding cork flooring, but the key is knowing how to adjust the machine's drum height properly, reducing its pressure, and how to maneuver it as you sand. When running the machine, your speed should be about twice as fast as you would go on a typical wood floor; you actually have to push the machine instead of letting it pull you at its pace. Cork tile can easily be cut through, so both short or long passes should be done as fast as possible to remove the proper amount of surface. A common alternate method to using the belt or drum sander is to just abrade the floor using a hardplate or regular buffer driver, provided the substrate is within the industry tolerances.
After the first sanding pass, we vacuumed the floor to remove any residual cork dust, and in this case it served a dual purpose-it helped us verify the tiles' bond strength to the substrate. Instead of using a hand mallet to check the bond, we attached a small upholstery nozzle to the vacuum. When passed over the tile to remove the cork dust, the nozzle would grab and hold or pull up any loose tiles, allowing us to see which tiles needed to be replaced. When the floor was originally installed, the contractor used a one-part adhesive, but with cork flooring it's best to use a contact adhesive to ensure full bonding to the substrate. Overall, approximately 500 tiles were replaced, and we found the perimeters were particularly loose due to the adhesive being skinned over from excessive open time.
Next, the floor was sanded at a 45-degree angle using 80-grit paper, followed by the multi-disc sander with 100-grit paper in areas where the floor had multiple undulations in the substrate. This method allowed the cork surface to be sanded without cutting excessive material from its face.
The floor was cleaned and then screened twice using a maroon pad with abrasive strips, going from 120 to 150. For some sections with a smoother surface, a hardplate was used. The techniques, grits and processes were all chosen based on the condition of the floor-primarily the condition of the substrate-in order to provide removal of just enough surface area without damaging or cutting excess material.
Sanding Particularities
Sanding a cork floor always presents a judgment call, and this job certainly illustrated that. Because cork will conform to all irregularities in the substrate, you have to be careful when sanding, regardless of what machine, grit and technique you use. There may be a 1-foot-square area where the floor dipped or is raised, and therefore you must be careful, as your machine may not cut the floor at all, or you might cut off excess material. In areas where there are dips, you have to go back over the depressed area with an edger or palm sander to remove the proper amount from the cork's surface. When screening or buffing, you've got to learn to ride the ups and downs of the floor; I refer to it as "riding the waves" instead of always going in a straight path. It takes practice to learn how to manage the machines and choose the right angle of the machines so you work with the undulations in a delicate way.
Another tricky thing about cork is that, occasionally, different areas throughout an installation of this size may cut differently due to slight variations of the cork density. The lesson is: Always try to begin with the highest grit paper or screen possible and adjust to more aggressive grits only if necessary to get the proper amount of surface removed.
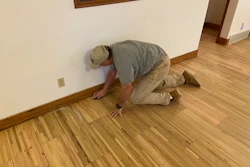
This job provided some additional sanding challenges. There were rows of hundreds of computer desks that could not be moved or disassembled, so all these areas had to be hand-sanded. Adjacent to the desks and also within the field areas, the subfloor had channels around 2 to 4 feet wide and some over 40 feet long where the computer wiring was run. We could see and feel downward deflection when walking over these access channels. In order to stabilize the substrate, we used sandbags to weigh down 10-foot sections of the channels so we could sand the floor without movement as we worked our way slowly, with extreme caution, along their length, moving the sand bags as we progressed. Overall, the amount of material we removed from the tile faces throughout this job was between 1?16 to 3?32 inch.
Finishing Up
Per the specification, a European waterborne finish specifically formulated for cork was used. The first coat was rolled on with a light or reduced spread rate so the edges of the tiles would not be saturated, which can sometimes cause the edges of cork tiles to swell. This first coat acts as a base coat or sealer, helping to provide an even application of the remaining coats and preventing excessive urethane from penetrating between the seams.
The second coat was rolled north and south after proper drying time of the first coat, keeping control of the recommended spread rate per the urethane manufacturer's specifications. We used fans directing air flow away from the urethane but providing air movement, which is important for the urethane to cure properly and evenly across a job this big (or one of any size, for that matter). After allowing the second coat to properly dry (verifying it with surface moisture meters), the floor was screened lightly with a maroon pad, and the third coat was rolled east and west.
Most urethane waterborne finishes will work on cork, but always check to make sure what you've chosen is recommended by the manufacturer. The finish must have enough elasticity so it doesn't fracture when walked on and the cork tile compresses, but also have strength and durability for overall long-term performance.
Looking back, the biggest obstacles on this job were definitely the undulations in the substrate-trying to work with its uneven subfloor without removing excess cork material-as well as having to hand-sand around the computer desks and manage sanding over the deflecting channels. Of course, you can still see many undulations (see the "after" photo in the middle of page 43), but now the tiles are restored to their original colors, all surface debris is removed, and the cork floor is completely refurbished, with the approval of the entire college staff involved in the process. The new finish is wearing extremely well and is maintained within the outlined spec, and the appearance of the library isn't an embarrassment to the college anymore. The college was also extremely pleased that the contractor could provide the college with enough manpower to complete the job within a tight timeframe while surpassing expectations for the floor's overall appearance.
It does take experience working with cork, as with any other flooring material, but it is not that difficult if you are trained properly and taught how to overcome any obstacles. This particular job was very difficult-some people had predicted it couldn't be corrected in this manner-but with the expertise of the crews using the specified guidelines, it turned out beautifully.
J & J Floormasters also contributed to this article.
Before Photos |
|
|
|
|
|
|
|
Before |
After |
|
|
|
Before |
After |
|
|
|
Before |
After |
|
|
|