Here in the area where I do the majority of my work—central Wisconsin—there are a lot of old houses with original maple flooring. This old maple differs a bit from newer maple floors. I've found that, the older maple floors become, the harder they seem to get. Some even get so hard they feel like you're sanding concrete, causing your paper to dull out extremely fast. Here are a few things I've found that will help you in your sanding process if you find yourself having to sand one of these old maple floors.
1) Don't Use Too Low of a Grit
Many times on these old maple floors, there is a type of coating that tends to gum up the sandpaper. I generally don't like to use any less than a 36-grit paper. However, if the floor is in really bad shape and has old varnish or black backing from a linoleum floor, I'm required to go down to a 24-grit paper. Using too low of a grit means working very hard to remove the sanding marks left from using the open-coat papers.
2) Edger Paper Does Matter
Generally, I have noticed that the newer hybrid minerals like zirconia or ceramic variations tend to not cut as fast and kind of skate over the surface. However, they tend to leave a deeper scratch pattern in the floor because the mineral particles are tougher and do not wear down as fast. For my final paper used for edging, I find silicon carbide abrasive discs work the best. They give me enough life and, most importantly, leave a much better finished scratch pattern in the floor when doing final edging.
3) Go Fine or Go Home
Because maple floors are characteristically hard and very straight-grained, they show every sanding imperfection. This is even more true for older floors because of the hardness. When I sand maple, no matter if I'm doing it natural or staining the floor, I finish off with 120-grit paper on my big sander. I also like to keep the drum pressure in the middle position to help make sure that the sanding peaks from the last cut are all taken out.
4) Dust Can Be Your Friend
Many times these old floors aren't flat, even after you've sanded them. I've done some floors where I put a 6-foot level on the floor and it dropped 3 inches! Even if your big machine is cutting super-flat, there still is the possibility of leaving sanding lines. I know we typically want to keep as much dust off of the floor as possible, but I've found, in cases like this, a little dust can help out a lot when screening the floor, because it will help show any sanding lines left from an area of the floor that is slanted.
5) Gaps, Gaps, Gaps
So many old floors have gaps caused from years and years without maintenance. Also, many of these homes did not install cooling systems until years after the floor was installed, causing the floor to expand and contract. Each time this happened, dirt and debris got caught in the cracks, leaving the wood unable to fit as tightly as it had previously. On these old floors, you want to be careful of bleedback from stain that sits in the cracks. Sometimes, even if you check the floor with a moisture meter before applying the finish, stain that sits in the cracks isn't dry. I've even seen this happen when using a water-based sealer. You want to make sure you give yourself enough time between each coat of finish so you don't get poly beads.
These are a few tricks I've learned over the years of sanding old maple floors. Hope it helps you out on your next maple refinish. If you have any questions, feel free to contact me. Happy sanding!
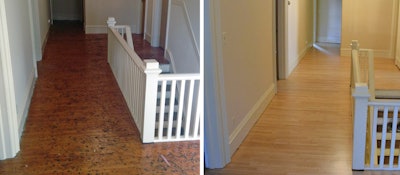
 (Before) This is a 20-year-old maple floor that discolored over time because of the UV-sensitive finish used. It also was very cupped and required that I sand it at about 35-degree angle on the first cut. Sanding it very fine was important, because I stained the floor a nutmeg color.
 Before
 After
After
 After
After
 This patterned floor is about 60-year-old maple. It took a lot of work to get it flat: I had to use a multi-disc sander to make sure all the scratch marks were gone from where the big machine overlapped and went across the grain (this is where leaving some dust on the floor helped me see some of the scratches).