Recently a wood floor finisher asked for some advice regarding a job he was about to begin. His customer wanted a wide maple floor finished in a 2,000-square-foot house. The floor was to be sanded, stained a dark brown color and finished with four coats of a leading waterborne finish in a satin sheen. The customer and his designer made it clear that the stain color and the satin sheen level was expected to be even and uniform over the entire floor area. A sample was made, and the designer wanted the stain more uniform. This finisher has been in business for many years and in recent years has found customers are becoming more critical. He has become very fussy in his sanding procedure and is doing the best finishing job he can, but his high-end customers are never quite satisfied. He has bought new equipment to avoid old machine problems and has tried to keep up with newer tools and techniques. He is confident in the skills he's learned over many years, but the newer products don't seem to work the same as his old favorites. His biggest concern on this job is not his abilities, but his customer's occupation — he happens to be an attorney.
He is hardly alone in his concerns. Contractors everywhere are asking, "How has wood flooring work become so critical over the years?" and, "Why do we have more problems with maple floors than we have with oak?"
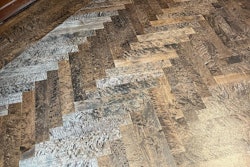
Maple flooring has had a major resurgence since white floors lost popularity in the early 1990s. Because of its clean, light appearance that is easy to decorate around, maple has become the flooring of choice when a light design is required. Along with maple strip flooring, more maple plank is being installed, and in areas where maple was not prevalent in the past. Areas with high relative humidity, such as Florida, are seeing maple plank gain popularity. This can create concerns for installers because of the relative instability of wide maple flooring. Fortunately, with climate control more widespread than ever before, these issues have been minimized to some extent.
Of greater concern to many wood floor finishers are the difficulties that can and do arise when sanding and finishing maple. These can include sandpaper lines, abrasive selection, screen or swirl marks, wavy grain appearance, stains not taking uniformly, debris in the finish between coat abrasion and uneven sheens in low sheen finishes. Understanding how some of these issues create problems can save you time and money.
A Little History
In the 1950s and '60s, most final sandings on wood floors were done with 60- and 80-grit sandpapers. Most residential floors were oak. Sandpaper discs (hard plating) were finding use on parquet and mosaic floors. Screens were not yet invented. Drum machines — the only ones available then — ran considerably slower than the belt sanders of today. The most commonly used finishes were shellac, varnish and seal-and-wax. Lacquer, moisture-cured polyurethane, oil-modified poly and Swedish finishes were gaining popularity. With many of those early products being so forgiving, most of the problems encountered by floor finishers were procedural. Today floors are being sanded with belt sanders to 120 and 150 grit and screened with 180 grit on rotary and orbital machines. VOC compliant oil stains, which have less solvent than older products and can take longer to dry, are used nationally. Waterborne finishes are applied in multiple coats, sometimes four or five. Between coats, sealers and finishes are treated with abrasive pads with very fine sanding strips.
Any one of these changes can cause problems, and when we combine them all, we have different and more complex finishing problems than in the past. Most, however, are still procedural. Some species, such as oak, are more likely to help the flooring contractor by hiding some of these mistakes. Maple,however, is not so forgiving. Not so many years ago, many in our industry referred to a maple herringbone floor coated with waterborne finish as "The Floor From Hell." This was because every sanding and application imperfection tends to show up on dense, light-colored woods such as maple, and applying finish across the grain was, and still is, a challenge. With the improvements in waterborne finish technology, flow and leveling are becoming less of a problem, but the finisher must still be vigilant.
Abrasives
One secret to sanding maple to a smooth, level finish is to start with an abrasive grade that will take down over wood at the side-match and level butting end joints. Inexperienced floor sanders attempt rough-sanding with a grade of paper too fine to effectively flatten the floor and remove the overwood. This comes from either trying to avoid an extra sanding or a fear of being too aggressive. That extra sanding maybe the key to a good job.
As when sanding any floor, never skip more than one grade of paper. When trying to save a sanding step, the lines from the previous sandpaper grade always shows up in the final finish coat. Sanding finer than 100 grit and/or fine screening closes the already tight grain of maple so much that the finish coats tend to show a washboard effect. This effect does not show up until the third or fourth coat is applied, and it is difficult to hide. This is the same as the grainy, hungry look that appears on oak, but since the maple grain is tighter, it shows as a washboard or wavy look. The deeper the seal coat penetrates and the longer it is allowed to dry before abrading, the flatter and more level the floor will look.
Sanding
When fine sanding maple floors, always reduce drum pressure to its lowest setting and slow the drum speed if your machine allows for it. Avoid sanding maple too smooth. Depending on the finish being applied, anything finer than 100 grit may be too smooth — always consult the finish manufacturer's directions.
RELATED: The Basics of Sanding Wood Flooring
Chatter marks with drum machines have been around for almost 40 years, and while waves in belt machines are newer, they can be just as frustrating. These can be an issue with any type of flooring, but especially with maple. Woods with open, porous grain, such as oak, can hide a small amount of these imperfections, but they stand out on maple and other dense woods.
Check that wheels are clean and free of debris, inspect drive and fan belts for splits or cracks, and check pulleys for chips. Keeping equipment in good working condition and paying attention to how paper is loaded can go a long way to eliminating wave and chatter. On belt machines, keep the upper roller assembly clean.
Many contractors do not like to screen maple. Screen scratches or swirl marks seem to have a way of showing in the final finish. The tendency is to sand and/or screen finer to hide these sanding imperfections, and this can lead to finish problems. Prior to the introduction of sanding screens, all floors were drum-sanded, edged and the edges hand-scraped and/or hand-sanded. This procedure is still recommended for many floors, and especially for floors being stained.
Cleaning
Debris in the finish coats accounts for many complaints when finishing maple. Again, the density of the wood and the light color tend to show even the slightest amount of dirt or dust. Thoroughly vacuum not only the floor but all baseboards, window sills and any adjoining areas. Then vacuum the floor a second time. This step pays dividends. Create a clean area adjacent to your work area and clean your shoes, pants and knee pads before the application of any finish coats. Many finishers keep a pair of smooth-soled shoes for finishing only, while others will wear "booties." It's also advisable not to let anyone enter your work area once it is prepared for finish coats. When carpeting adjoins your work area, cover the carpet with a drop cloth to avoid stirring up carpet fibers and tracking them in. Fibers in a final coat can bring you back for a recoat. Tack the floor with water, a solvent product or tack cloth appropriate for the sealer and finish you are applying.
Staining
Staining maple is generally not recommended by finish manufacturers since the dense grain does not allow the penetration of most pigments. Dyes work better but limit the colors available. Maple is a difficult wood on which to achieve uniform stain, and the appearance can look as if the stain was not applied evenly. If you screen before staining, be aware that the screen marks will show in any dark stain color. Educate customers about the difficulties involved in the staining of maple so they are warned of possible appearance issues.
RELATED: Get a Handle on Wood Floor Staining Strategies
Show the customer a variety of wood tone stains reduced with neutral stain. By using wood-tone stains mixed with neutral or clear stain, screen marks will be less noticeable and the stain will appear to be more uniform. Should the customer expect a darker, more uniform color, there are two other procedures that can be used. The first is to sand the floor with 100 grit on the drum machine and the edger, and then hand sand the edges with the grain with 80grit sandpaper. The second is to screen and then "pop the grain" with water and allow to dry overnight before staining.
The result of these options is that the neutral-stain floor will have the least stain color showing, the "popped grain"floor will have the deepest color with some blotchy areas of grain, while the drum-sanded floor will have the most uniform color and most even appearance. There is more hand work involved in this last floor, but the results are well worth the time and effort.
Application tools
The correct finish application tools to use when finishing a maple floor are the ones that you are the most comfortable with. Since maple floors can be touchy to finish, it is never a good idea to try anew or different application tool. Whether you use a brush, roller, lambswool or T-bar, the key to a good finish job is an even, uniform coating. It is important to feather any tool if applying a low-sheen finish. The T-bar type waterborne applicator has become popular with almost every type of finish, and is a fast way to get a uniform coating.
Between coats
Take care when abrading between multiple sealer and finish coats. Maple's density and light color can make screen marks, sandpaper lines or swirls obvious. No matter whether sandpaper strips or screens are used, it is the sharpness of these materials that causes marks, even in fine grades such as 150 or 180 grits. The safest approach when abrading between coats is to always use worn or old sandpaper or screens. Many floor finishers have found an advantage to using maroon abrasive pads between coats instead of screens (use the abrasive recommended by the finish manufacturer). Remember, between coats the intent is to smooth the coating, not remove it. Minimal abrasion is preferable to aggressive abrasion.
Be aware that scratches tend to be more prominent if thick or heavy finish coats are applied. This is especially true when using non-compliant oil-modified polyurethane or VOC-compliant oil-modified urethane. Hand-sanding between coats with used sandpaper,screens or abrasive pads in the direction of the grain helps to avoid screen marks. Many contractors feel that it is"old fashioned" to get on their knees and hand-sand a floor. Be advised that if it eliminates problems, then it is well worth the time it takes.
Low-sheen finishes
Maple is noted for being problematic with uneven finish sheens. The theory is that uneven coats of any low-sheen finish, especially satin or matte, can show up as shiny streaks or spots on a finished floor. Also obvious on these same floors are stop marks from lambswool applicators and trail ridges from T-bars. Many finishers then think that the material was bad or that the flattening agent was not mixed in sufficiently.
The fact is that the flatter and smoother a dense floor becomes, the more critical the application of the finish coats becomes. Problems usually show up on the third or fourth coats. Shiny areas can appear wherever there are heavy finish spots such as drops, puddles, turn or stop marks. As the flattening agent settles to the bottom of the applied coating, any area where there is a heavier film appears glossier due to the additional film build in that spot. These are even more obvious under can lighting or where there are large windows. The reason this phenomenon appears more in satin or matte coatings is because of the greater amount of flattening agent added to achieve the lower sheen. This can happen with any type of finish.
The best way to avoid this problem is to make the customer aware of the possibility. Stick with semi-gloss or gloss topcoats and use care when coating. Keep in mind that thinner coats always work better on maple. If shiny streaks or spots appear, it is difficult to hide them by recoating. Also, as the number of coats increases or as the coats become heavier, the higher the sheen level. Satin can look like semigloss; semi-gloss can look like gloss.
Find your own way
There is no magic solution or tool for sanding and finishing a maple floor. The best application tool and procedure is the one that the finisher is the most comfortable using. The trick to getting a great finish on maple is a diligent sanding job and the application of thin, uniform coats, with sufficient dry time on each coat. Contractors who specialize in finishing maple floors develop methods and procedures for completing beautiful floors time after time. When you find a process and product that works for you, don't change unless you can see a significant improvement.
No matter what your customer's occupation, you can show that you area professional by ensuring your customers understand the ramifications of what they request. If you head off the problems before they happen, everyone will be happier, and you will get repeat business and referrals from your customer. Develop a reputation for not having problems — being the "expert"means just that.