
A main selling point of wood floors is that when maintained properly, they last a lifetime—if not longer. In fact, your floor will probably outlive you. Evidence of this fact can be found in the beautiful wood flooring that still exists in historic buildings throughout the country and around the world. Some of these structures have floors well beyond 100 years old. The hand craftsmanship and use of wood species that may be extinct today make these floors a time capsule underfoot. As these floors continue to age, owners of the floors look to wood flooring contractors to preserve their piece of history. Given the conditions of these floors and the buildings in which they are located, this is not always an easy task. Working with older floors is a balancing act—you must preserve the floor while making it look as new as possible. Here are some tips on how to revitalize these wooden treasures.
Assess the Situation
When considering a job with older floors, carefully inspect both the floors and the building. With structures more than a century old, there are going to be conditions that present challenges to a flooring contractor. You're almost guaranteed to have complications during the job, but if you can spot most potential problems beforehand, it can spare you a lot of headaches.
The structural integrity of older buildings can vary from perfectly sound to downright dangerous. Although you're a flooring professional, not a structural engineer, you still need to determine the condition of the foundation, joists and support beams. Many of these buildings have settled, leaving the floors far from flat. If you try to flatten the floor in one area of the room, you could throw it off kilter in another area, which changes door heights and creates a host of other problems. If you're installing a new floor to match an existing floor, the new floors may have to be at a slight slope. If there are major structural problems, a general contractor should be involved to address them before you work on the floor.
Another area to inspect is the basement or crawlspace. Perform all your usual checks for jobsite conditions, and also take a look up at the subfloor to see if you can spot potential problems. Some of the boards may be rotten or damaged. Look for signs of termites—past and present. Because termites won't eat the chemicals in the finish, damage may not be evident upon first glance at the wood floor from above. Looking at the subfloor and the joists from below helps reveal if the pests have invaded the home. If one area has termite damage, it's likely other areas of the home are affected.
Back when these structures were built, building codes were almost nonexistent. In some cases, there may not be a subfloor at all, with the floor nailed directly to the joists. Some buildings may have gas pipes or wiring that run beneath the floor. Unexpected things could lie beneath the wood, which makes it crucial that your saw is set at the proper depth.
Once you've inspected the basement, go upstairs and check the floor. One of the main things to check is the wear layer of the floor. Depending on how many times the floor has been sanded in the past, there may be little or no wear layer left to sand. If the top part of the groove is breaking off or if you can see nail heads, the floor is at the end of its sanding life. Check transitions, air vents or anywhere else you can see the edges of the boards in as many places as possible. If there are questionable areas, don't start sanding—discuss it with the customer. Many old floors require a more aggressive sanding to remove multiple layers of old varnish or wax (more on that later), so be sure there is enough wood to accommodate multiple heavy cuts if necessary.
Through years of wear, the surface of the floor is bound to have some stains or damage. Moisture and pets are common culprits for damaged boards. Look for discolored or warped boards, and point out all of the questionable areas to the customer. If the damage is relatively minor, sanding could remove the stains. Severe damage requires board replacement or a partial tear-out to properly fix the floor.
Many older floors are covered by carpet or vinyl, and until you remove the old floor covering, it is difficult to determine the condition of the floors underneath. You can pull up corners and look in the closets in several places, but you never know what problems can arise until the entire floor covering is ripped out. Sometimes you still don't know until you start sanding the floor. Many contractors prefer to rip out carpeting themselves, so they know the wood won't be damaged in the process. If you tear out carpeting, your estimate should include the extra labor involved for removing the large amount of staples that likely will litter the floor.
Customer Expectations
Be up front with your customers and involve them in every step of the process. Before you start the job, find out what their expectations are. Walk the floor and note all areas of concern.
Be up front—no matter how good your sanding or repair job may be, a 100year-old floor won't look and perform like a new floor. Also, let them know that the more aggressively you sand the floor, the more life you take out of it. Some of the antique wood on these floors can no longer be found, so you want to do everything you can to save the wood, leaving as much of the wear layer as possible.
Other common customer concerns are squeaks and gaps in the floor. After years of settling, older floors may have much more movement and flexibility than their newer counterparts. Many older floors were fastened by hand with cut nails, and over the years, the nails have loosened. Also, old subloors are not as sturdy as those used today. There are going to be squeaks and cracks in an old floor—despite your efforts to get rid of them. You could nail down a squeaky board, but the squeak could move to another board. Unless you pull out the boards and fix the subfloor, the floor is going to make noise.
Likewise, most contractors find that filling in every gap in old floors is a waste of time and money. Because there is so much movement in the floor, after a few seasons the filler usually comes out. Educate customers about these issues to make sure their expectations are realistic.
Hazards
The homes and buildings with these older floors were built before there were strict building codes and environmental standards. This could present potential hazards for you, your workers and the occupants if you don't take precautions. One accident or lawsuit could put your company out of business.
Asbestos adhesives and asbestosbacked tile were common 100 years ago, so you need to be careful when removing old floor coverings or sanding over the top of what was an old subfloor. If there is any chance the floor contains asbestos, don't disturb it. Once the particles become airborne, they can be deadly. Become familiar with old floor coverings that used asbestos—9-by-9-inch tiles are common culprits. When in doubt, get the floor tested, and if there is a trace of hazardous material, inform the customer so he can call in an abatement company.
It used to be common to paint floors and stairs, and lead was used in paint until the late '70s. If an older floor is painted, there's a good chance it contains lead. You can buy a test kit at your local hardware store or have it tested by a professional. As with asbestos, lead becomes toxic when the particles become airborne. If lead is present, you can call in an abatement company, or simply paint over the floor or stairs with a new design or color.
The lack of building codes also means that some of these older homes have poor wiring and electrical systems. Many of the homes don't have 220-volt service, and sanding machines might not run properly, if at all. Check the electrical service, and bring in a booster box or generator if necessary. In these situations, some contractors prefer to use machines that can run on 110 volts.
Be especially careful when working over electrical sockets that are in the floor. Wax contains flammable mineral spirits, and when applied with steel wool near an electrical socket, it could create an arc of electricity and start a fire.
As always, be diligent about emptying the sawdust out of your bags. Old lacquer and wax finishes mixed with wood dust can be an especially dangerous recipe for spontaneous combustion. Every time you leave the house, empty your sander bags, even if they aren't full.
Board Repair
Repairing a board and getting it to match an old floor is a difficult process—one that separates experienced contractors from novices. The first step is determining the condition of the floor to see if it is stable enough to handle a board repair. Sometimes a floor is so fragile and has been sanded down so many times that removing a board can create a domino effect, damaging other boards around it. It may be best to lightly sand and finish the damaged board. Or, you may be able to perform a surface repair with filler and stain. Show the area to the customer and explain the situation—perhaps an area rug or furniture will be placed over the damaged boards, making them less noticeable. In areas that have holes from old radiators, sometimes it's best to plug the holes rather than replace the boards. If there is no subfloor below, you will have to create a minisubfloor of your own by installing boards to the sides of the joists in the repair area. Check with the customer to see if she wants to invest the time and money into such a complicated process.
The next step in board repair is matching the wood. Oftentimes, the wood is no longer available, and it's difficult to find the same species of wood to replace the damaged boards. And, even if you can find the same species, the new boards won't look anything like the aged wood. Antique floors also have varying widths—some are as narrow as 1 1 / 4 inch or as wide as 24 inches. The best way to match an old floor is to use wood from the same job site. This can be from wood in a closet or other non-conspicuous place in the home. When you remove older, fragile boards from another area, keep in mind that you are going to have a lot of waste— up to half. Make sure you have enough wood to cover your repair.
The next best way to match an old wood is to use wood from the same era salvaged from old buildings. Contractors who commonly work on historical floors often are savvy about recovering wood floors from old buildings that are going to be demolished. They clean up the wood, remove nails from the salvageable boards, package them together and store them so they have all types of wood on hand for such repairs.
If you can't find old flooring for your repair, you will have to use new wood and stain it to match the existing floor. Even if you are going to sand and stain both the old floor and the new floor, you need to use a different mix of color on the new floor so it matches the amber tone of the old floor. Some contractors use blends of stains and tints, wood bleach or faux-finishing techniques to match the boards. Because there is so much trial and error involved, create several test panels until you get a match, and have the customer sign off on it.
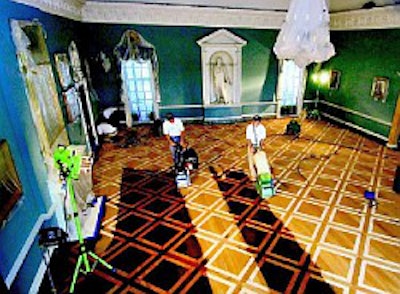
Sanding
Sanding old floors takes both patience and experience. They may require a more aggressive sanding to remove the dips, rolls and general unevenness in the floor, as well as all the layers of old varnish, wax and other debris embedded in the floor. As mentioned before, sometimes removing the dips and rolls is not an option. There is a balance between being aggressive enough to remove imperfections and keeping enough wood to preserve the wear layer. If you are going to sand the floor, it may be the last sanding the floor can withstand, so you better do it right.
Start with the least aggressive grit as you can to get down to bare wood. This may take longer, but it will extend the life of the floor. The goal is not to get the floor completely flat, but as flat as possible while still preserving the floor. Depending on the condition of the floor, try starting with 60 or 50 grit. If that doesn't work, drop down until you achieve an adequate cut to get the old finish off. Every floor sands differently, and sometimes you have to experiment to see what works best. As always, once you make your initial cut, follow the proper grit sequence.
If the floor is fragile or if the customer wants a lot of character left in the floor, you may have to hand-sand the entire floor. At the very least, you will have to hand-sand a portion of the floor. Many historic floors have so many highs and lows, with variations between boards, that a big machine would take too much wood off the surface. Areas around the perimeter also need to be hand-scraped, especially if they abut marble baseboards or ornate trim. Once you sand the floor, show it to your customer and address questionable areas before you apply your first coat of finish.
Finishing
Once the floor is sanded, extra care still needs to be taken with the finishing process. The finish tends to pool in the gaps and divots, which could lead to the finish not curing properly. Some contractors try to prevent this by brushing the finish on by hand in lighter coats.
From the turn of the century and continuing through the '70s, wax was a popular finish. Some people waxed their floors every year or more. This may have helped preserve the floors, but it left countless layers of wax embedded in the grain and between boards. No matter how well you sand the floor, wax can remain, which could cause contamination of modern-day finishes. In these cases, it's best to reapply a slip-resistant wax and avoid these problems.
If a waxed floor is still in decent condition, sometimes the best option is to avoid the sanding machine and simply clean and re-wax it. That could be all it takes to make the floor look as if it were sanded. Plus, this method preserves the rich patina that the wood has gained over the years.
Whatever finish you apply, make sure the customer knows how to maintain the floor properly. Owners of antique floors need to be diligent about following a routine maintenance schedule. The customer might be hesitant, but proper care and climate control is the only way to preserve an old floor.
Sanding and finishing old floors is both challenging and rewarding. Even the most experienced contractors will tell you that every old floor is different, and that it's a constant learning process. Working with old floors isn't the easiest job, but knowing you are doing your part to preserve a piece of history makes these floors worth the extra challenges.
Sources for this story included: John Aiello, co-owner, J.J. Hardwood Floors Inc.; Eddie Erdman; Sprigg Lynn, president, Universal Floors Inc.; Charles Peterson; and Steve Seabaugh, technical director, NWFA.
Put it in Writing
With any job, a well-written estimate and contract is important, but when dealing with older floors, it's essential. Contingencies must be included in the contract in case unanticipated problems arise. If the floor is covered with carpeting, a final estimate can't be determined until the wood floors are completely uncovered. You may find damage to the subfloor or boards that need repair. Include a clause stating that any additional repairs will cost extra.
Before you give a final quote on the job, you need to accurately determine your time and material costs, and reflect that in the price of the job. Many old floors are face-nailed, and many of the nails will need to be re-set or removed. Also, removing old finish can take twice the amount of time and abrasives. The dips and rolls in old floors may require extensive handscraping. Assess the job site as best you can, but also leave room in the contract for problems that arise.