
When wood floor contractors answer a call to do a recoat, their job becomes a bit like solving a riddle—they must puzzle out a series of correct answers before going on to the next step. And they must do it in a situation where, typically, almost everything is an unknown. If they succeed in getting the correct answers and taking the right steps, their reward can be having a profitable part of their business that is less physically taxing than installing or sanding. If they take a misstep, though, the consequence can be unhappy customers and money lost for redoing a floor. How to take the right steps?
Information Gathering
The first step in the riddle is to gather information about the house and the floor. What do you know about the job site? The ideal (but infrequent) scenario is that it's a home where you did the floors, and you feel confident the homeowners have been following your directions on how to maintain the floor. Usually, though it won't be that easy. Ask the customer:
• How old is the home?
• What is the species and finish?
• When was the last time it was refinished?
• Who did the floor?
• What do you use to clean the floor?
Of course, many customers might not know the answers to all those questions, and sometimes, particularly about cleaning products, they might not tell the truth, or they might think something they used a year ago has "worn off." Contractors have been known to snoop in cabinets or closets when they get a chance to see the products that might have been used on the floor. Seeing certain products—Orange-Glo is a notorious one—is a clue that recoating might be tricky.
Examining the Damage
The first decision that needs to be made is whether the floor is a candidate for recoating at all, or if it requires resanding. Just adding finish doesn't make problems disappear. Many homeowners don't bother calling a wood floor professional until their floors are so bad they can't stand looking at them any more, and by then a recoat is usually out of the question. Following are some factors to consider. Some may sound obvious, but customers often think that a recoat will magically make problems disappear, so better to state the obvious when doing customer education.
 Gray areas where finish has completely worn off the floor
Bare Patches:
Areas where the finish has worn off to bare wood indicate a floor that probably needs to be resanded. Skilled contractors could take the time to spot-build extra finish coats on those areas, but by the time you do that, you might have been better off just resanding the whole floor. Also, bare areas with new finish might not be a color match with the rest of the floor. Even if the floor wasn't stained, the new finish might not match the aged finish on the rest of the floor.
Sometimes the floor is so worn that it's actually turning gray, dirt has worn into the soft grain, or the soft grain is so damaged that it's dished out. Areas like these are surefire indicators of a resand.
 Pet stains
 Water damage in front of a kitchen sink
Pet Stains/Water Damage:
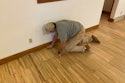
Walk the floor carefully to be on the lookout for these areas, paying particular attention to flooring by windows and doors. Pick up potted plants to see if the flooring has water stains underneath. Look for the pet's water bowl. Check the spot where they say they put their Christmas tree. Just recoating won't do anything to improve the appearance of water or pet stains; in fact, even resanding doesn't always take out pet stains or severe water stains—board replacement may be necessary.
Discoloration:
Areas where the wood has changed color due to placement of area rugs, area rug backings or furniture won't improve with a recoat. In fact, they, too, might not even sand out of the floor.
 Dents from dog nails
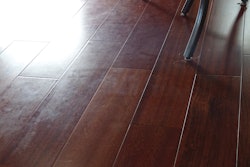
Dents:
As much as customers might hope it would, finish will not fill in dents and make them disappear. Dents that are objectionable to the customer must have a board replacement. Dents throughout the floor (such as high heel marks or long dents from dog nails in the photos in this article) might improve slightly but won't go away. (See the sidebar for before and after photos.)
Damaged Boards:
Boards that are cracked, split, loose or noisy—or all of those things—won't change because of a recoat.
Finish Investigation
If your customer can live with any of the above problems on the floor and it seems the floor might be a candidate for recoating, your sleuthing still has only begun. Now the question becomes: What is the finish on the floor?
These days, the answer to that question runs the gamut. Is it site-finished or prefinished? If site-finished, is it a typical topcoat-type of finish, wax or oil?
If it's a prefinished floor, depending on the finish, it may be easy to recoat, difficult to abrade and recoat, or, with certain finishes, simply impossible to recoat. That can lead some contractors to bid prefinished recoat jobs very high or try to talk those customers into a total resand (many prefinished floor warranties are voided once any new finish is applied on the floor anyway). For a thorough discussion of recoating prefinished floors, see the article "Recoating Prefinished Wood Floors Doesn't Have to Be a Gamble" from the June/July 2012 issue.
Most contractors can look at a wood floor and make a good guess as to whether it's a common topcoat finish, wax or oil. If it's obviously being maintained as a wax floor, wax finish is the only option, since conventional finishes won't stick to a waxed floor. You'll need to use the products recommended by the wax manufacturer to clean and recoat the floor with wax.
RELATED: Should You Recoat that Wood Floor or Run?
Sometimes, though, wax isn't as obvious. Contractors use several methods to test for wax contamination; the most common one is to take a white rag soaked in mineral spirits and rub it on an inconspicuous place on the floor, such as in a closet. If a yellow/brownish color transfers to the rag, that's an indication of wax. Another test is to put drops of water on the floor and see if they turn white, which means it's wax. Yet another test is to rub the floor with some sandpaper; if the finish balls up, that's wax.
The question is: Which oil finish or hardwax oil is it?
Penetrating oil or hardwax oil finishes are growing in popularity, so they present another option that must be considered when recoating. Their hallmark appearance is that they soak into the floor instead of leaving a distinct film build, and they have a super-matte or low luster sheen, so they are typically not difficult to spot. The question is: Which oil finish or hardwax oil is it? Many of them may be recoated with a common topcoat-type of finish, but not all can. If you can't find out which product it is, maintenance oil products are available to renovate such floors, but it's always best to do thorough test areas before renovating or recoating. Or, just resand the floor.
No matter which type of finish is on the floor, make sure it is well-adhered to the floor before recoating. If the original finish is chipping, peeling or releasing in any way, a new coat on top of it won't make it stick to the wood any better.

Searching for Contaminants
Once you've decided the wood floor probably doesn't need resanding and you think you know which type of finish is on the floor, it's probably best you don't unload all your recoating equipment just yet. Conventional recoating wisdom would suggest you do some test areas for compatibility first.
If you suspect contamination from an acrylic polish such as Orange Glo, you can use an acrylic test kit or do an ammonia test, which involves applying a couple drops of ammonia to the flooring surface for two to three minutes, then wiping with a clean white rag. If the ammonia has broken down the acrylic polish, you will see a spot that is dull or milky in sheen and color. You can also see the acrylic polish liquefy and become a slimy contaminant on the flooring surface.
For your compatibility test area, you might be tempted to go back to that out-of-the-way closet where you did your wax test, but that's not ideal. Now you're mainly testing for contamination on the floor—from maintenance products, furniture polish or anything else—and those products aren't likely to be used in a closet or underneath a piece of furniture. So, choose your spot wisely and use the same cleaning/abrasion/finishing process you plan to use on the entire floor. Once it's dry, you must scrape the finish to make sure it's really adhered. Your best bet is a cross-hatch adhesion test, which is ASTM D3359-09e2. (You can see a video of how to do the test on the WFB YouTube channel.)
There are some places that are well-known trouble areas for contaminants, including kitchens, particularly around stovetops (cooking oils, cooking sprays, stainless steel appliance cleaners, oven cleaners and granite top cleaners all lurk in kitchens); bathrooms; and dining room tables, where overspray from furniture polish can cause trouble. If they aren't removed from the floor, you might even be able to feel them when you hit them with your buffer.
CYA: Cover Your Assets
You need to 'disclaim the hell out of the floor.'
So, the floor looks like it can be recoated, you think you know the finish, and you've done your test areas … smooth sailing from here? Maybe, maybe not. That's why, as one contractor puts it, you need to "disclaim the hell out of the floor." Meaning, you can do everything right but still find out in the middle of recoating that there's a spot where the finish won't stick, or that there was a contaminant down in the gaps between the boards. Your customers need to know about that possibility ahead of time, and you must protect yourself by having a contract that clearly explains the possibility of the floor needing a resand after all. Walk them through the scenario: "We might be here for two days doing the recoat and find out there's a finish problem, then need three more days to resand and refinish the floor." Give them the information they need to decide whether they want to recoat or resand.
Keeping it Clean
Although there are many finish types on the market that make recoating more complicated, today there are also many options for recoating systems and tools that can make the job go easier. There are chemical recoating systems that don't require mechanical abrasion, sanding machines for abrading before recoats, small autoscrubbers for easier and more effective cleaning wood floors before recoats, special buffer attachments for abrading during recoats, and more.
No matter which recoating system or process you choose, one thing is essential: thoroughly cleaning the floor, and that means seriously cleaning with a professional-grade cleaner from a finish manufacturer. Some contractors who don't have cleaning equipment specific to recoating take a page from gym-floor contractors' playbook by "wet-screening" the floor, in which they apply the cleaner to the floor, abrade it with a screen or pad on the buffer, then vacuum up the moisture with a wet-vac. Just be cautious about pushing contaminants and excessive cleaning liquid/water down into the seams between boards, in exposed grain or into open voids. (For more on cleaning during recoating, see the article "The Missing Link: Are You Skipping a Step in Your Recoats?" from the June/July 2014 issue.)
That cleaning process is essential not only for the appearance of the floor but also for increasing chances of finish adhesion. For the actual finish, opinions and processes vary. Some contractors use two coats for every recoat; many use just one. Some contractors use a sealer coat as the first coat when recoating, saying it adheres better than a topcoat; others use only a topcoat. Some contractors swear by using a dewaxed shellac as their first coat on a recoat, loving it for its quick dry time and ability to stick to almost any finish; others won't use it due to safety concerns or can't use it due to VOC laws in their area.
When choosing the finish for the recoat, consider the sheen. A matte finish will do a much better job disguising those long dents from the big exuberant family dog than the glossy finish that was on the floor before.
Managing Expectations
No matter the finish, the most well-executed recoat can go awry if the customers don't end up liking the results. If they expect the floor to look brand new, they'll probably be disappointed. The floor will look much better than it did before, but it won't eliminate any of those major problems listed at the start of this article. As one contractor put it, that's "like putting a Band-Aid on a broken leg." If you can keep expectations on a reasonable level, and you take the right precautions along the way, you'll probably find that recoating can be a lucrative part of your business.
Sources for this article included: Johannes Boonstra, Rubio Monocoat USA LLC; Wayne Lee, Middle Tennessee Lumber; Brett Miller, National Wood Flooring Association; Jay Daniel Moore, Antique Floors; Joe Rocco, Artistic Floors by Design; and Brent Sorbet, Horner Flooring.
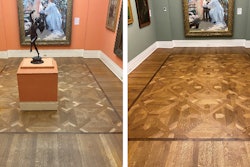
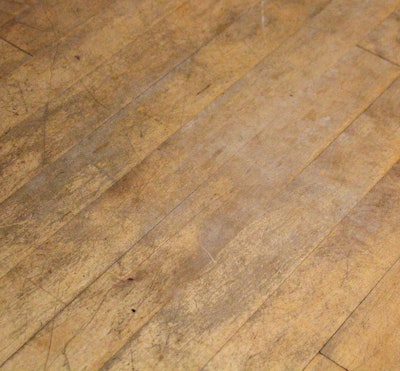
Recoating Before & After
While recoating will improve a wood floor's overall appearance, it can't hide deep dents in the wood. This yellow birch floor was recoated with two coats of a commercial waterborne finish. As you can see from before and after shots taken from approximately the same spot on the floor, a deep cleaning and two coats of new finish made the floor look much better and eliminated minor scuffs and scratches, but it was no match for dents in the wood.