As part of the 30-year anniversary of doing this magazine, in the last issue we began taking a look at how wood flooring life has changed in three decades (see that article). In this issue, we continue with Part 2 of that story, as we talk with three big names in the wood flooring industry—Daniel Boone, Howard Brickman and Dan Antes—about creating custom color, finishing, and designing custom wood floors.
 It's only because of modern coloring and finishing technology that Daniel Boone was able to make these existing stairs match the layered color of the prefinished white oak flooring (installed by another contractor), he says.
Getting color on floors: then and today
Daniel Boone, training manager at American Sanders, Sparta, N.C.
As recently as 40 years ago, your options for adding color to a wood floor were stains, either DuraSeal or Minwax. From time to time we would use something from a paint store like Sherwin-Williams or Pittsburgh if there was some oddball color a customer wanted, but doing that would always put the whole job at risk. With the DuraSeal stains, once they were dry, you could put poly on them and the stain would be fine. If you used a brand from a paint store, when you brushed the poly on, the stain would pull with the finish. You'd see light and dark areas and pull marks. You had to do a lot of testing to find out if the stain was compatible with the finish. It was difficult, so 99 percent of the time we just used DuraSeal.
At that time, the hottest colors in my area, the Southeast, were Antique Brown and Spice Brown. Out of 10 jobs maybe one or two would be a different color; we used Coffee Brown, Medium Brown and Golden Brown from time to time.
Back then, that stain was thick as molasses, and you would just hate it. We would wipe it on and wipe it off, and you had to take a little brush to cut in the corners by your jambs. The wipe guy really struggled, because within minutes the stain would start to get a drag to it. You went through a ton of rags, and if you didn't have the right terrycloth towels, it was brutal getting that stain off. Sometimes we would also buff the floor just to help the drying process.
Back in the day, at my company, we also used a product out of Southern California that we called sap stain, but it was actually a dye you would mix with a lacquer retarder. It had an extremely bad odor, but you could use it to make white oak as dark as you wanted. We applied it with a sprayer or lambswool applicator, and after you applied it you would wipe it off using towels on an applicator head. As it dried it would look weird and splotchy—it was like watching water-base dry back in the day—but you'd come back the next day and it had this rich, uniform color. We would put moisture-cure over it and it would really get a deep color. I think it was popular on the West Coast but never on the East Coast; I learned about it from someone in Washington State who consulted for restaurant chains.
Into the '90s we were still doing white floors here in Florida—anything from driftwood to pastel colors, making the floors look like the the hardwax oil floors today. Of course, we didn't have those products, so we had to make our own colors. I remember a job back when we first started doing pickled floors, and the builder insisted that I use his process, which included bleaching the white oak floor twice. He called me the next day, and that floor was as yellow as a school bus! The next time we did it my way. We would use paint from the hardware store, whether gray or white deck paint or gray or white enamel, and thin it down with mineral spirits to get the color we wanted and wipe it on and off. One reason I was able to be successful with those colors was that I was already using water-based finishes that would dry clear. The thing was, you had to hope that when you put the finish on, it wouldn't drastically change the color, which sometimes happened.
One other option for creating custom colors was a powdered dye you could buy at paint stores; it was like an aniline dye but in paint form. You would mix it with denatured alcohol, and you had to have multiple guys to get it on and off the floor. It was extremely difficult, and there were only a couple older guys at my dad's company who could work fast enough to do it.
Today, as far as color goes, you can do anything. Each company has their own bag of tricks and their own directions for how you apply it, whether it's a reactive stain with some kind of pre-treatment or color blocker and more, and people are also using techniques like applying a steel wool and vinegar solution for different effects.
RELATED: Shades of Gray: How to Use Vinegar & Steel Wool to Darken a Floor
I had a stair job awhile back where the customer picked out a white oak prefinished floor that had a dark background and white grain. Their stairs had a gunstock brown color on them and needed to match the new floor. Using the existing treads and risers and new parts for the spindles and railings, I was able to make it all look exactly like the prefinished floor (see photos). The homeowner was blown away, the builder was blown away, and the painter was blown away, but 30 years ago I couldn't have done that—we didn't have the right chemicals, dyes or colors.
Of course, now there are many options for wood flooring stains both as far as the number of suppliers and the colors, and we also have quick-drying stains. A great thing today is that you can go out and pick a system for your floor from the color to the finish to the cleaner instead of having to pick and choose—not that people don't still experiment with mixing products!
Something interesting that's happening with color is that people are seeing these wood flooring colors and effects on social media, sometimes from a world away. I have a friend in Australia who posted a photo of a floor he did that had a bleached effect on white oak. A woman on the East Coast of the U.S. emailed him and asked him how she could get that look on her floor, and I tried to help her find a contractor who could do it. Although there are so many more products available to create these looks, it still takes a skilled wood floor pro with years of experience to be able to consistently deliver the colors our customers ask for today.
 By the time of Howard Brickman's article in the Journal of Light Construction in 1994, he was using waterborne coatings. He offered this advice: 'Two coats of oil-modified urethane will usually do the job, but I use four coats of water-based finishes because waterbased finishes go down thinner. I've found the best way to apply finish is with a 10x3-inch foam paint pad applicator on a mop-length handle.'

My journey in wood flooring finishes
Howard Brickman, Brickman Consulting, Norwell, Mass.
Thirty years ago was the introduction of water-based finish to the U.S. When I started in the wood floor business in the late '70s, the new finish was oil-modified polyurethane—versus some kind of varnish, or moisture cure. Until the mid '70s, most everything had a penetrating oil and a coat of paste wax on it except for gymnasiums. The gyms were finished with some kind of gloss varnish.
In those days, all the prefinished flooring was penetrating oil and wax, and there were only three companies in North America doing prefinished.
Everything as far as finishes go has transitioned from solvent-based coatings to increasingly robust water formulations. The majority of the wood flooring contractors still prefer to use the older solvent-based finishes, but environmental regulations have created challenges for those products.
Forty years ago in the lower end of the market, a floor would have one or two coats of lacquer, then one coat of urethane. The top coat of finish would quickly wear away, and you'd recognize those floors when you went to do a sand and finish because anywhere there was traffic, the finish was gone. The kitchen, front door to the hallway, pathway to the bathroom ... anywhere people made a slight turn as they walked, the finish was gone. The majority of the floor surface without any traffic looked relatively serviceable, but the wear patterns were bare areas with gray color where it was basically bare wood.
When the polyurethanes first came out, there were some major issues, namely adhesion to stained wood and intercoat adhesion, but by the late '80s a lot of the issues with poly were fixed. The process was typically two coats. For the sealer coat, a lot of the low-cost refinishers would just thin out their poly with mineral spirits—a common practice for both poly and varnishes.
In some areas of the country, the Swedish (urea formaldehyde, what we now call "conversion varnish") finishes were being sold, just as water-based finishes were being introduced. Two companies, Basic Coatings and Bona, introduced the first popular water-based finishes. Basic had been manufacturing finish for bowling alleys and adapted the product to the sand-and-finish trade. And what is now Bona was introduced by Gary Reynolds after he started manufacturing and distributing solvent-based coatings under the Woodline brand. Reynolds was a wood floor finish veteran, and early in his career had been the leader at DuraSeal before it was acquired by Minwax. Some waterborne products were really difficult to use, but Bona's Pacific Strong developed a huge following because of ease of application. We used to say you could trip and spill it, and it would flow out perfectly.
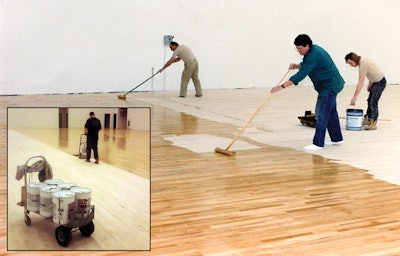
 How coating was done 30 years ago: Poly spread by hand with a brush.
For applying poly, we used a 6-inch China bristle block brush, and we would brush every square inch of the floor. A lot of people used lambswool applicators. For Swedish finish, we used a special brush, which was kind of like a wallpaper brush. You had to know what you were doing with any of those tools. Applying finish with a brush by hand is back-breaking work, and keeping a wet edge demanded that you also work quickly. It was water-based finishes that brought us different applicators; first the foam pad and then the T-bar. In large open areas, for the first time you could very quickly lay down a great deal of finish—two men can T-bar 10,000 square feet in one to two hours. Of course, today many people also roll both waterborne and oil-modified poly.
The environmental regulations started the move to water-based finishes, and one reason I shifted to using them was to differentiate myself by using this new premium product that didn't smell as bad, dried a lot faster and looked pretty good. And, from a personal experience point of view, if you were coating for an hour with oil-modified urethane or other solvent-based finishes, the fumes in the building were horrendous. You pretty much had to wear a respirator, but a lot of us didn't.
We had moisture-curing urethane, too, which was the most durable finish on the market, but the odor and conditions on the job site were even worse, and it has some really potent organic solvents. There is not a very big market for these toxic, flammable coatings today.
RELATED: Safety Lessons from Real Wood Flooring Contractors
With the lacquers and some of the other finishes on the market, coating floors was a dangerous business. I had a friend who was applying lacquer sealer in a house when the thermostat sparked a flash fire. He had second- and third-degree burns over 90 percent of his body, and after two or three weeks in intensive care, he died. I asked myself, "Why are you using a product that can kill you? What are you thinking? It's just a wood floor, it's not worth getting killed or severely injured over." I made the transition to water-based shortly after. Lacquers were finally taken off the market here in Massachusetts four or five years ago after some wood flooring contractors died.
Today there are so many different brands of water-based out there I can't keep up. And, it's funny, you know how if you live long enough and you save all your old ties, eventually they go back into fashion again? Maybe 10 years ago we started to see these European oil finishes come into the market. They are basically penetrating oil finishes without the paste wax. Many are applied in similar ways to how we applied the old DuraSeal penetrating sealer with #2 steel wool.
Consumer preferences have gone from gloss finishes to lower sheen dull finishes, but I don't think most of the market will ever come full circle back to finishes that require a lot of maintenance. Hardwood floors had a bad rap in the '60s and '70s because everybody had wood floors with wax in their house, and putting another coat of wax on was part of your torturous household chores. Like today's carpet cleaning companies, there used to be floor wax companies—two guys, a truck and a buffer. They would service numerous jobs each day. Consumers today are more focused on their busy lives and are not willing to have the maintenance done. Forty years ago, stay-at-home wives were available for in-home maintenance. Today you can buy a robot to clean your floors while you are at work. Nothing is predictable but change.
 How custom wood flooring designs used to be done: sketched out by hand to scale using a compass and a lot of geometry. The sketch by Chuck Crispin shown above was used to make his first Floor of the Year-winning floor (in 1993), shown below.

 Click to read the original article about this winning floor from 1993.
From graph paper to terabytes
Dan Antes, general manager at Daniel Antes Marquetry, Nashville, Ind.
When we were doing custom floors 30 years ago, we didn't have AutoCAD at all. We were hand-sketching on graph paper to scale. I remember the first medallion I ever made with Chuck Crispin. We were in the basement of his house using miter sleds and compasses and protractors. Once you got to the outside, you started scribing things together, using the trammels to make the curves and all that. If we needed to do a line segment and an arc bisector with a tangent and a center point and a perpendicular bisector, we were using sine and cosine and functions … it's funny, I don't even know how to do that math anymore.
When working on a whole house we worked off of paper prints that were typically hand-drawn and then copied multiple times (of course, that was the idea of blueprints—they were stacked with carbon paper). The best you could do with that was to scale your unit size of your parquet and see how many repetitions were going to go across the room. There was a lot of math and layout!
When you're looking at scaling 3⁄16 or 1⁄8 inch by hand on a big house on a set of plans, it's really easy to be off by 5 percent as far as total footage, so back in the day you'd order 10 to 15 percent over. Today, with a really good takeoff, you're comfortable at 5 percent over. If somebody sends me a paper print today, I'm like, are you kidding? Send me a PDF!
Once the computer evolution really started, they had CAD pretty quick, but the drawing tools were so weak that it would take 40 or 50 hours to draw a medallion that, with the new tools, you could draw in four. You would draw the medallion and have to select the border of each piece, copy and paste it, trim it over to those boundaries, etc., etc. It was a huge amount of work to get it ready to send to Fine Lines or wherever to laser-cut it.
Now you select the entire medallion and can easily combine regions, so it's vastly quicker. It's funny to think about the computing power. In the early '90s, if you had 100 Mb that was a huge hard drive. Now I have single files that are more than three times that big. For example, the file for the Archetypal winning floor with the aluminum spiral around the spiral staircase (pictured) was 330 Mb because of all the templates and annotations we made on every piece—the pieces were free-form and no two pieces were the same, so each piece had a part number engraved on the top. At this point, I've got 6 terabytes on one machine, 3 terabytes on another machine and 8 gigabytes of dedicated graphics memory to run the latest CAD software, so that's pretty explosive.
 Advances in technology have made free-form designs like this 2010 Wood Floor of the Year winner by Archetypal Imagery Corp. more accessible than they were when designs were hand-graphed. Created by Distinctive Hardwood Floors, each piece of the wenge ribbon in this floor was engraved with its own number since no two pieces were the same.


 With today's AutoCAD programs, customers can get a relatively accurate rendering of their inlay as it progress from line drawing (top) to rendering (middle) before being produced in wood (bottom). Rendering by Christopher D. Antes at Custom CAD Design LLC; inlay by Daniel Antes Marquetry.
I can remember going to a job site and spending the first couple days chalking lines. Now we are there for an hour and we're laying parquet. And today, I don't need master craftsmen on the job site; I could hire someone off the street with an eye for detail, because the parts are perfect and the cut is guaranteed. There's a higher yield with less material waste.
Today I have years of CAD designs available. If you want standard European parquet and you just don't know if you want Brittany or Versailles, that's easy—I can have the whole house CAD'd in less than an hour. But typically I try to not do anything twice; I'm trying to push people into something more custom due to the nature of my disease!
Initial design work can be expensive, even with the advances in technology. For example, a mandala I recently did took over 100 hours to draw and part out—that kind of drawing is really expensive. In the past, I don't think that level of detail would have even been possible except for maybe the Dave Marzaleks of the world. So I think today's technology makes floors like this a little more accessible.
What using CAD really gives you is the ability to play with the shape; it's totally free-form. You can model it all out and turn on control points and drag lines in and out and sculpt the contour as you're working it. You can't do that with wood because it's typically only subtractive—you cut it three times and it's still too short! So with CAD you get that kind of additive ability on something that's typically only subtractive. It's really a very cool way to totally know what you're doing before you start cutting.