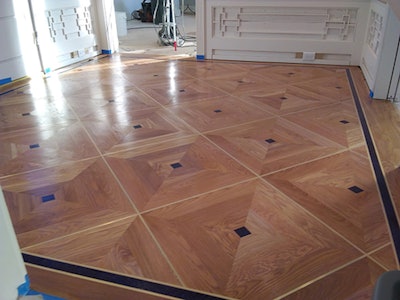
I recently sat down with James Harbour of Harbour Precision Floors to talk about a project that won James the 2018 Wood Floor Business Readers’ Choice award. The project was to install and finish a custom hardwood floor that included two species of wood along with a brass metal inlay. James faced some interesting challenges that required him to pay closer-than-usual attention to the techniques we commonly use on most installation, sand, and finish jobs. We talked about a couple of these techniques while he was working on the project. James is a previous student of mine at the NOFMA/NWFA school, so I was interested to see how this project turned out. I have to agree with the readers of Wood Floor Business on the outcome.
According to James, a project like this begins with a customer who wants to do something really special. A lot of thought goes into the design process, which in this case was managed by an interior designer contracted by the customer. Once a design is agreed on, then it’s up to the wood floor craftsman to be on his or her game to get it right. “This floor had to be perfect, with no flaws, or it was going to have to be ripped up and started over,” James said. “And I didn’t want to do that. Either way, I just wanted it to look right when I was finished.”

Since we already mentioned that the project was in a home that is almost 80 years old, wood floor craftsmen know that James had to work with rooms that are likely to be out of square and have uneven subfloors. “I knew I had to get the subfloor as even as possible so the finished floor would be flat, and the joints would be tight with no gaps,” James told me, explaining that one of the rooms was a new addition and was close enough to square and flat to not pose much of a problem. The featured room, however, “was old, wavy, out-of-square, and had lots of angles,” he said. James knew he would not attempt to make adjustments for the out-of-square room in the field, but had to plan it into the border design. “Measure 10 times and cut once” was James’ approach to the layout of the floor.

The sanding process was what caused James the most concern. He had to sand precisely down to the brass inlay and no further. If he tried to work around the metal he risked dishing out the wood, “and that wouldn’t be acceptable” James said. He was also concerned about causing the brass to pop out. He had heard horror stories of this happening. Brass and wood heat up during the sanding process, but at drastically different rates, so if the brass inlay heated up too much, it could expand enough to explode out of the floor. This was a topic James and I talked about during the project. We discussed a couple of strategies for sanding both the wood and the inlay, and James continued on with a plan.


The quality of craftsmanship seen in this wood floor speaks to more than the apparent skills of the craftsman, but also to the years of hard work and dedication to develop those skills. James has been working at these skills for over 20 years. I recall when he was a student at one of my NOFMA/NWFA schools. He was one of four students in a class of 70 that scored 100% on his proficiency test. He was paying attention to the details then and continues that mindset today. James tells me that he always enjoys doing custom floor installations. Each job gives him an opportunity to apply what he has learned over the years and to take risks, which in turn allows him to develop his skills even further. When asked for any advice or insight to share with other floor craftsmen, he gave a not-so-obvious but genuine response. “Stay healthy and take care of your back.” Aside from that, he went on to emphasize how valuable it is to learn from others. The tools and techniques for wood floor installation, sanding and finishing are constantly evolving, and it’s important “to get as much training as you can from the experts.”
As for developing a reputation for doing quality custom wood floors, James said, “You have to be willing to take risks, and you have to be on your game.” And according to James, that includes being willing to tear a floor out and start over if it’s not what you or your customer expect it to be. Having to redo the work can be an expensive lesson. But if faced with that circumstance, it can also be a valuable lesson for the craftsman that strives to perfect his skills, push boundaries, and produce award-winning floors.
About Daniel Boone:
Daniel Boone has been in the wood flooring business for all of his life. A second-generation wood floor installer, Daniel started working at an early age with his father and led his own crews by the age of 16. Establishing his own business in 1982, Daniel built a reputation for quality installations in prestigious homes and commercial projects throughout the Southeast.
From 1996–2000 Daniel was technical director for the National Wood Flooring Association, where he created a national curriculum for wood floor education. Daniel has served on various committees and taught over 12,000 students over 20 years. Since 1996, he has traveled extensively leading and teaching wood floor installation and finishing schools for industry associations and private businesses in the United States, Canada, Australia, China, Thailand, Indonesia, New Zealand and Mexico.
In early 2017 Daniel went to work with American Sanders to create the curriculum and lead day-to-day operation of the American Sanders Wood Floor Sand & Finish School. Daniel is currently managing and teaching the American Sanders schools while also providing instruction at some NWFA and other commercial sanding and finishing schools.
Daniel is passionate about raising the level of professionalism in the wood flooring industry. He volunteers several weeks each year as a lead instructor at the NWFA Sand & Finish Schools.