
Nothing demonstrates finer craftsmanship than a hand-scraped floor. It can be difficult, however, to keep distressed floors looking their best year after year when grime builds up in the grooves where they were scraped. Revitalizing the floor isn't as simple as running a big machine over the floor, since it would then lose its characteristic marks. With so many of these floors now installed, every wood flooring contractor needs to know how to properly prep and refinish them.
Below, we show one method of making distressed floors regain their lustre. Before starting, as with any refinish job, assess the floor. Get as much information as possible from the homeowner regarding what she does to maintain the floor and what chemicals come into contact with it. This includes the chemicals used for cleaning the furniture or balusters that may have over-sprayed onto the floor. Armed with that information, you can begin the following steps. As you'll see, the process is simple but labor-intensive, so charge accordingly.
SUPPLY LIST
- Floor cleaner
- Maroon pad
- Industrial sandpaper
- China-bristle vacuum
- 6-inch China-bristle brush, painters pad or other applicator
- Plastic painters tray
- Finish

Step 1
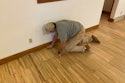
Using an industry- or manufacturer-approved cleaning product, get on your hands and knees to work the solution into the highs and lows of each plank with a maroon pad and remove any grime or scum buildup. If you use a buffer, you can miss the lows and burn through the highs of the hand-scraping—regardless of the number of pads you put on the buffer plate.

Step 2
After the entire floor is cleaned, it's ready to be abraded. Avoid using a screen for this, since the mesh pattern can leave a distinct scratch pattern, leading to labor-intensive and costly repairs. Instead, use a pad that's between 150 and 180 grit, like a maroon pad, or paper. If you're applying water-based finish, you may want to consider using a 180- to 220-grit pad or paper.

Step 3
Abrading on your hands and knees is best, so cut the paper large enough to cover your hand and back it up with a maroon pad. This applies the proper pressure and prevents leaving a visible scratch patter n from your fingers after finishing. Also, the maroon pad really contours into the beveled or pillowed edges of the flooring. Be cautious about using no-clog papers, since they may contain stearate soap that, in rare cases, can cause finish-bonding-related issues.

Step 4
Going with the grain of the wood, cut the pad no more than 3 inches wide and work up and down a couple of planks at a time, making sure you're abrading thoroughly and changing your paper often. Vacuum up any debris with a China-bristle vacuum attachment—standard felt attachments won't get into the nooks and crannies of the scraping. Then, wipe the floor down with a microfiber towel and tack with a dampened rag until the floor is entirely clean. This may require several passes.

Step 5
For oil-based finish, use a 4- to 6-inch China-bristle brush along with a lambswool applicator and divide the floor up into about 2-foot rows, always applying in the direction of the grain. Use a lambswool applicator with moisture cure or conversion varnish since they cure in less time. If you're working with water-based finish, avoid using a T-bar because this often floods the floor with finish, which not only gets to be expensive but can cause puddling and areas of dark finish, as well as panelization.

Step 6
Instead, get down on your hands and knees and use a painters pad and plastic painters tray to apply the finish. (Most water-based finish manufacturers warn against using metal painters trays because the metal can adversely react with the finish chemicals.) Work up and down two or three planks at a time, just as you did while abrading the floor.

Step 7
Because you're so close to the floor surface, you can notice any contamination or "holidays" (missed spots) in the finish and take care of them right away.
If you've done the proper hand-sanding, hand-rubbing and cleaning of the floor—all hard labor—the refinished floor should look as good as "new."
Keep in Mind…When working with products finished with aluminum oxide, you'll need to use a system designed to recoat prefinished floors with little or no abrasion. These systems are available from several waterborne finish manufacturers. For floors with seasonal or intentional gaps, don't flood the floor with water-based finish. This causes "panelization," where the floor boards move together as a unit rather than separately. If you're asked to refinish a wax floor, inform the homeowners that you can't use anything other than a wax finish. It is virtually impossible to entirely remove wax from handscraped or distressed wood flooring, and any leftover wax will react with and contaminate the new finish. |