I've always been fixated on color and finishing, and in my early years in the wood flooring business, I prided myself on being sort of a color expert. Then, about 25 years ago, I hired an actual artist—a trained fine artist, Vartan Arutyunian—to work in my business, and I realized I didn't really understand much about color at all. He saw things that I didn't see, and I would say to myself, "Man, I thought I was so anal about everything, but this guy sees everything in a completely different way!'" I was seeing my vision of the color, not the actual color, if that makes any sense. Before long Vartan told me that I really needed to go back to learning the very basics of color. I went to a finishing school and a graining school in New York, and after getting more education, I thought I knew everything … but wood doesn't work like that. A wood canvas isn't white; it changes your colors. And then it changes as it ages and is exposed to light—and that's what's so fascinating about working with colors and finishes in the wood flooring industry.
In our wood flooring business today, we specialize in very high-end work around the world, and one of the reasons clients seek us out is because of our obsession with color. After working with Vartan, I realized how important his insights were to my business, and he became my partner. In this article I will walk you through one job we got specifically because of our ability to adjust the color and deliver a level of artistry that top clients expect.
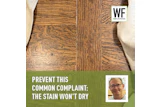
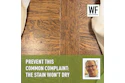
 When we became involved in this job, we were given these two pieces of flooring. The board on the right was the original sample they had been using that was almost two years old and had aged. When we received the board on the left, the entire board looked like the far left color—that was the flooring with the finish freshly applied. We used bleach and layers of oil finish on that board to get the right side of that board to match their original sample.
Finishing starts before you think it does
This one concept is so important to understand: Finishing starts from the time of installation, or rather, finishing even starts from the time you are planning what materials you need. What I mean is that when you are selecting your material and the cut and the species, you are already making choices about how the final color and finish will look for the client.
When we do a job, usually the client has chosen a particular product for a very specific look (usually a very expensive product!). We never have the wood flooring delivered to the job site. Instead, we deliver it straight to our shop. For a very high-end project, I will know the configuration of each room. For the sake of simplicity, let's say we have a room 20 feet wide and 40 feet long, and I have a 12-inch plank. I will know that I will have 20 runs of that 12-inch plank going across the room—so 20 lines of flooring. What we will do is sort the flooring by color and grain, then we'll start planning our wood for each separate line of flooring.
The relaxing, uniform look
When a client wants a uniform, relaxing look without drastic color changes between boards, we will start with one row that is very dark. The next row will be a little lighter, a little lighter, then a little darker, a little bit darker … so in each line we will match the color and the grain configuration and change the color and grain gradually across the floor so that your eye doesn't notice the changes. We also have a goal that each line or run of flooring will look like one continuous piece of flooring, so we try to match the grain. For such selective clients we'll have to order much more flooring than you would for an average job. Right now we are working on a $1.5 million project for a famous person; I ordered 45 percent culling for that job.
 The stairs on this job had been coated with the same finish as the flooring upstairs—the wrong color. This created a particular challenge because they have inlaid suede perfectly even with the wood, meaning they can't be sanded. Another problem is they were built with American white oak instead European white oak that was used for the flooring. I convinced the homeowner to do a preliminary color adjustment without deep-sanding the finish to let the stairs age for awhile before we try to make them match the floor exactly.
Once the rows are planned we will vacuum-bundle each row and label them one through 20, and the pieces in the bundle will be labeled a, b, c, etc., so each board is laid in the correct order. Once it's racked out, if the dry-lay looks good, then we will actually install the floor at the job.
You might think it's crazy to plan every single board in the floor. I should back up and explain the product we are often working with. It's a plank product from Europe made from white oak trees in France and Germany. The manufacturer uses only trees that are the same shape from the sunlight hitting all sides of the tree evenly. The trees have to be on a certain steepness of a hill so that the minerals go down to the roots correctly; this all produces a very tight grain. They won't cut a tree until it is between 230–250 years old—at this point it is at the end of its life but hasn't begun to decay. Once they are allowed to cut the tree, a helicopter removes it from the forest so other trees aren't damaged.
So, my point is this: If this company has gone to so much hassle to get the perfect grain and wood, when it comes to us as the wood flooring contractors, it's all in our hands to make the artistic magic happen.
 The client wanted a uniform look to the floor, but the boards had been racked out randomly, so our first priority was to tape off individual boards as necessary to even out the color differences.
Things don't always go as planned
We got involved in this project because of issues with the color on the wood floor. The entire project was probably 7,000 square feet, and we were brought in to deal with the 3,000 square feet on the main level. The project was an ultra-modern new home built in a traditional neighborhood on the East Coast by a prestigious architect in New York.
RELATED: Using Aniline Dyes Provides Unlimited Wood Floor Colors
We got a call from the wood flooring manufacturer that there were issues with the color on the project. All of the flooring had been installed, and so far the upstairs had been sanded and finished by another wood flooring company. When the client saw that color, all progress stopped. Let me be clear that this other company never actually did anything badly or wrong on the finishing process or the color. The wood had been sold and the color spec'd almost two years before. The designer on the project had been selecting the color palette for everything from the exquisite walnut wood paneling to the marble work and the leather couches based on the color sample of the floor. But once the wood flooring contractor sanded the floor and applied the oil finish that had been spec'd—a standard product used specifically with that wood flooring—the architect and designer said, "That's not the color we ordered."
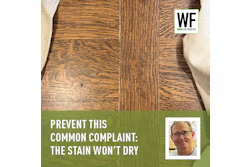
The color on the floor didn't even come close to matching the sample. The freshly applied finish looked cold and dry, but their sample looked like a beautiful warm, creamy color (see the photo on page 38). The wood flooring supplier suggested they try sanding and water-popping the floor, then reapplying the color, but that didn't work. Then the contractor sanded it again and tried using combinations of different oil finish products to match the color, but it still didn't match.

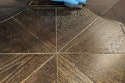
 Once we had the color corrected throughout the floor, we noticed a very short rift and quartersawn board right in the middle of the floor, so Vartan carved and used our graining technique to make the board blend in with the adjacent livesawn boards (top photo). The board is in the photo above but is not noticeable because the repair blends in seamlessly.
The architect requested a new sample of the color from the flooring supplier, and when it arrived, the architect said the supplier must have changed its colors since their original sample, because they didn't match. The flooring supplier tried to explain that it depends where you keep the wood samples—coatings are transparent, and if you leave a sample in front of a window for a year and a half, the wood will change, and so the color will.
At this point, they were stuck: The architect wanted the color of the original aged, seasoned, warm sample; the flooring contractor wasn't able to reproduce the color; and the supplier knew they were supplying the correct wood and finish for the sample. The supplier called us and told us to expect a call from the architects. When we got the call and went to meet them in their office in New York, we saw that the lead architect was there. It rarely happens to have a lead architect in these meetings, but this was an extremely important client for them. When we saw the difference in the samples, we knew we could recreate the color using our own bleaching process and the oil finish products we use.
First step: neutralizing the color
Because of the time frame on the project, they chose to concentrate on fixing the color on just the main level. We agreed that our company would do all the sanding and finishing on that level. Because the wood flooring was so high-end, we could start with 80 on the sanding and then go to 100 and 120 on the big machine, ending with a Trio with 100-grit.
There were also stairs with the wood flooring with inlaid suede (see the photo at left), and because sanding them would have created a height difference with the suede, I asked the owner if we could see how that flooring patinas over time before we try to adjust the color on top of the existing finish.
Earlier I said that finish starts with installation. On this job, because the extremely high-end flooring was already installed and the kitchen was already installed on top of the flooring, we weren't able to carefully rack out the floor the way we normally would for a client who wants a uniform look, creating gradual transitions in color along with the illusion that each row is one continuous board. This flooring had been laid completely randomly, but we still wanted it to appear the way it would if we had laid the floor from the beginning.
First we had to even out the color. We have a proprietary process we've developed to bleach the floor. It's a two-component process that neutralizes itself once it reacts with the wood. We went over the entire floor two times to even out the color with this process. The downside of doing that to the entire floor, of course, is that you have boards that were lighter to start with, and now they might be too light, and there were still boards that were too dark. We went back to adjust those boards, but first we applied the first coat of LED-cured oil finish. After that first coat, maybe 40–60 percent of the boards were the color we wanted—the rest were too light or too dark. With the specific LED finish we were using, you can keep applying layers of color over the finished boards, so we went over the floor, taping off individual boards and applying layers of color until each board was the correct color.
With the color adjusted on every board to even out the tone, we applied a last coat of finish to marry the boards across the entire floor.

 The final result was a floor that has the soothing, uniform look the client was seeking. Although the individual boards don't run the entire length of the floor, the final effect is seamless.
The issue with that one board right in the middle
After going through the entire floor board by board, we had the colors we wanted. But now Vartan noticed something else. Right in the middle of the floor—a floor with boards that were an average of 13 or 14 feet long—he saw this 3½- or 4-foot board that was totally rift and quartersawn. It was like a zebra in the middle of the floor. The boards around it were all livesawn boards.
We couldn't leave that board there like that. I think it would have bothered Vartan and me more than anyone, but if the clients picked up that one board and decided they didn't like it, it would have been too late; it would have been a disaster. The clients could easily say they don't like that row of flooring, which ran all the way underneath the kitchen cabinets. Now you've got to remove the kitchen! In the end, leaving that one board could cost a huge amount of money by the time it would be all fixed. Why take the risk? And also, why live your life like that? It's going to bother you the rest of your life—you may get away with it, but you're going to know you didn't do the floor the best you could have.
RELATED: Get a Handle on Wood Floor Staining Strategies
In this case, Vartan said we had to take things up a notch by creating cathedral grain on that board so it would blend into the next board in that row—a skill we learned by attending a class specifically about "graining" (see the sidebar on the facing page for more information on this class). When Vartan does something this complicated on a board, he doesn't just paint it onto the board. We make our own flexible Bondo type of product, like you use on cars but more flexible so it won't crack or break if the wood moves. It's hard to explain in detail in writing, but basically we scrape down the wood in some areas and drill tiny holes throughout—the same thing the auto body guys do so it won't come out; the holes hold it and the color so it will be durable for the future. Now when you glance down that row of flooring, that board blends right into the next one.
Why should anyone be this obsessed?
In the industry it's taught that the floor should be inspected from a standing position. For our clients, standing up like that is not going to happen. The owner doesn't really care how you are standing! And the owner is the person who is worrying the least on these jobs. Usually you have the GC, architect, the designer, the owner's rep, probably another engineer or architect, and the money guy … and all of them are going to go on their hands and knees to make sure everything is perfect. They aren't standing up 5 feet tall! But if you really do it right from the beginning and you fix everything at the right time (before they see it!), you can make a lot of money and they will wait forever to do a project with you; you don't have to kill yourself trying to do four jobs all at once to try to not lose that client. If they want you enough, they will even plan it in a way that fits into your schedule because they say, "This guy is quality." You have to create a feeling, not just a piece of wood. The sky is the limit, and when you are an artist or are able to resource the skills of a real artist, you can do anything you want.
From RH management to color adjustments (and how to not attract monkeys)By Howard Brickman
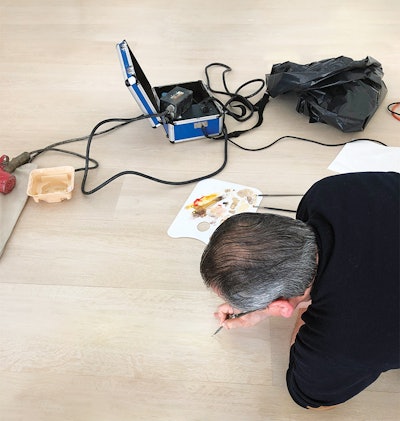
I was brought into this project by the owner to provide advice to the GC/construction manager with regards to managing interior conditions before and during the installation. I had worked with this GC on several other projects, and they specialize in high-quality outcomes—but are always looking at the budget and expenses. My two main tasks were to monitor moisture content of the wood flooring and subfloor and the RH of the interior. During the work day, with contractors constantly opening the doors, it was going to be extremely difficult to keep the RH in the desired range when the outdoor conditions were high humidity. The GC had two commercial dehumidifiers in the area where the wood flooring was stored and to be installed. The flooring was 30 x 300 mm very-long-length solid white oak, so it was important to keep it at a MC in equilibrium with the building interior AND have the building interior at the appropriate conditions before and after delivery. Once the flooring equilibrated to the proper MC, we covered the bundles with plastic to maintain the correct MC. When the installation started, the building interior had to be at the optimum RH. When I consult on high-end projects like this, depending on time of year we use either dehumidifiers or humidifiers. After installation, the original wood flooring contractor was unable to match the approved color sample to the installed floor after numerous attempts, and I suggested they contact Archetypal. The project manager was surprised that Archetypal's price to finish the floor was so much higher than the previously contracted prices. I resisted the opening to tell him that when you offer peanuts, all you attract is monkeys, and instead I explained that Avedis and Vartan execute color and finishing with greater acuity than any other wood floor finishers I have encountered on a job site … but they would need to support Archetypal by staying out of the way and giving them adequate time to complete the work. The owner and their design team were very pleased with the outcome. The project manager asked me to take a look at the "grain repair" (the problematic short board discussed in the main article on page 43), which was within 8 feet of the main entrance on the main floor. The project manager located the board with some difficulty. It was only after a very close examination on my knees that I could kind of tell that something had been done to physically alter the surface of the board. Watching Avedis and Vartan make color corrections on some sappy walnut boards at the February International Wood Flooring Association Extreme Wood Flooring school was a mini master class on blending and layering color (the photos on this page are from that school). I was amazed by how they were able to make the white sap among many pieces of dark walnut disappear. |


Learning to do wood grainIf you look at www.fauxfinish.com, you'll see a range of classes from color theory to wood graining and more; I took every single one of them, and they're all helpful. I highly suggest that if you are trying to be more artistic and creative on surfaces, you try one or all of these classes. |