I remember a job from my contracting days where we were restoring some floors in a historic home in Denver. The homeowner was a cabinetmaker, and he was meticulous. We resanded the home's original fir floors, and when it came time to coat them, I was using a waterborne finish that had just hit the market (in fact, all waterborne finishes were pretty new back then). The kitchen had floor-to-ceiling windows and a lot of can lights, and it seemed to be impossible for me to get a coat of finish on the floor that looked good. I kept trying different techniques, and I just couldn't get it to be acceptable, at least not up to this client's standards-what nine out of 10 customers would consider to be acceptable wasn't good enough for him. I accepted his challenge of perfection and continued to embrace what seemed to be an unattainable feat. Finally I had to call my local finish rep to come out to the job, and with his help we were able to lay down a beautiful coat of finish and get paid.
I learned a lot of lessons about finish from that one job, from customer expectations to how lighting affects finish and also when and where to try out a new finish. But I am not alone: You won't find a wood flooring contractor out there who doesn't have plenty of finish horror stories to tell. In this article I'll try to share some of the most common finish problems I see and talk about things I've learned to prevent them. But before that, let's talk about those customer expectations.
Great Expectations
You need to be confident in understanding what the realistic expectations are for a site-finish wood floor and translate that confidence to your customer. Have you ever had a customer tell you there's a problem and you need to come see it at a certain time of day when the sun hits it from a certain angle with your head cocked to one side just right? Per our industry standards, this perceived "problem" that needs to be viewed under specific conditions may not necessarily be a problem at all. It's unrealistic to think a site-finished floor will end up looking like furniture or cabinets. It's also unrealistic to think the finish on furniture or cabinets will perform the same as wood floor finishes. We don't walk on furniture and we don't (usually) eat on our wood floors. These finishes are manufactured to perform for different purposes and are applied using different methods; therefore the final results for wood floor coatings are completely different from cabinets or furniture. When assessing wood floor finish issues, the standard is to evaluate the floor under these conditions:
• The floor should be observed from a standing position on the floor being assessed.
• The evaluation must be conducted with ambient lighting, meaning the general illumination present in the room. As contractors we need to take into account what the lighting situation is specific to the job we're on, whether that includes a big window or a row of can lights, and adjust our methods accordingly.
• Glare from direct light sources must not be used during evaluation. You can't introduce new lighting sources or wait until a certain time of the day to be able to evaluate the problem.
Before you start the job, paint a picture for the customers of what to expect during the project and, more importantly, when the job is done. This opening conversation with your customer is extremely important and will ultimately affect how your entire job will flow. They need to know ahead of time that wood floor finish is designed to be walked on and that it will not look or perform like their kitchen table. Once your customer understands the complexity of applying finish in an uncontrolled environment and the potential unexpected pitfalls we can endure at the time of application or during dry times, they will better accept minor inconsistencies in the finished product. With that said, let's talk about some problems:
Uneven Sheen

Sometimes the appearance of different sheens can just be an optical illusion. Lighting and variations in subfloors can make light reflect differently off the surface of the floor. Of course, good luck trying to convince your customers that they're seeing things!
Prevention:
Mix the Finish Well: Whether it's a new floor or a repair, mixing the finish properly is key. Matting agents tend to settle at the bottom of the container, so if the finish isn't mixed well, the finish will usually start out shinier and end up duller.
Expect Sheen Differences: If you're coating a big area, mix all the gallons you need into one larger container; this is called "batching your finish." The sheen can vary slightly from one gallon to another or from batch to batch, so mixing the finish together avoids problems with these minute sheen inconsistencies on your floor. Also, never assume that just because two different finishes are labeled the same, like "matte" or "satin," they will have the same sheen. Sheen levels are inherent to specific finishes and can vary from one manufacturer's product to another. For example, one satin product may have a gloss level that's 15-20 and another product may be 25-30. Sheen levels are proprietary to the products.
Match Sanding Sequences: The scratch pattern on the flooring surface affects how light reflects off the finished surface. If you have a floor that you final screened with a 220-grit and you hand sand the perimeter of the floor with 120-grit, the gloss level of the final coat will ultimately be different around the perimeter than in the field based on how the ambient lighting is reflecting from the surface.
RELATED: The Recoating Riddle: Find the Right Clues When Recoating Wood Floors
Keep Consistent Mil Thickness: Say you've got a 1,000-foot floor and two gallons of finish. You're on your last stretch and realize you're running out of finish and may not have enough to finish the job, so you start putting more pressure on your applicator and begin squeegeeing out finish to ensure you get a coat on the whole floor. You will most likely get a callback due to sheen variation. The thickness of the finish affects the appearance of the sheen: The thicker the coat, the higher the gloss level.
Use a New Applicator: Many contractors like to reuse their applicators by washing them out and storing them in containers full of water. Regardless of how clean you think you're getting it, it's almost impossible to get all the finish out of an applicator. Applicators are specially designed to hold onto finish; any remaining finish in the applicator will be transferred to the subsequent coats and can interfere with your final coat. Many of us have always cleaned out our applicators after every job and reused them on the next job without problems. The problem is the one job that goes south and becomes the job we don't get paid on-that can set us back weeks, if not months, in revenue. Keeping a fresh applicator for every job takes one more variable out of the equation for potential failure. If you're adamant about reusing your applicators to save a few pennies, I recommend using a designated applicator for build coats and always using a new applicator for the topcoat (just be sure to de-shed it first). Build the miniscule cost of a new applicator into every job.
Give it Time to Cure: Finish sheens can change slightly (or "mellow") as a product cures out. If you're trying to match an existing finish, make sure you let your finish totally cure before you determine if it's a match or not. I'll never forget the lady who called three hours after I finished her job complaining that there were shiny spots on her floor. When I went to her house two days later, everything was perfect.
Feather Finish In: When doing repairs, take your time to assess the repair area and determine whether you will be able to feather in your repair or need to cut it off at good breaking points (doorways, cabinets, etc.). I like to use the analogy of an airplane taking off and landing when discussing feathering finish. Many times you can blend areas by simply feathering the finish into the field. This method of repair is acceptable when a) you know the finish you're matching and b) your customer understands the importance of evaluating the repairs after the repair area has fully cured out.
Thin Down the Finish: Depending on your finish, you may be able to thin it down and apply multiple thinned coats. This gives you more control over the build and final appearance. Some waterborne finishes can be thinned down by adding water, and some oil-modified poly can be thinned by adding mineral spirits. You have to check with the manufacturer to determine if that will work for the product you are using. This method is extremely helpful when I have an isolation repair and need to build up the finish at the repair area for a perfect match. I like to apply multiple thinned coats to the area of contention, then carefully blend out subsequent coats beyond the area for the final blending. When I do this, I use a hair dryer or a heat gun to speed-dry each coat and determine how my sheen levels and build compare.
Recoat Everything: When in doubt on repairs, I would simply recoat the entire area or room or find good breaking points. One good approach is to look for areas in the room where the light sources affect the appearance of the floor. Perhaps there's a row of windows or different lighting sources that already create a difference in the perception of the finish; those are great areas where you can determine whether to feather repairs or to find a breaking point.
How to Fix It:
If sheen inconsistencies become a thorn in the job, usually abrading and recoating the entire floor will fix them.
Overworked Finish

Prevention:
Lay it Down and Leave it Alone: When I teach someone to coat a floor I tell them to focus on a manageable work area-about 3 by 3 feet-where you can comfortably keep focus on small areas without overextending yourself. Focus on that one small area and ignore the rest of the floor. If you see a small puddle or a spot you missed 6 feet out, don't touch it. Once the finish is dry you can do minor repairs, and that's easier than repairing a big area of overworked finish. Depending on the finish and the humidity on the job site, you may have a very short window of opportunity to touch that finish again once it's down. This is also a common issue when you haven't mapped out your coating strategy prior to application.
Don't Wring Out Applicators: The most common cause of bubbles I see in the field is when guys continuously "wring out" their applicators during the application process. This is not uncommon and actually a natural instinct to keep the applicator free from drips. Keep in mind that when we force the finish from the foam applicators, we introduce air into the applicator in its place. This will always introduce air into the finish we are applying and cause foam or bubbles. Rather than "wringing out" your applicator, get into the habit of tapping excess off.
Don't Use Old Finish: Older or expired finishes can be foamy or bubbly due to the defoamers that can break down over time. Proper mixing of your finish is critical to how the finish performs. Always know who you're buying your finish from and know where to check for the batch codes of each product you're using.
Create a Strategy: Probably the most important step of applying finish is mapping the job prior to getting started. When you're coating a large cut-up floor, detail out a strategy for coating the floor in sections before you start. This way you won't end up in a situation where you have an area half-coated and have to come back later. Figure out good cut-off points and use tape lines as necessary.
RELATED: Picking the Right Wood Floor Finish Applicator
Control Air Flow: Air movement across the finish causes it to not flow and level as it's designed to do, so the more air flow there is when you're coating, the more likely it is you'll have problems with coating, uneven finish, debris in the finish, streaks, etc. While you're coating the floor, make sure the HVAC system is turned off. As soon as the finish is skinned over, you'll want that air flow circulating again to help evacuate the solvent from the air. The easiest way to do this is to program the thermostat so the HVAC is off while coating and kicks back on when you think the finish is ready for air flow (usually 30 to 45 minutes later). One thing that can be more difficult to manage is the fan under the refrigerator. The only thing to do for that is to turn off the breaker for the fridge while you're coating (just remember to turn it back on!).
Use Finish Retarders: If you are concerned about the finish drying too fast, you can slow the dry time of some finishes by using retarders. Some finish companies offer their own retarders that extend dry times. For some finishes you can slow drying simply by adding water. Check with the finish manufacturer to see if slowing the dry time is possible and what the company recommends.
How to Fix It:
The best way to repair these issues is to abrade and recoat.
Lap Lines

Prevention:
Choose the Right Applicator: Always use the applicator your finish manufacturer recommends to apply their finish. If your finish can be rolled, use a roller instead of a T-bar. You'll prevent most lap lines when rolling due to how the roller applies finish to the floor. A roller simply picks up the finish and then lays it back down uniformly, rather than pulling or dragging the finish as we do with T-bars or lambswool applicators. Rolling finish is an excellent method to alleviate lap lines. If you need to use a T-bar, it's easier to back out of a space using a lightweight T-bar than a heavyweight T-bar.
Use a Tape Line: If you have big areas you need to coat, use a tape line along board edges at tie-in areas. You can coat right up to that tape line, and then when you pull the line you have a nice straight edge you can cut back into. I always coached my guys to treat that taped-off area as if it were expensive white carpet-cut into it carefully so that you don't overlap to potentially create a new set of issues.
Coat a Walk-Off Area First: This is a trick I learned in the gym floor business that also works great for residential jobs. It takes some extra time, but it's worth it if you have difficulty backing out of a room. Say you have a hallway where you know you'll be ending the job. Start by using a tape line to coat half the length of the hallway and let it completely dry. Once it has dried, begin coating on the opposite side of the room. When you're almost done coating, you can walk on the already-coated half of the hallway and pull the finish straight over the uncoated half of the hallway instead of having to back out.
Push Off Instead of Pulling Back: When you're feathering with a T-bar, it's easier to push your applicator away from you than it is to reach out and try pulling it back toward you. Push off no further than 3 feet out in order to maintain a workable area. Again, think of the airplane taking off rather than landing. (This is where you also need to make sure you don't have excessive finish on your applicator.)
How to Fix It:
If you have lap lines in your final coat of finish, you will likely need to abrade and recoat the floor using one of these methods to avoid getting them again.
Streaks

Prevention:
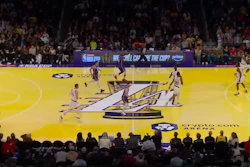
Everything I've said about extending dry times applies here, as well as the advice about using a roller when possible, especially when coating a multi-directional floor like this one. One very common cause for streaks comes back to how important it is to use the proper applicator on the job and always making sure you have a new applicator for final coats:
Avoid Hard Spots on Your Applicator: Streaks can easily be caused by hard spots/stiff bristles on your applicator. Check your applicator carefully, and remember what I said before about always using a new applicator for your final coat.
How to Fix It:
An abrade and recoat is almost always necessary to repair this issue. Sometimes the floor may need to be abraded with coarser grits, then repeat abrading as necessary with proper grit sequences in order to completely remove the ridges and scratch patterns prior to recoating.
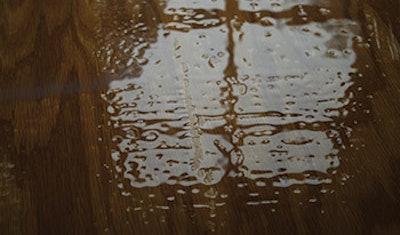
Blisters

Prevention:
Again, manage your air flow so the finish isn't skinning over too fast. Also:
Avoid the Sun: You have several ways to do this. You can cover the windows with clear plastic, which lets in the light but prevents the heat from coming into the room. Better yet, you can plan your coating around the times when the sun is hitting the floor. If you have a two-story bank of windows with sunlight baking the floor, for example, you'll want to get in there early in the morning or late in the day, so coordinate accordingly. I always hear the argument that "it's too hard to schedule this way because we've got other jobs scheduled," but at the end of the day, you've got to ensure the best conditions for every aspect of your job so that you don't end up wasting time and money going back.
How to Fix It:
Blisters can usually be addressed by isolation repairs or a complete abrade and recoat once the source has been eliminated.
Contamination


Prevention:
Test an Area: Always do a test area before recoating. You have to pick the area carefully, because it should be in an inconspicuous area but should also be somewhere that would have had cleaning products applied (in closets and under area rugs don't usually work). Some manufacturers offer kits that allow you to test for contamination.
Investigate: Ask homeowners what they use to clean the floor, but never believe them. They will always tell you what they think you will want to hear. I remember a customer who showed me the recommended cleaner that she used daily on her floors, then further into the conversation she said, "Oh, my cleaning lady uses this shiny polish every Christmas on our floors, but that stuff wears off by St. Patrick's Day." I always got in the habit of being snoopy and looking in the cabinets in the laundry room or under the kitchen sink to see what cleaning products I could find. If there is a specific cleaner you find out has contaminated the floor, sometimes you can call the manufacturer of that product to find out how to remove it.
How to Fix It:
Unfortunately, many times you'll need to completely resand the floor. If you determine contamination is present before coating, don't try screening the floor and think that's going to effectively get rid of the contaminant. Without removing the contamination first, you are only pushing the contaminant around the floor and driving it down into the open grain and gaps of the floor.
Peeling

Prevention:
Use Compatible Finishes: Even if products are from the same manufacturer, don't assume they're compatible. We did a job once where we coated a hickory floor with two coats of one finish and did the topcoat with the same manufacturer's commercial-grade finish. We got a call about a month later that the finish was peeling off in big sheets. Had we checked with the manufacturer or read the instructions first, we would have known that those two finishes weren't compatible.
Know Your Window: Many finishes have a "hot-coat" window in which they will chemically adhere to the previous coat without physical abrasion; this window of opportunity varies from product to product and manufacturer to manufacturer. If you miss that window, you'll likely need to mechanically abrade the floor so the next coat of finish has something to stick to. If you don't, you risk peeling.
Abrade Well: When you abrade between coats, use the abrasive recommended by the manufacturer and make sure you do it well. Don't leave shiny areas on the floor, and maintain a sharp abrasive using recommended abrasive coverage rates.
Know If the Floor Can Be Recoated: In today's market there are some factory-finished products that simply cannot be recoated, no matter what you do. Test first!
RELATED: Clear Up Confusion About Wood Floor Maintenance
How to Fix It:
A floor that is peeling usually has to be resanded. If you're not sure why the floor is peeling, you can send peelings into a finish lab. They can typically determine the number of coats within the sample, the scratch patterns, which finishes are on the floor and whether contamination or stain residual is present, all of which can give you the cause for failure.
Chipping Finish

In this picture you can see that finish is chipping away from the stain, most likely due to either the stain not being dry or too much pigment left behind from the stain.
Prevention:
Watch Stain Dry Times: Make sure your stain has enough time to dry. Especially now with all the quick-dry stains out there, it's pretty common to see guys rushing the job and not giving the stain its recommended dry times. Finish will not properly adhere to stain that hasn't thoroughly dried. Cooler, more humid conditions will also cause stains to dry much slower.
Wipe All the Pigment Up: You need to wipe all stains, but be especially careful with highly pigmented (darker) stains. An ebony or mahogany stain contains more pigment than a nutmeg stain contains. Get in the habit of wiping the floor with a white towel right before you coat (or a colored towel for white stains). If you get any color transfer onto the towel, you've still got pigment on top of the floor that needs to be removed.
Use the Right Finish Over Stain: Not all finishes are made to be applied over stain; check with the manufacturer before coating over stain.
How to Fix It:
Unfortunately, if your finish is chipping away from the stain on a floor, you will likely be resanding the floor. There is no shortcut to fixing this problem, which is all the reason why it's so important to follow these simple steps to achieve success.
This article was adapted from a seminar Brett Miller presented at the 2013 NWFA Wood Flooring Expo. For more finish flaw tips, keep reading:
More finish flaw tips:
Poly Beads

When poly seeps down into open gaps in the floor, it tends to dry slowly and can remain liquid for a long time. When seasonal chaånges happen and humidity levels rise, the floor closes up and the boards squeeze the liquid finish up to form what we call "poly beads." They tend to be common with gym floors, which often are installed with expansion gaps and lack good climate control.
Prevention:
There isn't much you can do to prevent poly beads except for keeping the job site conditions as stable as possible.
How to Fix It:
Poly beads aren't usually difficult to deal with; typically you can pop them off with your fingernail or a scraper. Sometimes the floor may need to be abraded and recoated.
Sidebonding

This is a problem that happens most often with waterborne finishes in which the finish glues the sides of the boards together. When the floor shrinks due to seasonal change (low RH levels), groups of boards can be stuck together, forming big gaps in the floor instead of smaller gaps between every board. Or, like in the second photo, the floor (here, Australian Cypress) splits at its weakest point, which happens to be in the middle of the boards.
Prevention:
Use the Right Sealer: Some sealers help to prevent sidebonding of the topcoats.
Use Poly Sealer or Stain as Your First Coat: When we did gyms where they wanted waterborne topcoats, sometimes we use oil-modified sealers or stains before using waterborne finishes.Maintain Consistent Job-Site Conditions: If the RH levels are consistent year-round, sidebonding won't be an issue.
How to Fix It:
Many times going through a few cycles of seasonal change will help the boards break apart and the gaps will dissipate among several board runs. We had one high-profile gym job with such bad sidebonding we had to rip the floor out and put in a new one to appease the client.
White Line Syndrome (WLS)

Some finishes are more elastic than others. When wood shrinks due to low relative humidity levels, some finishes will stretch with the wood and form a bridge at the gap between two adjacent boards. Elasticity of finishes is not a bad thing and can actually be beneficial in some circumstances; however on a dark floor these white lines can look horrible.
WLS is often confused with finish delamination (or peeling/chipping). I've seen cases (like in this photo) where the white lines are only at board butt-ends. Since this is solid oak, there's very little longitudinal shrinkage in the wood itself, which leads me to believe this is either a case of deflection (vertical movement) at the ends of the boards or that there was high/low variation between the ends of the boards and the finish wasn't abraded properly. This can cause the finish to release just in those areas as well. If I were to take these finish samples to a lab they would be able to determine the actual cause.
Prevention:
Maintain Environmental Controls: The more consistent the conditions in the home, the less shrinkage and movement you'll have in the floor.
Use the Right Finish: Some finishes tend to show more white lines than others. More elastic finishes tend to be more prone to this.
Use Lighter Colors: If white lines are a concern, try to steer customers to a lighter floor that won't show the white lines.
How to Fix It:
Check with specific manufacturer for recommended repairs or allow floors to go through a few cycles of seasonal change to allow it to correct itself.
Editor's Note: For a detailed discussion about WLS, see the article "What is Really Causing White Line Syndrome?".