|
|
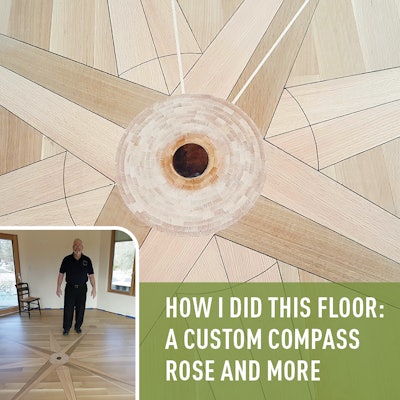
This job ended up being a time-intensive, complicated one that happened over months and involved everything from tiny end-grain to a custom compass, but it didn't start that way. It began with me being hired by the architect to simply consult on the flooring. The homeowner was purchasing the wood flooring from someone the architect suspected didn't know how to make wood flooring. He was correct. The flooring was incredibly, amazingly bad. They had to rip the tongues and grooves off of it and have it remanufactured.
While I was at this job site, though, I saw an octagonal room at one end of the house and asked the project manager what was going to go on that floor. He said they were planning to install a compass rose. The architect, Donald Grose said, "Howard, you're an artist, why don't you submit a proposal to her?" And that's how I ended up spending months working in this house, on and off between my travel, as the interior of the home was being completed. Fortunately, time was not of the essence on this project!
Planning a design pointing to Acca
Before I could even begin to think about the technical parts of the job, there was a long, involved design process with the homeowner, Fran, who is a follower of the Bahá'í faith. The octagonal room was to be her meditation room and would have no furniture with the exception of a couple chairs and some cushions. She and I talked about different designs, and she told me she had found something in a text from the 1700s that had an old Arabic design. It was a very interesting outline of a compass rose. She said, "That's what I want." I asked, "How do you want to adapt it?" She said, "That's what I want."
And so Donald, the architect, put the rose into CAD and scaled it for a 6-foot diameter, then cut it out of paper and put it on the subfloor with the correct orientation. The wood flooring installers installed right over it, being sure to not put nails where the inlay would go. After the flooring was installed, just to make sure Fran was happy with the design, I took some cardboard protection they had used, cut out the pieces of the inlay and put them on top of the floor … and it didn't look right. It wasn't big enough for the room. So I sanded the floor and drew out a larger design in pencil on the floor, and we both agreed it still didn't look right. Finally we got the design scaled up to where it was the proper size.
Next we discussed species, and I brought in different species of lumber for her to see. The field was quartersawn white oak, and she wanted the design to be texturally slightly different but not too different. We decided on using heavily figured material for the points; one side would have dominant ray fleck in it and the other would have a sort of feather look.
She wanted to see the outline of the compass but in a subtle way, so I told her I could use black-dyed veneer as a pencil-line pinstripe around the entire compass. It was 25/1,000 inch thick. Let me just admit right now that I did not realize at the time how difficult it was going to be to execute those veneer lines.
The floor would also have lines through it that have significance for her faith. In Bahá'í they pray toward Acca (now referred to as Acre), a city in what is now Israel—that's where their prophet was imprisoned by the Turks and died. So Fran wanted to have radial lines pointing toward Acca. She did some research, and it turns out that in early navigation before people knew how to construct a chart with intersecting lines of longitude, they navigated using a rhumb line; it's a constant heading that takes you to a point but not in a straight line. That's what we would have in the floor.
I asked Fran if she wanted me to inlay directional letters, and we worked with different typefaces. She found one she liked, and Donald was able to manipulate it to get it exactly as she wanted. As I looked at it, I realized how extremely difficult it was going to be to directly inlay the letters with fine tips that would easily break off with a scroll saw, so I called Jim Garth of Decorative Flooring for his help. Turns out that the number nine is significant in the Bahá'í faith, so he laser-cut the letters inlaid into nine-sided polygons and also made a template I could easily use to drop the polygons into the floor with a router.
Attacking the design one cut at a time
Since we had changed the size of the compass rose after installation, I now had to worry about nail locations. I sanded the floor again, drew out the inlay full-size, went over the outline with rare earth magnets and dug the nails out.
For the inlay, I had to carefully think about the sequence of the design because of how the parts overlaid each other. The minor points had to go in first because they were intersecting the major points. Then I could install the major points, then cut the circular detail on the major points that also had a center axis pinstripe. That circular detail would have to be on a perfect arc to meet the pinstripe correctly.
To start marking the layout on the floor, I located my center, then took a stick and nail and used it like a compass to mark my outer circle and tips. Once I had my north and south, I just bisected everything using my wooden stick compass to mark my eight points and drew them on the floor (for visibility, I placed blue tape outside of the marked pencil lines).
Next I marked my center circle and used a router with an arm to cut away the extra flooring around my center point because I needed space to do my cuts. I didn't try to make my final cut at this point but instead left about ⅜ inch close to where my final center circle would be. With the center cut out, I installed a small piece of ¾-inch plywood over my center point to support it as I was doing my lines.
For the points, I used a Festool track saw, which offers a different level of straightness and quality to your cuts. I first constructed each point out of some scrap laminate I had to get an exact cut, then used that as a template when I cut my actual pieces. The minor points were installed first.
You can see in the photo below that there are three places of alignment:
1 - The center line of the minor point (A) has to go directly oriented to the center of the compass rose.
2 - The arc (B) has to be oriented with the pencil mark of the arc on the existing floor.
3 - There are two pencil lines (C and D) showing where material will be cut away for the major points.

I cut all the actual pieces from lumber; I surfaced them using a little surfacer at my house. For each point, I cut the piece to fit, put it in and marked the arc before I completely installed it. As I cut the two halves of the points and the middle line of veneer, I glued them together using a Bona adhesive sausage. Then, to install the arc of black veneer, I scribed the circle with my pencil and (with nerves of steel!) I cut it with a jigsaw and installed the veneer. After five or six hours of being on my knees, I would walk out of there just elated every day when I didn't have any miscuts! So, using that process, I created the four minor points and inlaid them (photo 1).

For the points, I used a particularly thin blade on a vibrating saw. At this point I didn't worry if the point was off 1⁄16 or ⅛ of an inch; I was more concerned with the crispness of the cut (photos 2.).

Again, I used scrap pieces of laminate as patterns to establish a precise fit for the major points that would be surrounded by veneer. As I was fitting I would put the black veneer in first, then fit the larger pieces to that (photo 3). In photo 4 you can see the major pieces all pre-cut and ready to go in, along with the loose black veneer for the outside lines.


With all the major points installed, next I made a circular template so I could use a router with a stop collar to cut out the inner circle. I personally like using a stop collar rather than a bearing bit because the chances of cutting into my pattern with the stop collar are zero. With the stop collar, you have to allow for the difference between the stop collar and the bit, versus the bearing bit that bears directly on the pattern with no offset. In photo 5 it's all cut out and you can see the collar on the router and the offset of the cut from the pattern.

Next I cut my radial lines pointing to Acca. I cut the body of the line with my Festool and then used a vibrating saw and my Japanese chisels for the point (photo 6). Then I selected a piece of quartersawn maple that has some ray fleck in it. If you look closely, you can see it has a very interesting texture, sort of like fish scales (photo 7). I used two pieces of wood for the points and matched the grain up to the line (photo 8).


Next I built the center of the compass with end grain and hot melt adhesive. It spirals from a zero taper to full size (photos 9, 10).


My on-site shop was in the basement of the house, and I had noticed a pile of lumber down there, including slabs from a walnut tree they had cut on the property. I noticed one had crotch figure where it had been struck by lightning, and it had a really interesting grain pattern to it. I got permission to use it for the center of the inlay. Where it was split by lightning, I double-cut it so I could bring the two pieces together, then glued it, drew a circle on top, cut it with a jigsaw (photo 11) and sanded it to the line with a disc sander.

Then I put my circle on top of my end grain, marked it and hand-chiseled the end grain out to fit (photo 12).

Then it was time to put the directional letters in using the router and precut template; I glued them in with Bona adhesive (photos 13, 14, 15).


With the directional letters installed, there was nothing left but to sand and finish the floor. I had already sanded the field with 80 grit on the big machine before I began the inlay work and had sanded as I went on the inlay using 80-grit on the Festool. At this point I used the Bona Multidisc on the buffer. For a floor like this, which I'm basically treating more like a piece of furniture than a floor, I also hand-sanded the entire floor with 120 on the Festool.
I coated the floor with a coat of Bona Drifast Natural stain and then three coats of Satin Bona Traffic HD waterborne finish. The floor was the final thing in the whole house to be completed. Fran, the owner, was a delight to work with. She was very supportive and had a lot of faith in me, even though it took a long time to execute. She was very pleased with the result and was very complimentary. There aren't many people who will put up with me! I'm 70 years old and just have so many hours I can work, and most people don't appreciate the amount of mental effort it takes to execute a custom floor like this properly.

Every craftsman needs good hand tools
To tackle custom inlay work, you have to have some pretty decent woodworking skills and know how to use hand tools. It's a totally different mentality from doing regular wood floor work. When you're doing precision work that requires fitting around arcs and tapering, you cannot cut 20 pieces at a time and expect it to look right; pieces have to be measured and cut individually. To that end, I love having a sharp block plane, sharp chisels (see my Japanese chisels in photo 6), a sharp Japanese pull saw, and a sharp hand-scraper. You'd be surprised what you can do with a good hand-scraper, like fine adjustments taking 1/100 inch off to make things work precisely. These aren't expensive tools—it's fun to have fancy tools, but they don't have to be fancy to work well. |