Hi everyone, this week I am continuing my series on moisture-testing concrete. (You can read Part 1, talking about the calcium chloride test, here.)
One tip I would like to share is to have more tests on hand than you need to conduct. Once, while placing a Calcium Chloride (CC) test on a concrete slab, the homeowner walked in to ask me questions about the job schedule. I was distracted and accidentally knocked some of the CC out of the jar. I couldn't collect it and put it back in the jar, so that test was not good anymore. I had more tests in my van, so I was lucky that day. Just be cautious when handling those tests. One thing can go wrong and throw your results off.
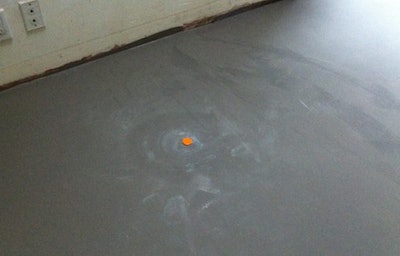
Let's move on to relative humidity (RH) tests. What are we measuring? What is RH? RH is the amount of moisture in the air in relation to the amount the air can hold if saturated, expressed as a percent. The RH test ASTM F2170 is very easy to use. All you have to do is drill a hole in the slab, place a sensor in there and measure the RH with a reader:

The steps are as follows (for the most part):
1) Drill a hole in the concrete to the depth required.
2) Clean the hole with a vacuum and a wire brush.
3) Place your sensor in the hole.
4) Come back the next day and take a reading.
5) Plug the hole and use a compound to fill/seal it.
That's all there is to it. I'm not getting into too many details about how to conduct RH and CC tests because I find that it is much easier to understand them once you've done it yourself on a job site. All you have to remember is this: They are both very different tests. Which is better, easier or more accurate? We'll talk about that in the next blog post.
If you are just getting into slab testing, remember that CC tests measure the moisture that travels to the surface; you have a jar of CC that absorb that moisture and you have to do what looks like a complicated calculation to get a result. The RH test is basically a hole in the slab, and you are measuring the RH in that hole. You don't have to calculate anything. You already have a reader that you place on the sensor inside the hole, and you get a result.
So far, so good. You conducted the tests and recorded the results. I make a copy of the result and give it to my customers for future reference. I keep a copy for myself just in case. Recording your results is crucial in case something goes wrong in the future.
Hopefully you will always test your concrete from now on and NEVER have a cupped floor. This is one of those times when it is okay to say "never."
In my next post we'll look at pros and cons of the testing methods.
RELATED: Mitigate Moisture: Reduce Risk of Callbacks on Slab Jobs